A tutorial Inspired by Chapter 21 of the excellent book "LightWave 6.5 Magic" from New Riders.
Front Projection Mapping...
�

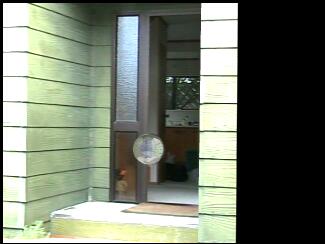
Here's my front door...� Wanna come in? Yep, then click here (DivX) |
Ok, so its been used for
ages for cool compositing effects on still backgrounds, right?� You'd
draw a silhoette of a building or tree, then fly that cow behind it...�
Very cool indeed.
The problem was, move the projection-mapped objects, or camera, and the mapping goes out the window - The images stays in the same place, att the same size even if you wanted to fly forward or backward.� To do anything serious, you'd need to start looking at those photo-modeling tools like Canoma, or get RealViz right? No Way!� With the release of Lightwave[6.5] comes Fixed front projection mapping!� No more dreaming of buying a hi-end package to map those photo's to models - Its here right now, and in everyones favorite 3D animation package too! (Gosh!) Download the AVI
file (222kb) and see it in action for yourself!��
|
The Process...
This is not so much a tutorial,
but more a talk-through of how I used fixed projection mapping to
recreate my own front door in LightWave using just a photo, some inspiration
from a book and 10 spare minutes!
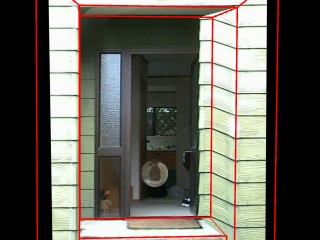
In this case, I'm using a low-res snapshot of my own front door taken with my Sony Handycam.� If you are just trying this technique for the first time, then I would suggest picking a photo of something simple (ie. cubic shaped like a office block, or a doorway like this one, or perhaps even a table!)
If you want to have a go
at my doorway, just save the image above (its low quality at 320x240, but
its good enough to play with for now)�
�
 |
Step 1:
With my photo in hand, I started by first modeling an approximate mock-up of my front door area as seen in the photo in modeler. Ideally, I could have measured the area and modelled it accurately, but for this tutorial I wasn't too fussed.. In the case of doing this for a paying project, you would probably want to be a bit more accurate, not to mention ensure a high quality photograph. Once the front door was modelled
to approximately match the photograph, the object was saved and it was
off to layout to perform our magic.
|
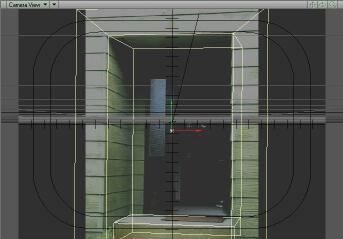
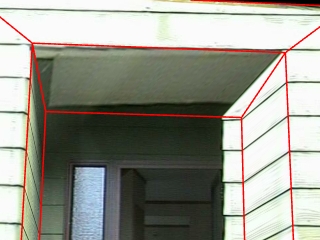
In camera view, align the model to match the photo |
Step 2:
I started Layout and loaded the photo image, as well as the model I had just built. Select Scene/Compositing and set the background image as the photo.� I also pressed d (display options) and set the camera background to be the background image.� This got my photo on screen as a reference. With some muddling about of the camera, and a bit of tweaking of the model I managed to align the model to approximately fit the photo image itself in the background.� It wasn't perfect, but it was close. I then keyframed the camera
(and the model since I'd moved it) at frame 0.� I then pressed
d and selected Blank as my camera background (to speed things
up a bit).� I also removed the image from the compositing setting
as I didn't want it rendered in the background!
|
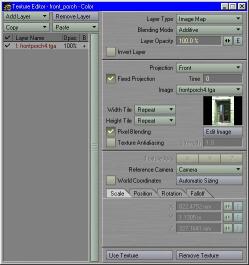 |
Step 3:
The next step is simple - To set the surface map.� Select the surface editor,� set Diffuse to 0% and luminous to 100%.� You can leave all the other settings as-is. Click the T next to the color setting to bring up the texture editor. Select Projection as Front, and tick Fixed Projection.� Time should be 0 (since the camera and model are aligned at frame 0) and reference camera should be set to the camera (in case you have multiple cameras) That's it.� You're done - just like that! |
That's it!
I then moved the camera in towards the door and the results were better then I imagined!� Of course, its not perfect, and I suggest you carefully plan your animations when doing this since some angles really don't work! (Trust me - I put a couple of them below as proof!)
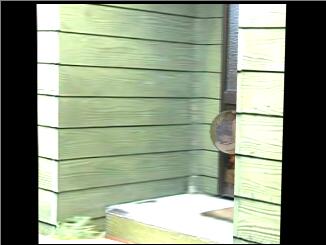
Snapshots from the Video:
The camera is moving into the photo! |
It looks nice at different angles too! |
Here's some BAD angles!
Don't look up! Seems that theres a bit of distortion going on! |
Doh, half the door is missing (and the wall is there!) |
Some tips:
- Use high res photos for more detail.� If you can, measure up the item before you model it so that you get things as accurate as possible.
- Try and calculate the same camera settings as you used when taking the photo - This will help align things more accurately.� Otherwise, doing it by hand is just as much fun! ;-)
- Remember that the mapping is calculated at a specific time, using a specific Reference Camera.� A good idea would be to parent the camera you are using to map the image to the object to the object itself, then create a new camera for any animation work instead.
- Don't move the object unless the Reference camera is parented to it.� You'll screw up the image mapping (try and see (but save the scene first!))
- Did you know that you can BAKE the Fixed projection map onto a UV surface too?! Just be sure to select 'Bake Shaders' in the LW_BAKER settings. :)
Many thanks to Dan Ablan for introducing me to this feature in the LightWave[6.5] magic book.� Incredibly, I never realised it was there... This just goes to show that reading the manual really would be a good idea, huh!� ;-)
Cheers!
�
Kevin
'kevman' Phillips
This page/article Copyright
� 2001 Kevin Phillips
 since 21-January-2001