The 1G Page
The 1G Page
Most production vehicles are engineered to have headroom. In some cases, there's a LOT of headroom. The DSM turbo cars are a great example. From the factory, they are about 210 HP. There are members of the DSM club that are producing more than 400 HP with the stock engine internals. The way to obtain significantly more horsepower is to use that headroom. However, as you use it up, you'll be operating closer to the point where you can do significant damage to your valuable car.
There are numerous sites on the internet which offer a staged recipe for increasing the power of these (and other) cars. Don't just follow them blindly. Find out what each modification does, why it works, and what are the dangers of using it. Read all you can. The DSM archives are a great place to start. Buy the dealer's maintenance manuals (the thick $90 ones) and read them. This site is all about what I've done to my cars, but you're responsible for what you do to yours. If you're running 20 pounds of boost on 89 octane pump gas, you will melt pistons. It's up to you to know why and how to avoid it.
Which brings me to the most important first step: get the gauges first! If you don't know how the engine is operating, how can you tune it? Or how can you keep from melting things? The first four things that you'll probably want to study are boost (the gauge in the dash is worthless), exhaust gas temperature, engine knock and the O2 sensor voltage. Todd Day has built an excellent tuning tool - the DataLogger. This handy tool lets you see almost everything the electronic control module (ECU) is doing to control the operation parameters of the engine. If you have a laptop, this is the best tuning tool you can get, at least for the '89-'94 DSM cars.
Before starting down the performance mod road, first make sure your car is in peak operating condition. Mine needed new plugs (I and many others on the DSM list use the stock ones), plug wires (I like the Magnecores) and a new fuel filter. All the engine fluids (clutch, transmission, transfer case, diff. and oil) were changed as well. I also noticed that a number of the vacuum hoses had become brittle and were on the verge of cracking, so they got replaced. RoadRace Engineering makes a great silicone hose replacement package, both for the 1G and 2G DSM cars. After 7 years and 100k+ miles, my shocks, clutch and exhaust were shot as well. These were replaced with KYB AGX shocks, and ACT 2600 clutch and Dave Buschur's 2.5" turbo-back exhaust.
One other word of warning: if you have a turbo DSM car, be conservative on when you change the timing belt. The factory manual recommends every 60k miles. A lot of guys in the DSM club replace it at 50k miles. If this belt goes, you'll be looking (at best) at a serious valve job, probably more like replacing the head, which is $1000 + a lot of labor. Don't try to stretch this one.
I also checked the compression, which was 165, 164, 164 and 169, so I knew the internals were in pretty good shape.
Now with the car in good operating condition, I started modifying for performance. Here's the list:
0) Clean the Intercooler: free
OK, so I'm a C programmer, plus I had forgotten this as a good first
step and didn't want to renumber all the others...
There's a hose that leads from the valve cover into the intake hose before the turbo. At high boost, that intake hose is under vacuum and pulls a small quantity of oil from the valve cover into the intake. Over time, that oil accumulates in the intercooler, ruining it's effectiveness. Clean it out! I use gasoline (wear gloves and take the right precautions), but the safer route is alcohol. Anything that'll dissolve engine oil will work. I was amazed at how much oil came out.
1) K&N Air filter and cut air box: $50
The OEM air filter is pretty restrictive and the original air box breathes
through a small horn that pulls air from behind the passenger's headlight..
When you replace the air filter for the first time, you'll see that a very
small portion of the filter is dirty. This means that a small percentage
of the filter's area is being used. I cut the airbox to allow more
of the filter's surface area to be exposed and use a K&N cleanable
filter for better air flow.
2) New Fuel Pump and Re-Wire: $200
The wire that supplies current to the fuel pump is about 16 gauge.
That, combined with it's long length (~10') caused a significant voltage
drop before getting to the pump. Replacing that wire with a run of
8 gauge brought the voltage at the pump up to where is should be.
There's a great page on how to do this here.
Another word of caution - be very careful with the metal fuel line coming
out of the pump housing. Mine was very rusted and fragile.
After successfully removing the pump housing (which took a long time, liquid
wrench and great persistence!), I encased the line in epoxy to protect
it.
More HPs mean more fuel. The stock pump just isn't up to it. The pump I used is the 255 GPH Walbro. The installation VFAQ is here.
3) Manual Boost Controller: $50
This is the first mod that made some serious power. The MBC allows
dialing in whatever boost you'd like to run. Be very careful here
- if you run too high boost, the engine will knock, EGTs will shoot up,
and stuff will melt. I now run 16 lbs. of boost on 92 octane street
gas and 25 lbs. with 117 octane race gas (with the below modifications).
The key is NO knock and low exhaust gas temps. Some guys who make
a lot of power run with a lot of knock. Since this car is also my
daily driver (in the winter), I'll err on the side of caution and say zero
knock to protect the engine.
Now that there's sufficient fuel and the ability to regulate the boost pressure, it's time to get more air:
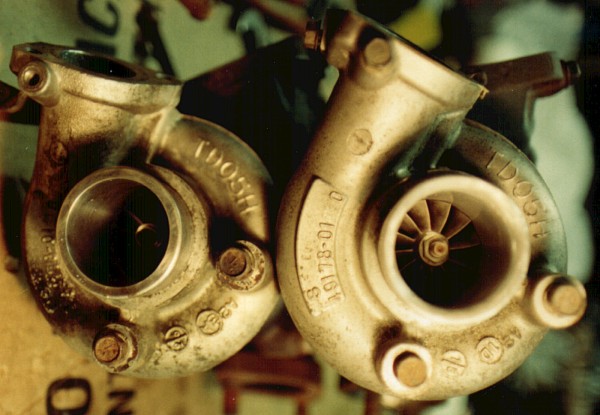
4) Porting: free
Porting opens up flow restrictions. There are several in the
stock system. Here's the pictures of my porting work. They
were scanned from photographic prints that I took before I bought my digital
camera, so they're not the best quality. Click on the thumbnails
to view the larger ~600x400 images:
 |
This is the intake to the compressor housing. I rounded off the intake edges for smoother flow. |
 |
Here's the turbine housing inlet, where the exhaust gasses enter the turbo after exiting the exhaust manifold. I removed the step, enlarged the inlet and smoothed it out a great deal. |
 |
This is the oxygen sensor housing, which connects the output side of the turbine to the exhaust system's downpipe. Again, the step is removed for smoother flow, and the outlet is enlarged and smoothed. |
I also ported the compressor output and the wastegate flapper opening for reduced boost creep.
Don't even consider doing porting with a Dremel-type tool unless you have many, many hours to spend. I used my air-powered die grinder with a solid carbide double-cut bit and it still took hours. There's a picture of the grinder and bit below.
5) MAF Mods: free
When you turn up the boost, a lot more air flows through the intake
path. The stock air filter fits over a device called the Mass Air
Flow Sensor (MAF). The MAF senses the volume of air entering the
engine. When running higher boost, the MAF sensor overruns and misses
counts. This leads the ECU to believe that less air is entering the
engine, so it adds less fuel, the engine runs leaner and things heat up.
The MAF sensor has two tunnels through the middle of it. Air passing
through the upper, larger one is metered. Air passing through the
lower, smaller one is not. By allowing more air to pass through the
lower one, overrunning the ECU is avoided. However you must be sure
that too much air isn't bypassed. This will cause a lean condition,
and the ensuing meltdown won't be very pretty.
 |
Here's a couple shots of my first stage of my MAF modifications. I removed the lower honeycomb and completely removed the front of the lower tunnel. After performing this mod, I had some difficulty with idle, since almost no air was going through the upper tunnel and being metered. This led to the 'flapper'. |
 |
Here's a shot of the flapper. At low air velocities, the flapper covers almost all the lower tunnel's opening. At high air velocity, the thin copper flap bends allow air to flow through the entire lower opening. |
6) Front Mount Intercooler: $80
The ideal gas law means that, all other things being equal, as you
compress air more, its temperature rises. Turning up the boost was
raising the temperature of the intake air higher than the stock Intercooler
could cool it. One common mod is to replace the louvers behind the
IC with a wire mesh for increased air flow. I tried this, but with
little effect. Part of the problem is that at high speeds, the area
in front of the tire is at high pressure, so the differential pressure
across the IC is low, leading to poor IC effencency.
Being the frugal engineer that I am, I wanted a less common and less
expensive solution than spending ~$1000 on a new front-mount. Since
a friend of mine has just bought a mig welder, I decided to learn how to
weld aluminum.
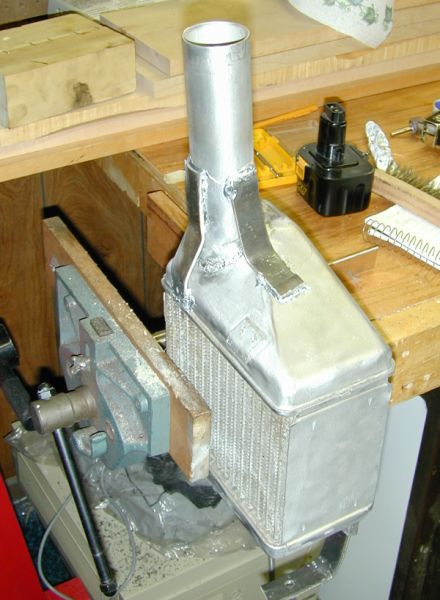 |
I bought a stock 1G Intercooler from a fellow DSMer for $20, cut off the stock inlet and output tubes, welded on new ones and braces to keep them from cracking. Welding Al is a lot tougher than I though it'd be! Here's the results: |
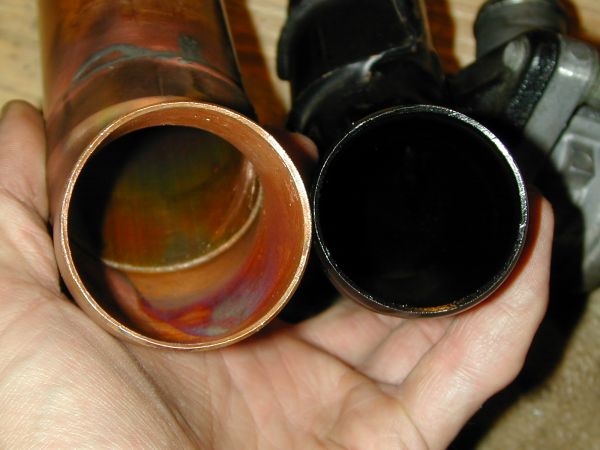 |
Next was to make the custom IC tubing. Again, rather than the traditional route, I wanted something more unique, distinctive and inexpensive. The solution - 2" Cu plumping pipe from Home Depot! Here's a shot of the difference between the stock IC tubing and the copper pipe I used: |
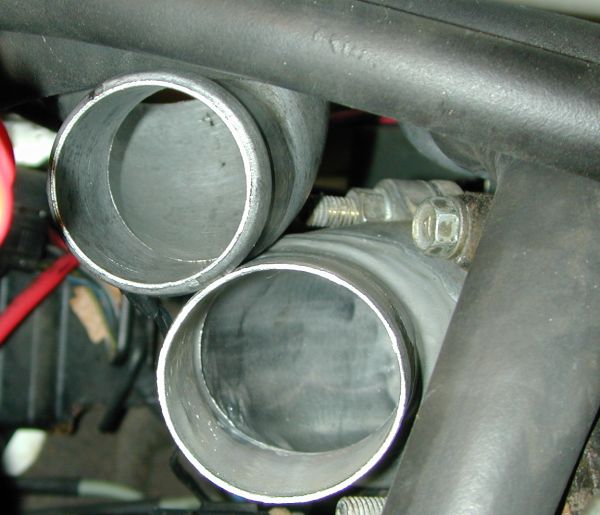 |
The throttle body elbow needed enlarging too, so I welded a piece of 2" Al tubing to a spare I had. Here's the difference between stock (upper left) and the new one: |
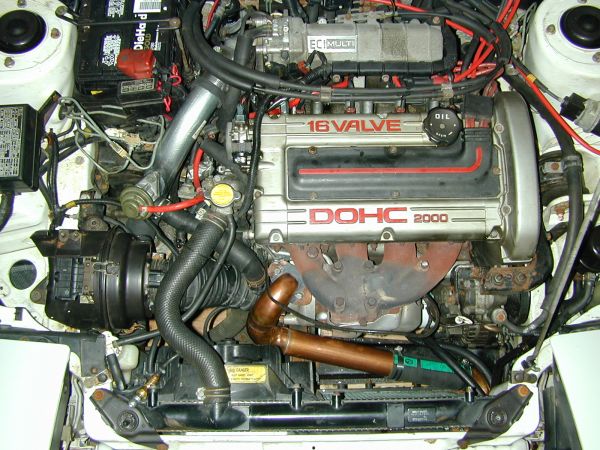 |
Here's a shot of the engine bay with the completed FM IC |
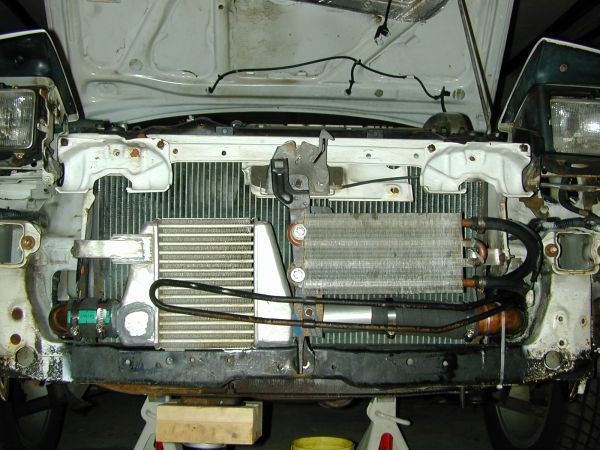 |
And here's a front shot with the bumper and fascia removed. Note the Intercooler on the left, oil cooler on the right, and power steering fluid cooler that crosses them both. |
I have since rewired the radiator fan to the A/C switch so I can turn the fan on at will. It pulls a lot of ambient air through the IC even when the car's sitting still. Great for cooling off between drag runs...
7) Cold Air Intake: $60
The MAF sensor pictured above also contains a temperature sensor so
the ECU knows the intake air temp. While datalogging, I noticed that
these temperatures were frequently 60 or 70 degrees above ambient.
It was clear that the intake was pulling air in from the engine compartment,
which had passed through the radiator and by the turbo.
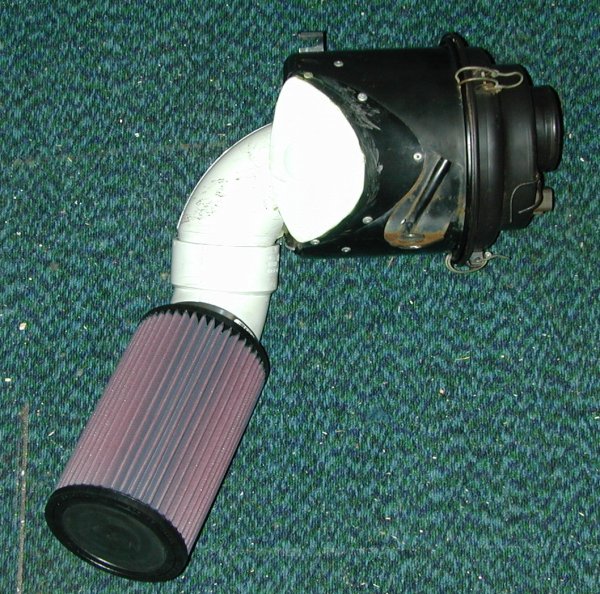 |
In order to bring in ambient air, I constructed tubing that puts a K&N filter where the stock intercooler used to be. Creative use of 2 90 degree 3" PVC elbows, no? |
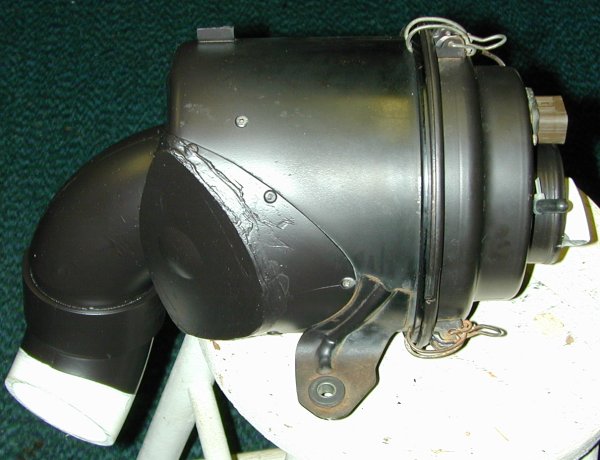 |
Here's a shot sans the filter after spray painting: |
 |
This is the opening for the stock IC's output. I used the carbide bit to hog it out to 3.5" for the PVC pipe. Be careful if you use one of these bits - it cuts sheet metal like a hot knife through butter... |
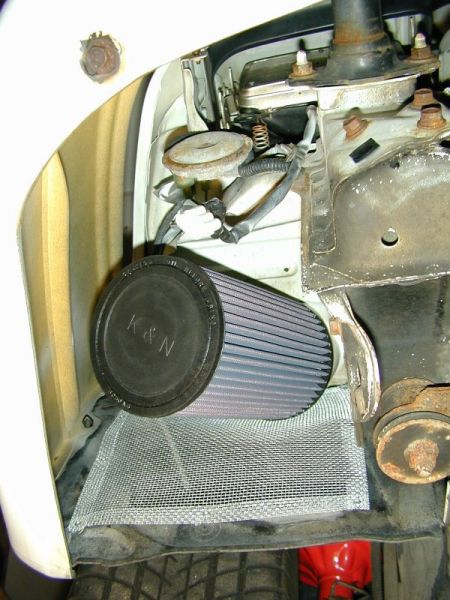 |
Here's a shot from under the car looking up. Notice the wire mesh screen between the air filter and the front passenger tire. |
Driving home one evening, I hit a massive puddle. Now the K&N is almost a foot above the ground so I wasn't worried about it. Big mistake. The engine stammered and stuttered and finally died. Turns out the forward splash from the tire went through the wire mesh and soaked the filter. I was hoping that I didn't hydrolock the engine. After disconnecting the air box and watching about a cup of water pour out, I was sure I did and I'd be walking the rest of the way home.
I disconnected the IC tubing at the lowest junctions and more water came out. Uh Oh.
After letting the car sit for a bit to air out, it started up, spit for a minute or so then was fine for the babied ride home. I had gotten off the throttle before the puddle, so the engine was idling when I hit it. Must be that not much water had made it into the engine.
When I got home, I removed the wire mesh and riveted a metal sheet on to prevent that from ever happening again.
The next time I hit 5# of boost there was some stammering, but that was probably from cleaning out some residual water from the line. Since then (about 3 months ago) I've not had any trouble. Whew!
8) Exhaust: $500
| This is really the exhaust from my 2G, but you get the idea. They're both Dave Buschur's 2.5" press-bent turbo-back exhausts. The turbo spools up significantly faster now for some reason... | |
| Here's the opening that mates up with the O2 housing I ported above. |
9) Clutch: $500
ACT 2600 is the only way to go for drag racing (in my opinion).
Make sure you take it very easy for the first 500 miles of city driving
to break it in though.
10) Shocks: $400
Not really a 1/4 mile performance improvement (I didn't see much of
a change afterwards), but included here for completeness. After 100k+
miles, the original shocks were shot. Replaced them with KYB AGX
adjustables. I can change the ride in under a minute. Just
wish it hadn't taken me 3 hours to remove the rusted on stockers...
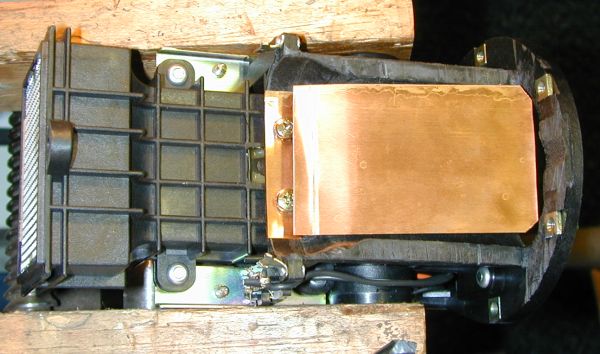
11) Hot Wire Air Flow Sensor and Fuel Computer: $300
In early May I purchased a hot wire air flow sensor and fuel computer
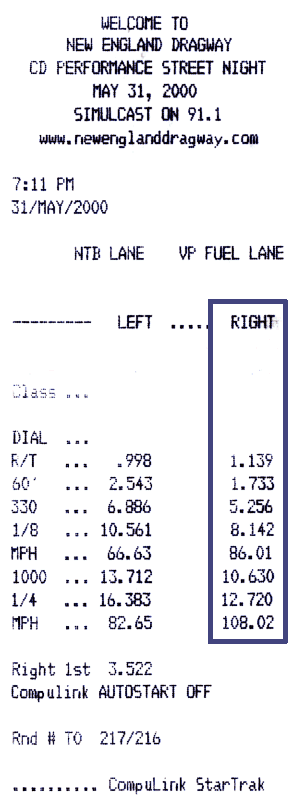
off of EBay for $300. The next trip to the track, I dropped 0.3 seconds
and picked up almost 8 MPH over my previous record!
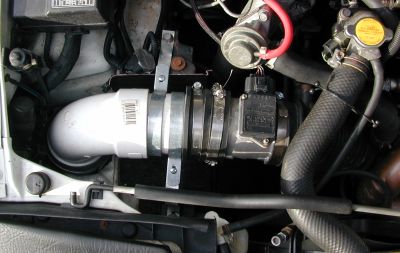 |
Here's the sensor itself. It completely replaces the stock mass air flow sensor. Unlike the stock MAF sensor, the new sensor is 3.5" in diameter and has a restriction about the size of a dime. Sounds pretty nice too! |
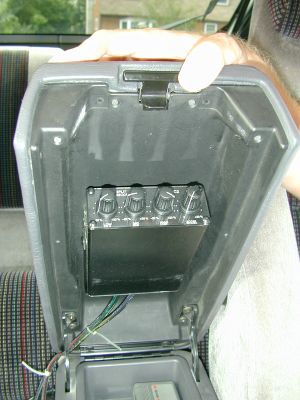 |
This is the fuel computer mounted under the arm rest. It allows changing the fuel maps for low, mid and high RPM ranges as well as acceleration enrichment from -20% to +20%. |
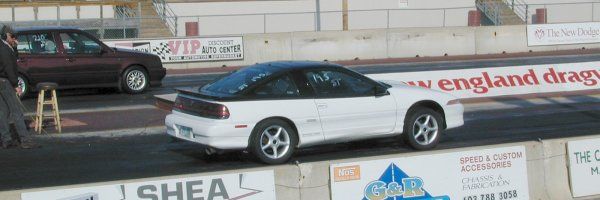
The results? Well, this info is from Road & Track (all but
my Talon), slowest to fastest:
| Vehicle |
|
|
|
|
| Acura Integra GS-R |
|
|
|
|
| Eagle Talon AWD (stock) |
|
|
|
|
| Porsche Boxter |
|
|
|
|
| Trans Am Ram Air |
|
|
|
|
| Mustang Cobra |
|
|
|
|
| Porsche 911 |
|
|
|
|
| Acura NSX |
|
|
|
|
| Corvette C5 |
|
|
|
|
| Dodge Viper GTS-R |
|
|
|
|
| My 112k Mile '91 Talon |
|
|
|
|
| Porsche 911 Turbo |
|
|
|
|
Here's a scan of the timeslip and a
screen shot of the data log for that run.
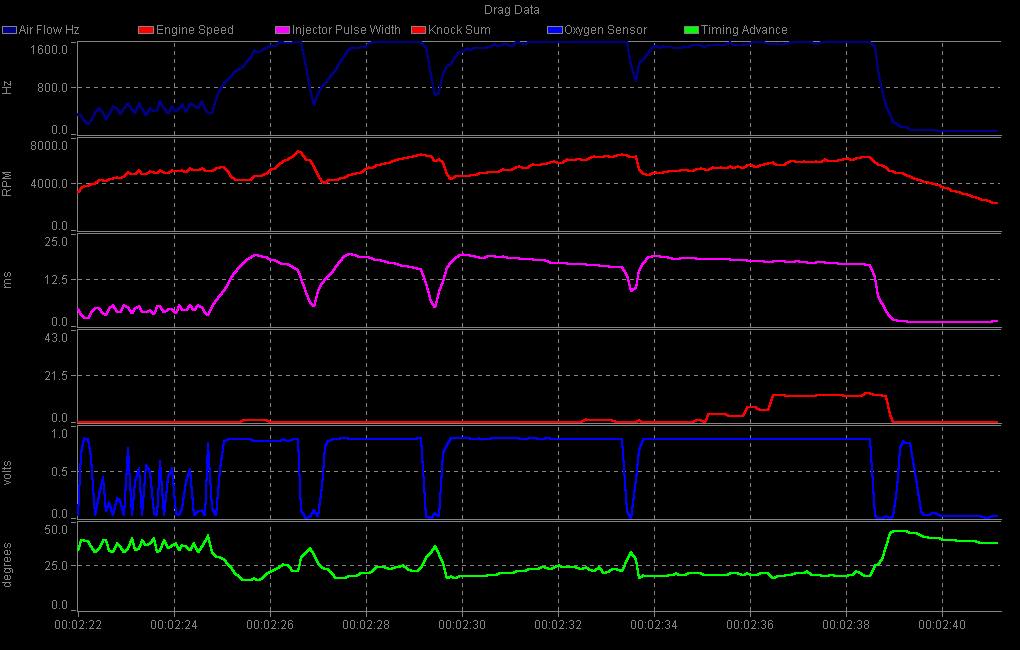
I think the key was my 60' time, which was a 1.733, the fastest I've ever
gotten. From the logger, here's my shift points:
|
|
|
|
|
|
|
|
|
|
|
|
|
|
|
The fuel computer was set to +1 +5 -4 +2.
My goal is 12.4 seconds in the 1/4 mile, just faster than the Porsche 911 Turbo. That'll be fast enough for my winter car :-)
Then it'll be time to make the red '98 go fast...
"I returned, and saw under the sun, that the race is not to the swift,
nor the battle to the strong, neither yet bread to the wise, nor yet riches
to men of understanding, nor yet favour to men of skill; but time and chance
happeneth to them all." - Ecclesiastes 9:11