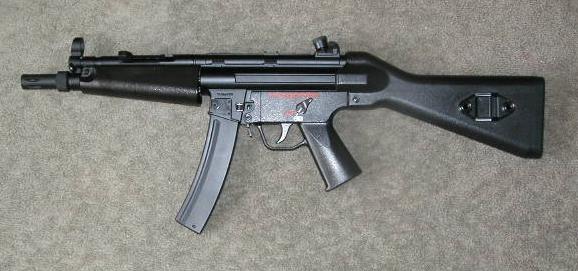
RAP5 ROF/Velocity Instructions
When I first received my RAP5 marker, it had some issues. The rate of fire (ROF) was very slow, and there a was considerable lag time when the trigger was pulled. I consulted the manual, but there was nothing about how to fix these problems. The manual DID talk about making the gun shoot "faster, " but did that mean ROF or velocity? Well, since I could not find a clear answer, I decided to forego the manual and just jump right in a see what I could figure out. What follows is what I have learned through trial and error.
This page is has alot of pictures in it. I tried to keep them smaller in size to help the people with dial-up connections, but it still may take a minute or two to fully download. Please be patient. I know it will be worth your time.
Thank you!
When adjusting the ROF and/or the velocity, you should know that changing one will, naturally, affect the other. Obviously, if you increase the velocity, you increase the pressure on the ball, which will increase (ever so slightly) the ROF, and vise versa. I have tried to make this information as clear as possible, and it is very easy to get mixed up in the process, so please be sure to check the pictures closely, and watch what your doing.
(Click on the pics for a larger one!)
NOTE: Before working on ANY type of firearm (real or not), make sure it is NOT loaded!!
Ok, now on to the good stuff!
 Ok, I am going to assume at this point that you have already read
the RAP5 General Disassembly Instructions. If you haven't, GO DO IT NOW!!
Alright, now that your back, and know how to take the gun down to the core, we
can proceed.
Ok, I am going to assume at this point that you have already read
the RAP5 General Disassembly Instructions. If you haven't, GO DO IT NOW!!
Alright, now that your back, and know how to take the gun down to the core, we
can proceed.
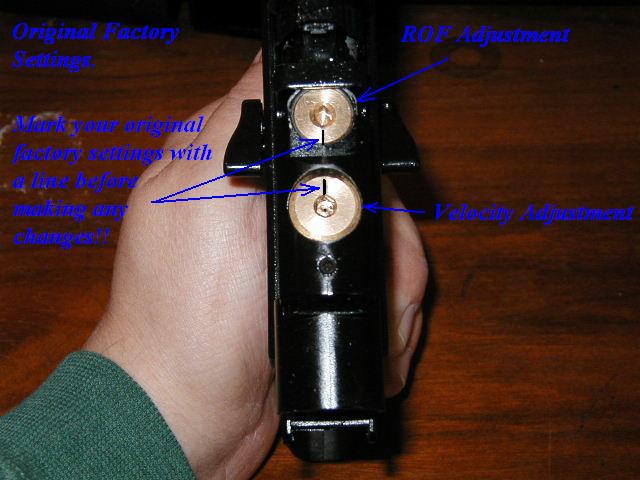
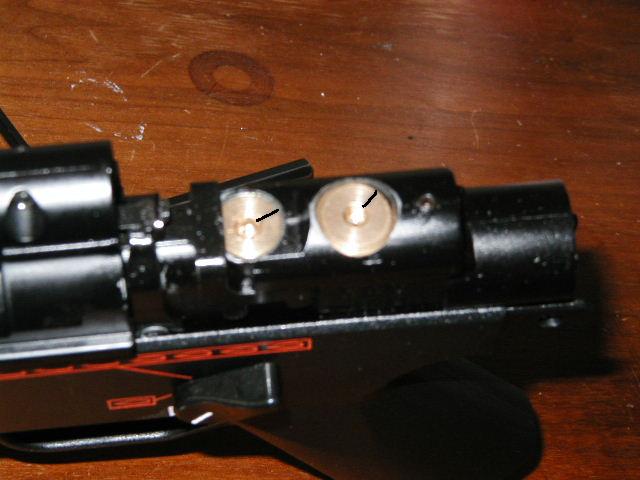
First, take the gun apart, down to the core. (See, I told you to read that other one first!) Once you have that done, you will see two large brass screws on the top of the core. Now, holding the core, looking at it from the top, with the muzzle end facing away from you, you have the ROF screw in the front, and the velocity screw to the rear. (Look at this picture if you don't understand!) Before making any adjustments, you should first mark a line on the two screws denoting where the original factory settings are. This way, if you REALLY foul something up, at least you should be able to get back to the "starting" point again.
Now that I had my markings, I made my first adjustment.
The manual stated that by turning the rear screw clockwise, that you could make
the marker shoot faster. Since the ROF on my RAP5 was VERY slow, I decided to
give that one a try first. I gave it about a half turn, reassembled the marker,
and test shot it. The ROF seemed a bit faster, so I again, dismantled the
marker, gave it another half turn (it wouldn't go anymore) and then reassembled
the marker. This seemed to fix the "lag" in the trigger some, and also increased
the ROF slightly more. However, when I went to shoot some rounds, I noticed that
the paint was moving WAAAAY to fast. NOTE: When the manual refers to making the
gun shoot "faster," they are referring to velocity. So, by turning the
rear screw clockwise, you can increase the velocity. Coincidentally,
turning the rear screw counter-clockwise will decrease the velocity.
(Funny how that works, eh?)
 Ok, I had found the velocity adjustment. So, I opened it back up,
and turned the velocity screw back down to a more reasonable speed. However,
when I did this, the "lag" in the trigger returned, and the ROF slowed back down
again. I again consulted the manual, looking for any reference to ROF. (When
will I ever learn?) Nothing, so I gave the other screw a crank. This one didn't
move much at all. I managed about 1/8 of a turn clockwise before it stopped. I
reassembled the marker again, only to find that it did not shoot at all! Oops.
Open it back up again. This time, I cranked it back to the original setting
(remember the mark!), and gave it another 1/4 turn. This completely eliminated
the "lag" in the trigger, and produced one MEAN machine gun. The ROF was TOO
fast. I turned the ROF clockwise about 1/8 turn and reassembled the gun. The gun
was now working as expected. The lag in the trigger was gone, and the ROF on
full auto was fast, but not too fast.
Ok, I had found the velocity adjustment. So, I opened it back up,
and turned the velocity screw back down to a more reasonable speed. However,
when I did this, the "lag" in the trigger returned, and the ROF slowed back down
again. I again consulted the manual, looking for any reference to ROF. (When
will I ever learn?) Nothing, so I gave the other screw a crank. This one didn't
move much at all. I managed about 1/8 of a turn clockwise before it stopped. I
reassembled the marker again, only to find that it did not shoot at all! Oops.
Open it back up again. This time, I cranked it back to the original setting
(remember the mark!), and gave it another 1/4 turn. This completely eliminated
the "lag" in the trigger, and produced one MEAN machine gun. The ROF was TOO
fast. I turned the ROF clockwise about 1/8 turn and reassembled the gun. The gun
was now working as expected. The lag in the trigger was gone, and the ROF on
full auto was fast, but not too fast.
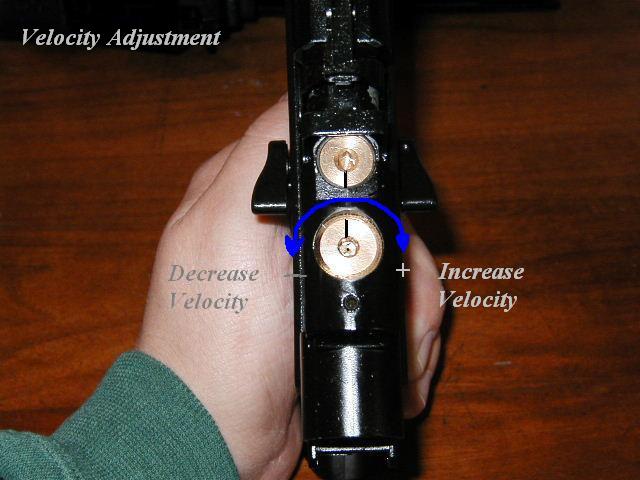
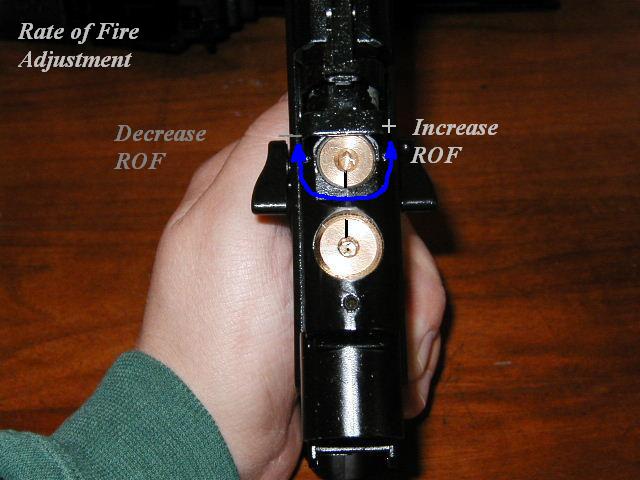
Now, this is where things get confusing. If you have not already noticed, the velocity and ROF screws work opposite each other. Turning the velocity screw clockwise increases the velocity, but turning the ROF screw clockwise decreases the ROF.
Ok, lets recap what we have learned:
The APS instruction manuals leave much to be desired.
The rear most screw is the Velocity adjustment. Clockwise to increase, counter-clockwise to decrease.
The forward screw is the ROF. Clockwise to decrease, and counter-clockwise to increase. (Make small adjustments.)
Just in case you were wondering, this is my current
setting. I still need to get out and chrony this thing, but I would estimate the
speed somewhere near 300fps with this setting.
One final note: Once you have the marker working the way you
like, you no longer have to tear the whole gun apart to adjust the velocity.
Simply unscrewing the rear site, and removing it from the marker, allows access
to the velocity adjustment screw. Of course, that means you would need a Philips
head screwdriver, whereas the other method you don't. Whichever is easier for
you.