


In this section you will find some experiments
and interesting applications done with the paramotor.
Each subject is explained briefly. The intention
is to collect as much information as available from paramotors pilots around
the world who have developed a special application which can be useful
for the community. It is just the beginning and I expect that this section
will grow during the next coming years. I hope that you will enjoy the
reading and the photographs.
If you think you have a good subject to bring
here, please feel free to e-mail me.
Since frenchman Nadar who was the first to have captured an aerial image from a hot air balloon over Paris in the end of the 19th century, many airborne platform were used to catch the fraction of moment of our mother earth. It ranges from a simple kite with remote-controled camera, an amateur recoverable rocket, a hot air balloon, an utlralight aircraft, a paraglider, a parachute, an aircraft, a helicopter, a jet and finally end up to the sophisticated military spy-satellite who can 'see' a cigarette light from a low orbit position in space...
Now, what can the paramotor do in this particular
field ? The paramotor has an incredible advantage over its direct competitors
(ultra lights aircrafts and conventional aircrafts) : it does not need
heavy maintenance and infrastructure regarding the flying hardware. The
most important factor limit for the paramotor is the weight of the equipment
(camera and other) that has to be brought in the sky... If it is just to
get an aerial photograph with a simple camera, the paramotor is probably
the less expensive and flexible way for doing it. The slow speed and precise
flight handling of the paramotor make it the ideal tool for aerial photography
in many disciplines. It can take off from anywhere : a space as little
as a tennis court is sufficient. The paramotor cruises easily at around
45 Km/h to the photo target at any altitude up to 3,000 feet AGL (500 to
1000 feet is widely used) and land anywhere within 25 sq. meters space
! A skilled pilot with the appropriate photo equipment and navigation system
will provide in some cases better results than more expensive conventional
ways of taking aerial photographs.
Let's explore the applications from the simple
'fun' aerial photograph to the more sophisticated aerial photograph for
scientific applications.
Please note that there are regulations about
aerial photography and rules may be different from one country to another.
Before taking an aerial photograph, be sure that you have all necessary
permissions and always carry a copy of them with you ! Severe law enforcement
exist in some countries if you do not have the appropriate permissions.
You can get more information about this sensitive issue directly from the
local Department of Civil Aviation where you operate.
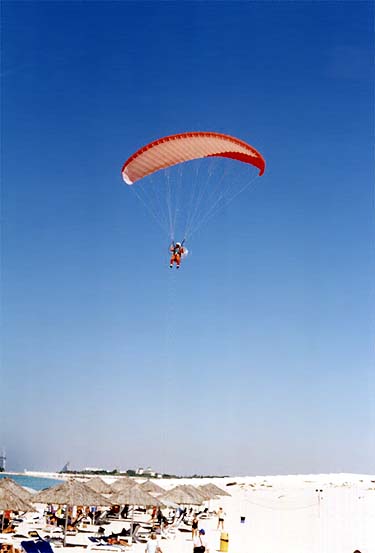
Usually taken with a low-cost camera, it lacks in resolution and quality but is sufficient for most of the amateurs. It is generally an 'oblique' view of the flown area. It is not intended for professional use. Below is a sample taken at around 1,000 feet altitude with a Kodak 35 mm pocket camera. Film is Kodak Gold 100 ASA.
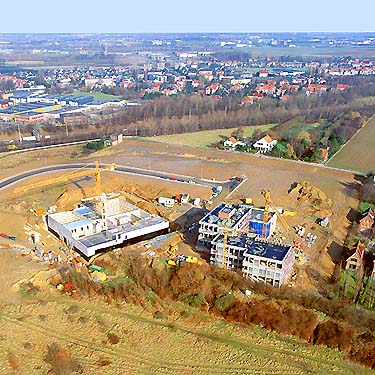
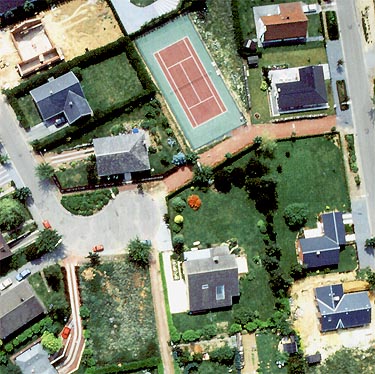
Now let's get more heavy and sophisticated stuff in the air and see what today's technology can offer in terms of high quality aerial photography at low altitude. To increase the resolution and quality of the photograph we first need a better optic, a larger film format (the bigger the better but this increases weight and in-flight manipulation problems as costs), an appropriate (high/medium) resolution film according to light conditions and subject characteristics. The usual compromise is the medium format camera : Hasselblad, Rollei, Mamiya, Linhof, Bronica etc... These manufacturers offer a wide range of accessories suitable for aerial photography. The medium format camera is excellent for producing high quality negatives at low altitude (below 3,000 feet). Another important factor is that you can easily enlarge up to 10 times or select part(s) of the image by still keeping an acceptable 'grain'. This is more difficult with the 35 mm format : even with the best optic in the world your shot taken at 3,000 feet and enlarged 10 times will not match the sharpness of a larger format camera. Details are important to the end user : more details and information is not only pleasant to the eye but to the scientific user it is crucial in order to optimize interpretation and multiple analysis.
Who can use these photographs and what for ?
Here is a list of hot professions/disciplines
who are highly interested by the medium :
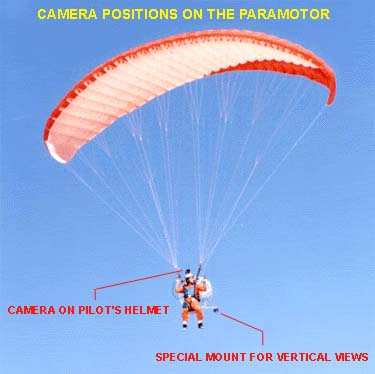
Here are various samples taken with my Hasselblad
500 ELM. Oblique views were taken by the camera fixed to my helmet. To
pinpoint the target during the flight, a special viewfinder helps me at
my right eye and is part of the helmet.The vertical photographs were done
with the use of a special bracket attached to the paramotor frame. Leveling
is performed by mean of a simple level-bulb. Differential GPS (DGPS) navigation
can be used for following an accurate flight path for successive overlapping
images. This offers a stereoscopic coverage and the photos can be processed
for 3D analysis and mapping. New analytic mapping systems needs a few convergent
aerial images to build the mathematical space solution for producing elevation
and features lines, volume and area calculation.

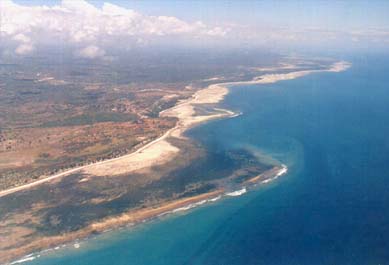
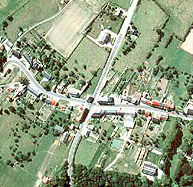 Countryside
view taken at 1,500 feet. This type of image is very helpful for GIS (Geographic
Information System)
Countryside
view taken at 1,500 feet. This type of image is very helpful for GIS (Geographic
Information System)
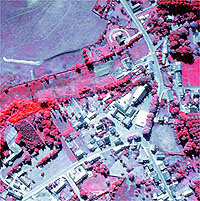 On
this infrared photograph, the brighter the red color, the stronger is the
chlorophyll reflecting the sun rays. This means that for example
dead or ill leaves on trees will produce none or less infrared rays.
Air pollution or bad irrigation could be the cause. Environment analysts
is using this tool for locating critical areas which need treatment or
protection. The combination of visible and infrared aerial photographs
provide additional accurate information to the analyst. Digital processing
with state-of-the-art GIS systems can deliver an efficient relational database
of the photographed objects and their attributes.
On
this infrared photograph, the brighter the red color, the stronger is the
chlorophyll reflecting the sun rays. This means that for example
dead or ill leaves on trees will produce none or less infrared rays.
Air pollution or bad irrigation could be the cause. Environment analysts
is using this tool for locating critical areas which need treatment or
protection. The combination of visible and infrared aerial photographs
provide additional accurate information to the analyst. Digital processing
with state-of-the-art GIS systems can deliver an efficient relational database
of the photographed objects and their attributes.
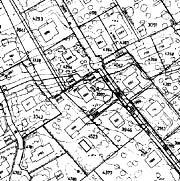

A photogrammetric workstation
 The
use of computers with complex algorithms has given to the aerial images
users an incredible tool to overcome and solve most demanding 3D analysis
problems. Today's technology offers incredible performance in image processing
and reduces dramatically the costs in important aerial surveys projects.
The aerial photographs taken from a paramotor can be processed by most
of this new analytic systems. It is certainly an ideal airborne platform
for low to medium aerial photography where an aircraft or a helicopter
is to expensive or not necessary in terms of small volume work.
The
use of computers with complex algorithms has given to the aerial images
users an incredible tool to overcome and solve most demanding 3D analysis
problems. Today's technology offers incredible performance in image processing
and reduces dramatically the costs in important aerial surveys projects.
The aerial photographs taken from a paramotor can be processed by most
of this new analytic systems. It is certainly an ideal airborne platform
for low to medium aerial photography where an aircraft or a helicopter
is to expensive or not necessary in terms of small volume work.
