ORACLE 8i R3 RDBMS Installation for PSU’s CSC Lab
Nick Abbruzzese
http://www.geocities.com/PiKappHK133
Plattsburgh State University
101 Broad Street
Plattsburgh, NY 12901
Table of Contents
1)
Introduction
a. Forward
b. Abstract
2)
Server Pre-Installation Tasks
c. Installation-Specific restrictions
1. Configure Linux environment
2.
Add users
3.
Create files
a. Procedure
2. Group Names
3. Products
5. Components
1. Ulimit
3. scripts
Introduction
Forward
This document contains a detailed account of all the work I have completed this spring semester of 2001 in Dr. Plaza’s CSC485 class. It is important to state that I had a partner in my research and activity. I worked with Paolo Nicolosi throughout the semester. H wrote certain parts of this report, and credit is given whenever the work is his. My intended audience consists of my classmates and the instructor. There are many terms and acronyms, along with much database and computer system jargon contained in this writing. I have opted not to include an index of these terms, as most are explained on my website. Please visit www.geocities.com/PiKappHK133 for help with anything of this nature. If there is anything missing or unclear, please feel free to e-mail me at [email protected] with your comments. Thank you, and please enjoy my report.
Abstract
The aim of my project is to install and configure the Oracle RDBMS server on the Linux server in our CSC computer Lab and to configure an identical suite of clients on each of the forty workstations there. Why Oracle, and why Linux, you ask? There are a few answers to these questions, but the best one is that when installed and configured properly on a Linux server the Oracle RDBMS provides unparalleled performance, reliability, and functionality. Oracle databases can be configured to interface with the web, java, C, and almost any type of application available. The fact that Oracle is known for its complexity and general user un-friendliness makes this proposal a daunting task. Nonetheless, my intent is to install and configure this complex system for use in our lab.
Server
Pre-installation Tasks
Before installing this cumbersome application, it is important to prepare the Linux machine on which Oracle will be configured. There are numerous variables that must be addressed during the pre-installation process. First, it is important to check the target systems against the hardware requirements. My website has more data and is cross-linked to definitions and terms which might be confusing.
These requirements represent the bare minimum needed on a system on which Oracle will be installed. It should be noted that exceeding these limits is a good thing, and the better you system is the better the database system will perform.
|
RAM |
32 MB required. |
|
Swap Space |
Three times RAM is recommended. |
|
Disk Drives |
4 devices: one for the Oracle software three for creating an OFA-compliant database. |
|
Disk Space |
At least 400 MB required. |
|
CD-ROM |
A CD-ROM drive supported by LINUX is required. |
Operating
Software requirements
There are also specific requirements for the Linux operating system installed on target machine. These requirements are listed here.
Operating System: Linux Kernel 2.0.33 or better
System Libraries: GNU C Library 2.0.6
TCL Library: Version 8.0.2-16
Operating System and Installation-Specific Issues and Restrictions
The following is a list of restrictions and generals issue that must be addressedbefore the installation to the target machine can begin. Concurrent Process Limit The number of concurrent Oracle processes is limited by the system’s imposed limit for the maximum number of semaphore identifiers. File Systems The Oracle Server must be able to verify that file writes have been made to Disk. File systems that do not support this verification are not supported for use with Oracle, such as NFS based on the UDP protocol. Very Large Files LINUX does not support large files (greater than 2 GB). Set up LINUX environment
LINUX Environment variable Summary
Here is a list of ENVIRONMENT variables and the values to which they must be set before installation may begin.
|
VARIABLE |
SETTING |
Mount Points |
At least four mount points, all at the same level of the directory structure. One is for the software, three are for an OFA-compliant database. |
OS Groups for Oracle Roles |
A OS group is required for the OSDBA role, and is usually named dba. |
OS Accounts |
A OS account dedicated solely to installing and upgrading the Oracle system.The account must be a member of the group used by OSDBA. |
Local bin directory |
A directory for software shared among Oracle users. The default location for this directory on Intel-LINUX is /usr/local/bin. |
oratab file |
Contains information about Oracle instances. |
Permissions for File Creation |
Set umask to 022. |
DISPLAY |
Set to the machine name and monitor of the station from which you are connecting to the server machine. |
LD_LIBRARY_PATH |
Required for Oracle products using shared libraries. Must include $ORACLE_HOME/lib. |
ORACLE_BASE |
Not required, but recommended as part of an OFA-compliant installation. |
ORACLE_HOME |
Set to the directory where the Oracle software will be installed. |
ORACLE_SID |
Specifies the instance name, or sid of the Oracle Server.Must be unique for Oracle instances running on same machine. Oracle Corporation recommends using four characters or fewer. |
ORACLE_TERM |
Required by all character mode and Motif mode Oracle products. |
ORA_NLS33 |
Required when creating a database with character set other than US7ASCII. Set to $ORACLE_HOME/ocommon/nls/admin/data. |
PATH |
The search path must include all of the following: $ORACLE_HOME/bin, /bin, /usr/bin, and /usr/local/bin |
SRCHOME |
Should be undefined when running the Installer. If SRCHOME is set, the Installer defaults to the location it specifies as the source of software to install. |
TWO_TASK |
Should be undefined when installing the Oracle8 Server. |
TMPDIR |
A directory with at least 20 MB available space where the oracle account has write permission. The default location on Linux is /usr/tmp. |
Tasks
to Perform as the root User
Not all tasks can be performed by the DBA. Some require access to restricted files that must be changed by the system administrator. In some cases, recompilation of the Kernel is necessary. In ours, however it was not. The system’s super-user must complete the following steps. Create Mount PointsCreate OS Groups for Database AdministratorsCreate OS Account to Own Oracle SoftwareCreate a Local bin DirectoryCreate the oratab File
SHMMAX Parameter System Memory Configuration
The SHMMAX parameter tells the amount of shared memory on a Linux-Intel system. The following table shows what the value of SHMMAX should be for each amount of RAM.
|
RAM |
SHMMAX |
|
64 |
16 |
|
128 |
32 |
|
256 |
64 |
|
512 |
128 |
|
1024 |
256 |
|
2048 |
512 |
|
4096 |
512 |
Server
Installation
The installation procedure for the server software to configured and installed on Shakespeare is fairly straightforward. There was only on problem during the entire process, and it will be described in detail at the end of this section. The installation can be completed by running a java based GUI named the Oracle Universal Installer. This simplifies the installation process greatly from previous versions of Oracle. When installing from a CD-Rom, the command to start the installation is
“Installation media locationt/runInstaller”
This command is to be run from an X-client. The quotation marks are not to be entered, and the path to the installation media must replace the words “installation media location.” For example, when installing from a CD, the command is
/mnt/cdrom/runInstaller
The manner in which we installed the server on Shakespeare was slightly different. The files were housed in the directory /oracle/install, so the command I used to initiate the Oracle universal install was
/oracle/install/runInstaller
The Universal Installer runs next, and the install process can begin. The universal installer asks a few questions, and then copies the files.
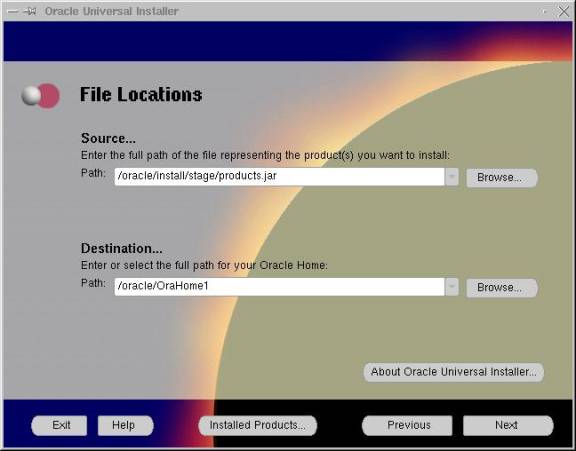
File Locations
The first thing to be entered is the location of the product index. In our case, the path is
/oracle/install/stage/product.jar
The destination is the oracle home directory, which in our case is
/oracle/OraHome1
The GUI screen looks like this:
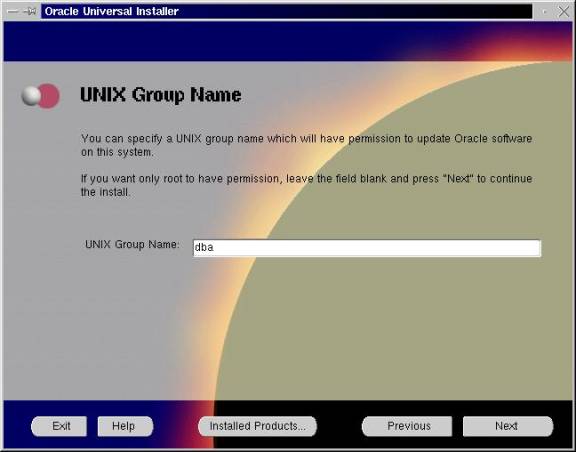
Group Names
The Oracle Universal Installer must know which users are eligible to complete installations on the machine. This is specified next. We use the group “DBA” for this purpose. We also use the group DBA for some other tasks, as well. This effectively gives users in this group the ability to administer databases.
The GUI screen looks like this:
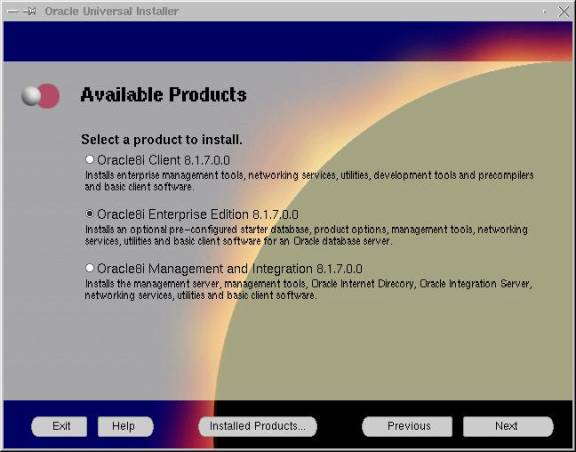
Products
The next step to complete is the selection of the products to be installed. There are three choices, Client, Management, and Enterprise Ed. Enterprise Edition is all-inclusive, and the most appropriate for our needs. Select the radio button of the type you wish to install, and click next.
The GUI screen looks like this:
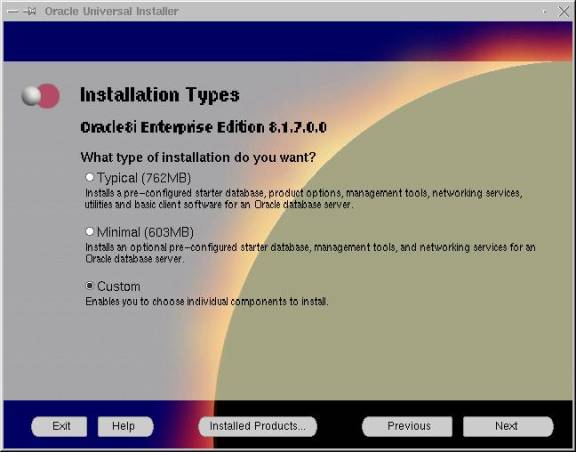
Installation type
The next screen that the GUI displays is the Installation Type screen. There are three choices, Typical,Minimal, and Custom. Typical installs the server, some clients, and some sample databases. Custom Minimal installs the server, fewer clients than the Typical Install, and no sample databases. Custom allows you to chose what you’d like to install. We chose custom. The GUI looks like this:
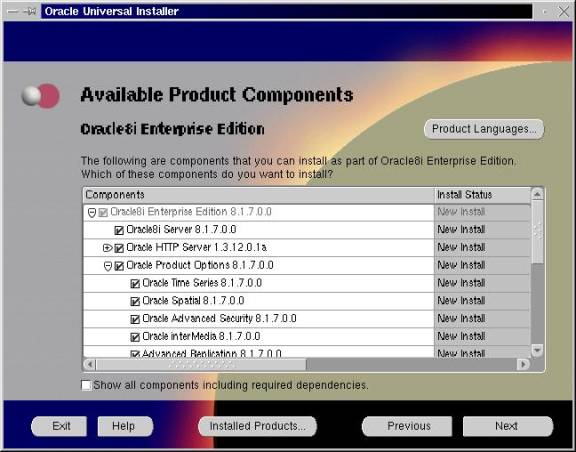
Components
The next step in the installation process is to select the packages to be installed. A list pops up, and you check of the box next to the items you want to install. During our installation, we decided to install everything available. This is not recommended for all users. The reason why we did it this way is simply that there is more than enough space, and we didn’t know exactly what all the different programs were for. The system administrator allowed us fifteen gigabytes of storage space for the oracle mount point. Therefore, we knew we had the space to install everything. We thought this would provide the maximum amount of flexibility to this instance of the RDBMS server.
The GUI looks like this:
Non-Oracle Components
Oracle requires the installation of the Java Runtime Environment, version 1.1.8.
This is an important package for the use of the Universal Installer and for many Oracle processes. This JRE is the only one that this version of Oracle works with. The installation is simple, all that is required is to specify the destination. We left it as the default, which was
/oracle/jre/1.1.8
the GUI looks like this:

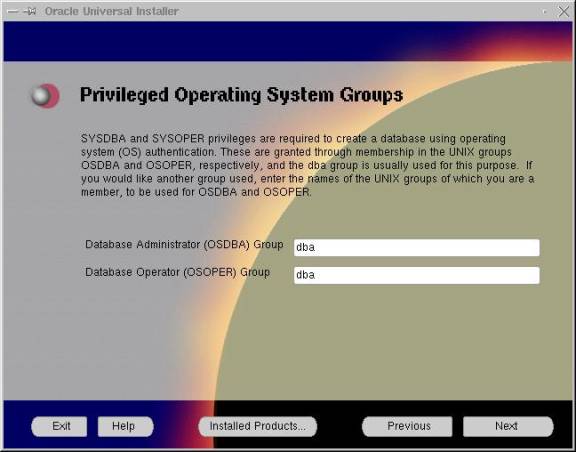
Privileged Groups
The users named OSDBA and OSOPER are vital to database creation, manipulation and management. Oracle must know which groups these users belong to. The last administrative user was assigned to the group DBA. These two are likewise assigned to the group DBA. This simplifies administration by keeping all the administrative accounts in one group. The GUI looks like this:
Authentication Methods
Oracle, like any other application needs a way to authenticate its logins. There are numerous protocols available, and at this stage in the installation you are prompted for which ones you will use. When we were installing our server, we did not recognize any of the authentication methods listed except for Kerberos. Therefore, we used the one we were familiar with. You simply select the method you wish to use and click on next.
The GUI looks like this:

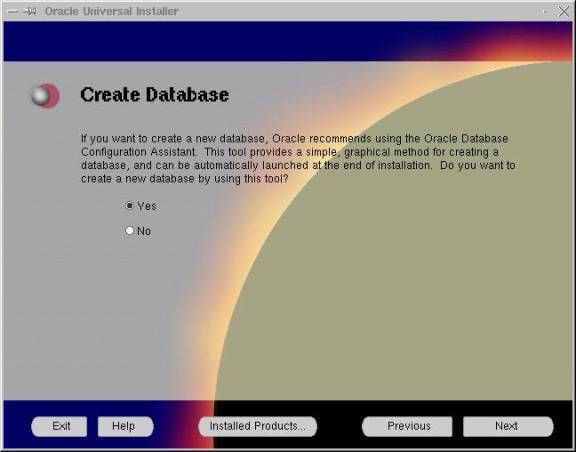
Database Creation
At this point in the installation, the GUI prompts you to create a new database. This is not necessary, and can be done later. However, we decided to use the Installer to do it while we were installing. At this point, all you have to do is click yes, and then next. The GUI looks like this:
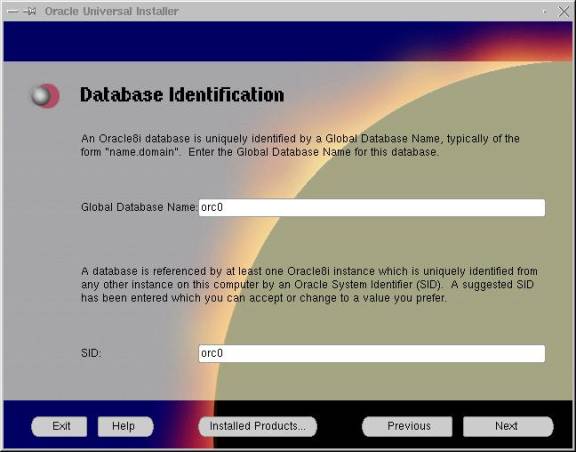
Database Name
The next step is to name the database. The database gets two names, a system identifier, which identifies the database to the system, and a global database name that identifies the database to Oracle. We set both to the same value. We called it orc0.
The GUI looks like this:
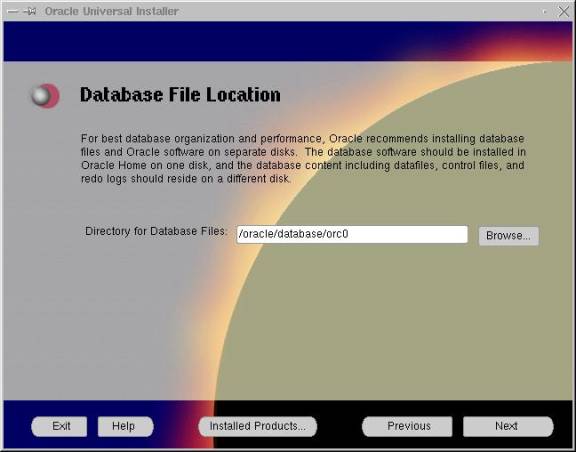
Database Location
The next thing to do in the database creation procedure is to specify the location of the database. We put ours under the oracle home directory, and we named the directory the same as the database, orc0. This simplifies use of the database. The GUI looks like this:
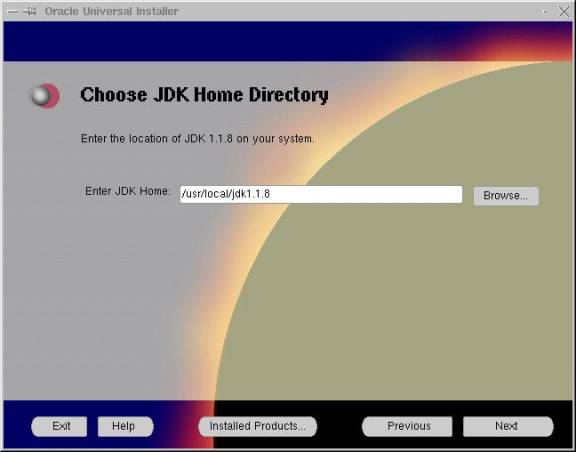
JDK Configuration
The final step in the Oracle Installation process is to configure the JDK version 1.1.8. This is a simple step. All that you have to do is specify the location of the JDK. In our case, it was located under /usr/local/jdk1.1.8 This is a variable which is system dependent. The GUI looks like this:
File Transfer and Linking
Next, the Oracle Universal installer copies files from the installation media to the destination. After this is done, it builds the binary files. Once this process is completed, the installation is complete. While we were installing, the process kept freezing at fifty percent completion of the file copy process. We couldn’t figure out why this happened continually. With some help, we discovered that that problem was in the ulimit settings for the computer.
Problems encountered
Ulimit
The ulimit is an upper bound for a number of users’ parameters. ulimit is characteristic of the BASH shell. Other shells have similar settings, but they may be called limit, of some other variation of the words “upper limit.” Ulimit sets limits on things such as maximum file size, number of concurrent processes, amount of CPU usage and number of open files per user. We determined that these limits were hindering the ability of the Universal installer to copy files. Basically, the oracle user, who was running the Oracle Universal Installer had a limit on the number and size of files he was allowed to have. Upon setting the ulimit values to unlimited for max file size, and max number of files open and maximum disk usage, the installation process would complete.
At this point, the installation was completed, and Paulo Nicolosi, my research partner, could perform post installation steps.
Post-Installation
Tasks
This area of research falls under Paul’s jurisdiction. His research and paper can be found here.
Client
Installation
Selected Clients
The number of Oracle clients available for installation is astronomical. The list of clients that come packaged with the Enterprise Edition of Oracle itself is quite large. A complete list can be found in the Oracle RDBMS 8i R3 Installation guide, which can be found at Oracle’s website. Here is a list of the clients that we installed. Basically, we just did a standard Client Application User class installation. What this means is that we ran the Universal Installer, and rather than selecting the Enterprise Edition class install we selected the Client installation. The following is a list of Clients installed, and a brief description.
|
Advanced Queuing |
Provides the functionality to support the Advanced Queueing API. |
|
Documentation |
Linux Intel (online) |
|
Net8 Client |
Provides products that enable client connections to databases across a network. A client-side application sends a request to Net8 to be transported across the network to the server. |
|
Oracle Advanced Security |
Oracle Advanced Security provides strong authentication support through a variety of authentication modules. It ensures data confidentiality during transmission using encryption. Oracle Advanced Security integrates with LDAP v3-compliant directory services, for centralized enterprise user management, enterprise role management, and single sign-on. Oracle Advanced Security provides single sign-on to multiple accounts and applications with a single password. |
|
Oracle Call Interface |
An application programming interface (API) for accessing an Oracle database from a C or C++ program |
|
Oracle Java Tools and CORBA Tools |
Provides Java tools to build and deploy Java stored procedures, CORBA objects, and Enterprise JavaBeans with Oracle's Java Virtual Machine |
|
Oracle JDBC Drivers |
A standard set of Java classes, specified by JavaSoft, that provides vendor-independent access to relational data through Java |
|
Oracle Universal Installer |
A Java-based application that lets you quickly install, update, and remove Oracle products. |
|
Oracle Utilities |
A suite of products used for database administration |
|
Oracle XML Developer's Kit |
This kit consists of a set of APIs for parsing and generating XML data. These interfaces have been written for Java, C, C++, and PL/SQL |
|
Oracle XML SQL Utility |
This utility is a set of Java classes and PL/SQL wrappers that permit queries to return result sets or objects wrapped in XML |
|
SQLJ |
A standard way to embed SQL statements in Java programs |
|
SQL*Plus |
Command line interface that allows SQL and PL/SQL database languages to be used with an Oracle database |
Method of Installation
The easiest way to complete an installation on a single workstation is to use the Oracle Universal Installer, just like in the server installation. However, in our case, the clients need to be installed on 40 different hosts. Since the same suite of clients will be installed on each machine, a method for automating the installation procedure would be beneficial. Luckily, Oracle provides just such an option. The oracle universal installer provides a silent install option, which automates the installation process. This coupled with a script (which I will call “auto host” in this context) written by Torrance Jones, Lenny Maiorani and Mitzy Guzman that automates processes on all 40 hosts makes this task seem much more simple. A simple script can be written to prepare each client machine for installation. At the end of the script, the call to the silent installation can be made. When the auto script runs the installation script, all 40 machines can be configured with a single command.
Silent Installation
A silent installation can be completed simply by generating response files. Basically all that a response file does is hold the answers to the questions that the GUI asks during installation. Rather than prompting the user for data, the install simply looks at these response files. Oracle provides templates for some response files. They are simple to configure, and well documented. The response files can be found on the Oracle CD, under the directory /response. The one I used was named clientuserapp.rsp. Lines beginning with // are comments that I have added for this paper. They do not exist in the actual file. Lines without comments received no changes. These lines were mostly just for displaying GUI windows, almost all of which were disabled by default.
The file looks like this:
//This is the header, it is self explanatory
//note that any values left
<value_unspecified> are left
//so on purpose. They are not relevant to this installation
#################################################################
## ##
##
Oracle8i 8.1.7 Appuser Install Response File Template ##
##
------------------------------------------------------------ ##
## ##
## Copyright(c) Oracle Corporation 2000. All rights
reserved. ##
## ##
## Specify values for the variables listed below to
customize ##
## your installation. ##
## ##
## Each variable is associated with a comment. The
comment ##
## identifies the variable type. ##
## ##
## Please specify the values in the following
format: ##
## ##
##
Type Example ##
##
String "Sample Value" ##
##
Boolean True or False ##
##
Number 1000 ##
##
StringList {"String value
1","String Value 2"}
##
## ##
## The values that are given as <Value
Required> need to be ##
## specified for a silent installation to be
successful. ##
## ##
#################################################################
[General]
RESPONSEFILE_VERSION=1.7.0
[SESSION]
#----------------------------------------------------------------------
# Name
: UNIX_GROUP_NAME
# Datatype
: String
# Description
: Unix group which will have write permissions on the
#
installer inventory directory
# Valid values
: Any Unix group to which the current user belongs
# Example value : "oinstall"
# Default value : None
# Mandatory
: No
#----------------------------------------------------------------------
//I set this one to ointall, as that is the
group which
//must install applications
UNIX_GROUP_NAME=”oinstall”
#----------------------------------------------------------------------
# Name
: FROM_LOCATION
# Datatype
: String
# Description
: Complete path of the products.jar file from the
# staging
area
#
containing products to install
# Valid values
: Full path ending in "products.jar"
# Example value :
"/cdrom/oracle8i/stage/products.jar"
# Default value : "../stage/products.jar"
# Mandatory
: No
#----------------------------------------------------------------------
FROM_LOCATION=<Value Unspecified>
#----------------------------------------------------------------------
# Name
: FROM_LOCATION_CD_LABEL
# Datatype
: String
# Description
: This variable should only be used in multi-CD
# installations. It includes the label of the Compact
# Disk
where the file "products.jar" exists. The label
# can
be found in the file "disk.label" in the same
# directory
as products.jar.
# Valid values
: Any string
# Example value : "oracle8i"
# Mandatory
: No
#----------------------------------------------------------------------
FROM_LOCATION_CD_LABEL=<Value Unspecified>
#----------------------------------------------------------------------
# Name
: NEXT_SESSION_RESPONSE
# Datatype
: String
# Description
: Optionally specifies the full path of next session's
#
response file. If only a file name is specified, the
#
response file is retrieved from <TEMP>\oraInstall
#
directory. This variable is only active if
# NEXT_SESSION is set to true.
# Valid values
: Full path to a valid response file or a response file
# name
# Example value : "/tmp/install.rsp"
# Default value : None
# Mandatory
: No
#----------------------------------------------------------------------
NEXT_SESSION_RESPONSE=<Value Unspecified>
#----------------------------------------------------------------------
# Name
: ORACLE_HOME
# Datatype
: String
# Description
: Full path of directory to use for installing Oracle
# products - the "Oracle Home"
# Valid values
: Directory path (existent or non-existent)
# Example value :
"/u01/app/oracle/products/8.1.7"
# Default value : none
# Mandatory
: Yes
#----------------------------------------------------------------------
//this gets set to the oracle home dir on the
hosts.
ORACLE_HOME=”/oracle/OraHome1”
#----------------------------------------------------------------------
# Name
: TOPLEVEL_COMPONENT
# Datatype
: StringList
# Description : Top-level product and version to install
#
The format is of the form {"<Internal name>",
# "<version>"}
# Note
: DO NOT CHANGE THE DEFAULT VALUE.
#
To install different top-level products, use one of
# the
#
other response file templates
# Mandatory
: Yes
#----------------------------------------------------------------------
TOPLEVEL_COMPONENT={"oracle.client","8.1.7.0.0"}
#----------------------------------------------------------------------
# Name
: SHOW_SPLASH_SCREEN
# Datatype
: Boolean
# Description
: Set to true to show the initial splash screen of the
#
installer
# Valid values
: true, false
# Default value : false
# Mandatory
: No
#----------------------------------------------------------------------
SHOW_SPLASH_SCREEN=false
#----------------------------------------------------------------------
# Name
: SHOW_WELCOME_PAGE
# Datatype
: Boolean
# Description
: Set to true to show the Welcome page of the installer
# Valid values
: true, false
# Default value : false
# Mandatory
: No
#----------------------------------------------------------------------
SHOW_WELCOME_PAGE=false
#----------------------------------------------------------------------
# Name
: SHOW_COMPONENT_LOCATIONS_PAGE
# Datatype
: Boolean
# Description
: Set to true to show the component locations page in
#
the installer. This page only
appears if there are
#
products whose install directories can be changed.
#
If you set this to false you will prevent the user
#
from specifying alternate install directories.
# Valid values
: true, false
# Default value : false
# Mandatory
: No
#----------------------------------------------------------------------
SHOW_COMPONENT_LOCATIONS_PAGE=false
#----------------------------------------------------------------------
# Name
: SHOW_CUSTOM_TREE_PAGE
# Datatype
: Boolean
# Description
: Set to true to display the available products
#
selection tree during a Custom install
# Valid values
: true, false
# Default value : false
# Mandatory
: No
#----------------------------------------------------------------------
SHOW_CUSTOM_TREE_PAGE=false
#----------------------------------------------------------------------
# Name
: SHOW_SUMMARY_PAGE
# Datatype
: Boolean
# Description
: Set to true to display the Summary page in the
#
installer
# Valid values
: true, false
# Default value : false
# Mandatory
: No
#----------------------------------------------------------------------
SHOW_SUMMARY_PAGE=false
#----------------------------------------------------------------------
# Name
: SHOW_INSTALL_PROGRESS_PAGE
# Datatype
: Boolean
# Description
: Set to true to show the install progress screen.
#
This screen shows detailed status of the
#
installation, which file is being copied, which link
#
action is being performed, etc.
It also shows
#
percentage complete.
# Valid values
: true, false
# Default value : true
# Mandatory
: Yes
#----------------------------------------------------------------------
SHOW_INSTALL_PROGRESS_PAGE=true
#----------------------------------------------------------------------
# Name
: SHOW_REQUIRED_CONFIG_TOOL_PAGE
# Datatype
: Boolean
# Description
: Set to true to display the status screen for
#
required configuration tools.
This screen shows the
#
status of each tool along with detailed information
#
in the event of tool failure.
# Valid values
: true, false
# Default value : true
# Mandatory
: Yes
#----------------------------------------------------------------------
SHOW_REQUIRED_CONFIG_TOOL_PAGE=true
#----------------------------------------------------------------------
# Name
: SHOW_OPTIONAL_CONFIG_TOOL_PAGE
# Datatype
: Boolean
# Description
: Set to true to display the optional configuration
#
tool page which allows you to launch optional
#
configuration tools and view details status,
#
including details on any failures.
# Valid values
: true, false
# Default value : false
# Mandatory
: No
#----------------------------------------------------------------------
SHOW_OPTIONAL_CONFIG_TOOL_PAGE=false
#----------------------------------------------------------------------
# Name
: SHOW_RELEASE_NOTES
# Datatype
: Boolean
# Description
: Set to true to show the release notes screen from
#
which Release Notes can be viewed.
NOTE, 8.1.6 does
#
not use any release notes so this will not be
#
relevant for an 8.1.6 install.
# Valid values
: true, false
# Default value : false
# Mandatory
: No
#----------------------------------------------------------------------
SHOW_RELEASE_NOTES=false
#----------------------------------------------------------------------
# Name
: SHOW_ROOTSH_CONFIRMATION
# Datatype
: Boolean
# Description
: Set to true to display the dialog which prompts the
#
user to run root.sh before a database is created.
#
If this is set to false, the root.sh script can be
#
run manually after installation, but the Database
#
Configuration Assistant may not have permissions to
#
update the oratab file if this is the first Oracle
#
installation on the machine.
# Valid values
: true, false
# Default value : true
# Mandatory
: No
#----------------------------------------------------------------------
//the root.sh script must be run during the
installation.
//It is the only part of the installation
that is not
//automated.
The root user must runt his script on each //host.
SHOW_ROOTSH_CONFIRMATION=true
#----------------------------------------------------------------------
# Name
: SHOW_END_SESSION_PAGE
# Datatype
: Boolean
# Description
: Set to true to display end session dialog. This
#
page shows whether the installation is successful.
# Valid values
: true, false
# Default value : false
# Mandatory
: No
#----------------------------------------------------------------------
SHOW_END_SESSION_PAGE=false
#----------------------------------------------------------------------
# Name
: SHOW_EXIT_CONFIRMATION
# Datatype
: Boolean
# Description
: Set to true to display dialog for confirming exit.
#
If set to false, installer will exit without
#
prompting.
# Valid values
: true, false
# Default value : false
# Mandatory
: No
#----------------------------------------------------------------------
SHOW_EXIT_CONFIRMATION=false
#----------------------------------------------------------------------
# Name
: NEXT_SESSION
# Datatype
: Boolean
# Description
: Set to true to allow users to go back to the File
#
Locations page for another installation. If this is
#
set to true, NEXT_SESSION_RESPONSE should be used to
#
indicate location of the second reponse file.
# Valid values
: true, false
# Default value : false
# Mandatory
: No
#----------------------------------------------------------------------
NEXT_SESSION=false
#----------------------------------------------------------------------
# Name
: NEXT_SESSION_ON_FAIL
# Datatype
: Boolean
# Description
: Set to true to allow users to go back to the File
#
Locations page for another installation even if the
#
first installation failed. This
flag is only
#
relevant if NEXT_SESSION is set to true.
# Valid values
: true, false
# Default value : false
# Mandatory
: No
#----------------------------------------------------------------------
NEXT_SESSION_ON_FAIL=false
#----------------------------------------------------------------------
# End of GENERAL SESSION section
#----------------------------------------------------------------------
#
# Oracle8i Client
#
//this part is for client installation
specific responses.
[oracle.client_8.1.7.0.0]
#----------------------------------------------------------------------
# Name
: INSTALL_TYPE
# Datatype
: String
# Description
: Type of installation for the Oracle8i Client
# Note
: DO NOT CHANGE THE DEFAULT VALUE.
#
To install using a different install type, use one of
#
the other response file
templates
# Mandatory
: Yes
# Example
: INSTALL_TYPE = "AppUser"
#----------------------------------------------------------------------
INSTALL_TYPE="AppUser"
#
# Net8 Configuration Assistant
#
//The Net8 Configuration assistant
automatically get run
//when the base install is done. Another response file is
//needed for this
[oracle.networking.netca_8.1.7.0.0]
#----------------------------------------------------------------------
# Name
: OPTIONAL_CONFIG_TOOLS
# Datatype
: StringList
# Description
: Specifying "netca" will launch the Net8 Configuration
#
Assistant configuration tool.
# Valid values
: {"netca"} or {}
# Example value : {"netca"}
# Default value : {"netca"}
# Mandatory
: No
#----------------------------------------------------------------------
//This is another response file which must be
edited to
//configure Net8
OPTIONAL_CONFIG_TOOLS={"netca"}
#----------------------------------------------------------------------
# Name
: s_responseFileName
# Datatype
: String
# Description
: This string contains the value of the -responseFile
#
argument for launching the Net8 Configuration
#
Assistant in silent mode. Use
the "netca.rsp"
#
response file template from the CD to customize
#
silent database creation. Set
the value of this
#
variable to your customized NetCA response file
# location.
# Valid values
: The full path to a customized NetCA response file
# based
on the netca.rsp template.
# Example value :
"/tmp/response/netca.rsp"
# Default value : None
# Mandatory
: Yes, for installs with the "-silent" flag
#----------------------------------------------------------------------
//this value is set to the location of the
Net8
//configuration file
s_responseFileName=”/orace/install/netca.rsp”
#----------------------------------------------------------------------
# Name
: b_launchNETCA
# Datatype
: Boolean
# Description
: This Boolean determines whether to launch the NetCA after
#
installation. To install Net8 without
launching the NetCA
#
at the end of the install, set this Boolean to false
# Valid values
: true or false
# Example value : true
# Default value : true
# Mandatory
: No
#----------------------------------------------------------------------
b_launchNETCA=true
That’s all there is
to configuring the clientappuser.rsp file.
It’s fairly simple, though a little long. Many of the responses don’t even need to be changed from the
defaults. Close inspection of the
comments I added to the file reveals that another response file must be edited
as well. When the installation process
has completed, the Net8 configuration assistant is launched. The next response file that must be
generated contains the responses for this application. A template for this file also resides in the
/response directory of the Oracle CD-ROM.
The response file follows here, in the same format as the last. Lines with no comment had no need for
alteration. It looks like this:
//This is the header of the file, it gives
the conventions
//for the file it’s self explanatory.
###############################################################
## Copyright(c) Oracle Corporation 1998. All rights
reserved.##
##
##
## Specify values for the variables listed below to
customize##
## your installation. ##
## ##
## Each variable is associated with a comment. The
comment ##
## identifies the variable type. ##
## ##
## Please specify the values in the following
format: ##
## ##
##
Type Example ##
##
String "Sample
Value" ##
##
Boolean True or False ##
## Number 1000 ##
##
StringList {"String value
1","String Value 2"} ##
## ##
###############################################################
[GENERAL]
RESPONSEFILE_VERSION="8.1.6"
CREATE_TYPE= "CUSTOM"
//I left these lines as is, they are used for
dialogs which
//aren’t important
[Session]
#ORACLE_HOME;String;Used in Dialog
ORACLE_HOME="d:\orahome81"
#ORACLE_HOME_NAME;String;Used in Dialog
ORACLE_HOME_NAME="zkleiman"
#TOPLEVEL_COMPONENT;StringList;Used in Dialog
TOPLEVEL_COMPONENT={"oracle.net.ca","8.1.6"}
#SHOW_COMPONENT_LOCATIONS_PAGE;Boolean;Used in
Dialog
SHOW_COMPONENT_LOCATIONS_PAGE=false
#SHOW_SUMMARY_PAGE;Boolean;Used in Dialog
SHOW_SUMMARY_PAGE=false
#SHOW_INSTALL_PROGRESS_PAGE;Boolean;Used in Dialog
SHOW_INSTALL_PROGRESS_PAGE=false
#SHOW_REQUIED_CONFIG_TOOL_PAGE;Boolean;Used in
Dialog
SHOW_REQUIED_CONFIG_TOOL_PAGE=false
#SHOW_OPTIONAL_CONFIG_TOOL_PAGE;Boolean;Used in
Dialog
SHOW_OPTIONAL_CONFIG_TOOL_PAGE=false
#SHOW_END_SESSION_PAGE;Boolean;Used in Dialog
SHOW_END_SESSION_PAGE=false
[oracle.net.ca]
//I changed this from the default to client,
because only
//clients are being installed
#INSTALLED_COMPONENTS;StringList;list of installed
components
# The possible values for installed components are:
#
"net8","server","client","aso",
"cman", "javavm"
INSTALLED_COMPONENTS={"client"}
#INSTALL_TYPE;String; type of install
# The possible values for install type are:
# "typical", "minimal" or
"custom"
INSTALL_TYPE=""typical""
//A typical install only needs one TNS
listener, so I
//changed this to reflect that
#LISTENER_NUMBER;Number;Number of Listeners
# A typical install sets one listener
LISTENER_NUMBER=1
//Since there was only one listener, we only
needed on
//listener name
#LISTENER_NAMES;StringList;list of listener names
# The values for listener are:
#
"LISTENER","LISTENER1","LISTENER2","LISTENER3",
...
# A typical install sets only "LISTENER"
LISTENER_NAMES={"LISTENER1"}
//TCP is the only protocol we are going to
use, and it
//connects on port 1521, so I changed this
line too.
#LISTENER_PROTOCOLS;StringList;list of listener
addresses (protocols and parameters separated by semicolons)
# The possible values for listener protocols are:
#
"TCP;1521","SPX;SERVICENAME","NMP;ORAPIPE","IPC;IPCKEY"
# A typical install sets only "TCP;1521"
LISTENER_PROTOCOLS={"TCP;1521”}
#LISTENER_START;String;name of the listener to
start, in double quotes
LISTENER_START=""LISTENER1""
//I wasn’t sure here, so I followed the
directions for a
//typical install
#NAMING_METHODS;StringList;list of naming methods
# The possible values for naming methods are:
# LDAP, TNSNAMES, ONAMES, HOSTNAME, NOVELL, NIS, DCE
# A typical install sets only:
"TNSNAMES","ONAMES","HOSTNAMES"
# or
"LDAP","TNSNAMES","ONAMES","HOSTNAMES"
for LDAP
NAMING_METHODS={"TNSNAMES","ONAMES","HOSTNAME"}
#NOVELL_NAMECONTEXT;String;Novell Directory Service
name context, in double quotes
# A typical install does not use this variable.
NOVELL_NAMECONTEXT =
""NAMCONTEXT""
#SUN_METAMAP;String; SUN meta map, in double quotes
# A typical install does not use this variable.
SUN_METAMAP = ""MAP""
#DCE_CELLNAME;String;DCE cell name, in double quotes
# A typical install does not use this variable.
DCE_CELLNAME = ""CELL""
//We only need one net device
#NSN_NUMBER;Number;Number of Listeners
# A typical install sets one net service name
NSN_NUMBER=1
//Again, I followed the directions for the
typical install
//here
#NSN_NAMES;StringList;list of Net Service names
# A typical install sets net service name to
"EXTPROC_CONNECTION_DATA"
NSN_NAMES={"EXTPROC_CONNECTION_DATA"}
//there’s only one device, so we only need
one name.
//”80” is used
#NSN_DBVERSION;StringList;list of NSN database
versions
# The possible values for database version are:
"80" and "81"
# A typical install sets database version to
"80"
NSN_DBVERSION={"80"}
//The service name set during installation is
orc0
#NSN_SERVICE_OR_SID;StringList;Oracle8i database's
service name (for Oracle8i database) or SID (for Oracle8 release 8.0 or Oracle7
database)
# A typical install sets Oracle8i database's service
name to "PLSExtProc"
NSN_SERVICE_OR_SID = {"orc0"}
//again, the only protocol we’re using is TCP
on port 1521
#NSN_PROTOCOLS;StringList;list of coma separated
strings of Net Service Name protocol parameters
# The possible values for net service name protocol
parameters are:
#"TCP;HOSTNAME;1521","NMP;COMPUTERNAME;ORAPIPE","SPX;SERVICENAME","IPC;IPCKEY"
# A typical install sets parameters to
"TCP;HOSTNAME;1521"
NSN_PROTOCOLS={"TCP;HOSTNAME;1521"}
And that’s the end of the netca.rsp file. It’s a little more confusing than the clientappuser.rsp file. This is mainly because it’s not formatted as nicely. Also, there are a few lines that are not used in every case. The lines containing information about SUN and CELL and some others are not important for our installation. These lines can safely be ignored, however.
OraInst.loc File
The next thing that needs to be done when installing using the silent method only needs to be done if this is the first time an install is being done on a host, and the install method is silent. When these are both true, the Universal Installer needs to know where to keep track of all the installed products on a machine. This is where the oraInst.loc file comes into play. This file contains two lines, one that is unspecified, and one that contains the path to the product index. The line must look like this:
inventory_loc=/oracle/inventory_dir
The part that reads inventory_dir must be replaced with the name of the product index directory. On our system, it is oraInventory. Therefore, on our system the line reads:
Inventory_loc=/oracle/oraInventory
This must be done on each host in the lab, but it can be automated with one of the scripts I will describe in the next section.
Scripts
As I mentioned previously, there are two scripts to be used in the installation process. The System Administrator Andrew Heuneman, with my help, created one. This script is called install.sh, and is located in the /oracle/install directory on Shakespeare. Lines beginning with comments added for this paper (not in the actual script) begin with //. It looks like this:
//use bash shell to do this stuff
#!/bin/bash
//create oracle directories
mkdir /oraclemkdir /oracle/install
//mount install files on Shakespeare to /oracle/install on the host
mount x:/oracle/install /oracle/install
cd /oracle/install
//copy oraInst file to /etc directory, and change permissions
cp oraInst.loc /etc
chmod 644 /etc/oraInst.loc
//send all display information to the machine “Fortinbras” in the lab
export DISPLAY=137.142.101.55:0
//this is the command that runs the universal installer in silent mode
su -c "/oracle/install/runInstaller [-silent] -responseFile /oracle/install/clientappuser.rsp" oracle
The next script to be used is the “auto install” script by Torrace, Lenny, and Mitzy. Full documentation on the script can be found here. I will not dissect this script, as all that is necessary to know about it is that it works. Passing this script the install script effectively automates the install process for every machine on the network with a singe command. Once this is completed, all that remains is to wait for each machine to display the dialog that tells the root user to run the root.sh script. After this, the rest of the installation completes, and the clients have all been successfully installed.
Current Status of the Lab
Currently in the lab the clients are not installed on the workstations. While the silent installation method worked fine on my test machines at home, I have been unable to replicate my success in the lab. The silent installation initiates, but I continuously get an error that says I do not have proper permissions to set the inventory. This leads me to believe that there is a problem either with users and groups on the clients, or that the oraInst.loc file is corrupt in some way. While this is dismaying, I believe it is a problem which is possible to fix and most likely will be done before the end of the semester. On the positive side, however, the server is installed and configured. Pre-existing windows clients have been able to connect to databases, so we know it works. The tasks that remain, aside from finishing the client installations, seem to be beyond my ability to perform. The lab needs a database administrator who has the knowledge and experience to configure the system in order to gain maximum performance and efficiency from this powerful application. This is, unfortunately, beyond my current ability.