When confronted with mysterious ignition problems, it can be very helpful if you can verify the strength of the spark. Holding the sparkplug-wire a couple of millimeters from the crankcase, while jumping on the kickstarter is not a very conclusive procedure. It is imprecise and not repeatable. It is much better to rig up a "three point spark tester".
You can make this tester from three lengths of brass M3 stud for the electrodes. Make also three brass pillars, into which you screw these studs. Then arrange the electrodes on a piece of insulation board. The sparkplugcap is connected to the fixed electrode. The adjustable electrode is connected to ground and the ionization electrode is loose, and is only there to get more precise results. Its point should be very close to, but not touching the fixed electrode’s point. Screw out the adjustable electrode with little increments at a time, until you stop getting sparks when jumping on the kickstarter. A /2 magneto should be able to jump about 8mm gap or more on this instrument.
![]()
When you do resistance measurements on a /2 coil, you might be surprised that you don’t find any connection between the secondary coil output and ground. In all my textbooks you only find diagrams of magnetos with a single output. In these the secondary coil has one lead connected to the sparkplug, the other to ground or the primary coil which is in practice almost the same (20-kV doesn't recognize a +/- 6-Volt difference). Not so on the boxer twins. After I dismantled an old defective coil, I found this diagram:
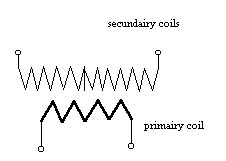
So with a resistance meter, you find a very low resistance between primary coil input and ground, several hundred kiloOhms between the two secondary outputs, and infinite in-between all other points.
This arrangement has a weird influence on the polarity of the sparkplug. Normally, electrons flow from the coil to the sparkplug central electrode, jump to the ground electrode (spark), flow through the crankcase metal to the other sparkplug ground electrode, jump again to that central electrode (spark in the exhaust stroke), and back to the coil, now on the other terminal. Now if you attach the magnet 180 degrees around, OR you exchange the spark plug wires, the electrons flow in the other direction. There is no easy way to detect this, and it could mean more difficult starting when it is very cold and wet.
![]()
Another little coil detail that is very important for its health. Below the two secondary coil terminals, you see small metal pointers. The distance between these pointers and the terminals should be 10 - 11 mm. This "safety gap" is there to allow the spark to jump, when it can't jump elsewhere (i.e. a loose sparkplug cap). If the spark can't jump over somewhere, it will try to jump through the coil insulation, and that is not good of course.
![]()
A standard coil failure is overheating. The coil is placed on quite a hot spot. And that heat deteriorates the coil-insulation. When it gets too weak, the coil will develop an internal short when hot. As soon as it cools down, it works again. A typical situation: You ride in stop and go traffic. Suddenly the engine dies. You try everything to start it again. You kick it and you curse it, and in the mean time the coil cools down. Suddenly it starts again, and you ride it a little while, until it gets hot again, etc. Only a new coil can cure this failure, but the same symptoms can be caused by a bad capacitor too.
BMW has provided a ventilation system for the electric’s though. Air is pulled from the gap at the lower end of the front engine cover, over the electric’s, through the topchannels of the crankcase, through that little meshwire filter to the carbs. The vacuum of the carbs cause the ventilation air to flow. So it is important to keep that small meshwire clean and lightly oiled.
![]()
The ignition points are real wear items. They get burned, get contaminated with oil and grease and the little cam follower wears down. So it is important to use a good capacitor to prevent sparks, exchange leaking engine oil seals, not to use oil or too much grease on the felt greasing pad, and making sure that the points are toughing square and parallel when you install a new set. Especially the Asian replacements for the original, now extinct, Bosch points, need quite a bit of bending to get them right. A points file is only a tool to get you home. When the points are filed or grinded, they usually turn bad again in no time.
![]()
A difficult to find ignition failure is a weak ignition-lock spring. On the boxers this is usually no concern. The ignition spike that you push into the lock opens two contacts that shunted the primary winding previously. But on the single BMW's (R20-R27), this same contact closes and makes sure that the 6-V battery voltage is connected to the ignition system. Now if the spring is weak, or the contacts are too far apart, this connection can start to vibrate with a stuttering ignition as a result.
![]()
Mention of the singles brings me to an error that only catches them who really care about their bike. If you take apart the centrifugal advance of a single to clean and grease the weights, you can accidentally assemble the cam 180 degrees around. If you then try to start the engine, the sparks will occur in the end of the exhaust stroke, when they won't do any harm, but not any good either. If you have jumped 20 times or so on the kickstarter, there will be enough gas in the cylinder, and the starter kicks back violently. That is not nice for your leg.
![]()
The centrifugal advance unit is another typical wear item. And not a cheap one. Not only the pivot points of the weights wear out. On the boxers the unit has two ignition cams, 180 degrees apart. On a new unit, these cams are nicely symmetrical, but they wear uneven. When you use a stroboscope to time the ignition, you see two S-marks jumping around in the inspection window. When they are particularly far apart, you probably need a new centrifugal advance. Other, but less plausible reasons could be a bent camshaft taper, grit between the magnet and the camshaft or a bent magnetshaft to which the advance is mounted.
![]()
Sometimes you might want to know, how wide the ignition inspection hole in the crankcase is. For example, BMW defines a maximum ignition point deviation between the two cylinders of 2 degrees. It would be nice if you can correlate this to the size of the inspection window. The boxers have a 22 cm flywheel and a 16 mm window. That is approx. 8 degrees. The singles have an 18 cm flywheel and also a 16 mm window, thus about 10 degrees.
![]()
The BMW workshop manual is particularly vague about how you time the ignition. On one point they state that you should setup the magneto carefully to get the right abrisz. At another point they say that you must turn around the whole magneto body for setting the advance. That way you upset your abrisz point again, which will make starting the bike more difficult. Luckily Bosch knew better how to set the ignition timing. When you remove the advance unit, you will see thet the points are installed on a seperate plate. That plate is screwed with two M3 screws onto the body. The holes are slotted, so you can move the plate around, thus setting the ignition timing. The only drawback is that you must remove the advance unit every time, when you want to set the timing. So setting the timing is a matter of measuring, removing the advance unit, adjusting the points plate, remount the advance, measure etc. A bit cumbersome but not difficult. It works the same on the singles R25-R27.
![]()
The R68/R69 is a little bit different. Because of their tremendous high compression ratio (1:8), they were prone to pinging when you only could find poor petrol. On these sports bikes BMW didn't want to compromise, so they put an extra manual advance lever on the handlebar. With this lever you could retard the ignition 10 degrees, enough to avoid the pinging on low octane fuel. The static timing was 12 degrees BTDC with the lever fully advanced. This resulted in an ignition timing between 2 degrees BTDC (lever fully retarded, centrifugal advance at rest) and 42 degrees BTDC (lever fully advanced, centrifugal advance fully open).

The magneto is a little bit different. Again the points are mounted on an extra plate. This plate can be rotated. The plate has an extra brace sticking out to the left. To this brace the bowden cable of the manual advance is attached, with a big spring to keep it fully advanced. The free play of the bowden cable is adjustable at the cablecover side. The rotation angle at which full advance is reached is adjustable with a clamping screw near the brace.
Setting the ignition timing of these magnetos is different then the other /2's. My method goes like this. Place the ignition points plate in the mostly advanced position, with the lever fully advanced. This you do with the clamp screw, I mentioned above, turned loose. The big spring will push the brace down. Now start the engine and let it idle. Point the beam of your stroboscope at the inspection window and you will see the S-mark somewhere in the corner. Now grap your manual advance lever and turn until the S-mark moves into the middle. Now quit the engine, turn the clamp screw tight, and you are done.