Question:
I want a sidecarhack, and someone told me to get a /2 frame and put a new BMW boxer engine in it. What is involved in this?
Answer:
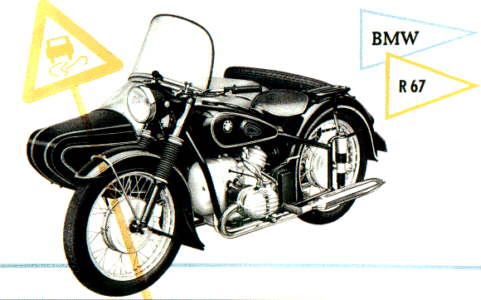
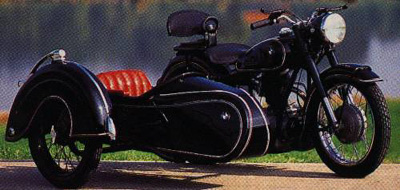
The /2 series bikes were factory aproved sidecar machines, as opposed to all the post '69 BMW's. The frame is very sturdy and has standard attachement points for a sidecar. You only need a special front engine bolt and two upper bolts, together with the sidecar and it's attatchement hardware. The necesary holes are already available. The Earless front fork is also a plus, because ity is very strong, and because you can change the steering dynamics for sidecar usage. In the fifties and sixties, you could buy a complete outfit, consisting of a R60(/2) with a Spezial sidecar. The latter actually was a Steib TR500 with BMW logo's. Or you could buy the R26/R27 with a Standard, being a Steib LS200 with BMW logo's. Other popular sidecar's were the Steib S350, S250, S500 and S501, The Danish Bender and the Dutch Hollandia.
Nowadays you see a lot of /2's with an Ural or Dnepr sidecar. This is a copy of the military Steib sidecar. Sometimes you also see the Tsjechian Velorex or the ex Eastern Germany Elastic. (IMHO not so attractive) /2's with an old Steib or a Dnepr sidecar are a beautifull sight, but are not very powerfull. The R60/2 with sidecar has a topspeed of 110 km/h. In modern trafic a bit low maybe. And because it is relatively easy to exchange the engine for a post '69 boxer engine, this is common practice. So you can put a R75/x or a R90/6 engine in there and get a lot more power. But be aware, don't overdo this because a real high speed sidecar outfit needs a lot more modifications, like stronger brakes and lower wheels for better stability.
David Makin sended me this article about what you can expect when swapping engines:
This article summarizes experience in building two old frame/new motor "conversions". One is an R50/2, rebuilt with an R75/7 powerplant and fitted with a large Bender sidecar. The other is a 1966 R69S, fitted with the engine from an R90/6 but a four-speed gearbox from a /5. Basically we transplanted the modern engines complete with carbs and exhaust, gearbox, drive shaft, cables, hand controls, and instruments into the /2 chassis. Building the conversions was aided by the availability of an empty /7 crankcase, and a spare gearbox. Thus, I was able to offer up a lightweight drive train to the /2 frame without a lot of effort to test assemble. Here's the modifications required to the /2 frame to fit a /5/6/7 engine/gearbox:
-- trim the sidestand bracket so that it presents a smooth face on the inside
--shorten rear tank mount about 3/4"
--reweld the triangular frame gusset at the V of the top rear frame tubes under the seat about 3/8 of an inch higher up the tubes, so that the air box can be fitted. [There is evidently some considerable variation in /2 frames; we've since learned that other conversions have required spreading the frame to accept the motor, and dimpling the frame to clear the oil filter plate.]
With these modifications the engine can be installed less timing coverand starter cover which have to be fitted after the main lump is in. With the engine in place, the gearbox can be installed in the normal way.
At this point two more major tasks remain: the Earles fork, which may hit the timing cover, and the fact that the drive shaft was shy of the output flange by about 1/4 inch. To deal with the easy part first, we took the /2 drive shafts out of the /2 swing arm, and replaced it with /6 /7 shafts. The later drive shaft is about 5 or 6 mm longer, but the /6/7 "bell" has to be turned down to match the /2. You cannot use a /5 drive shaft and bell; there isn't enough metal in the bell to allow sufficient machining.
At the front, the lower brace between the legs of the Earles fork hit the timing cover. Interference apparently depends on what fork you are using; the R69S fork, for example, had a flatter tube in this spot to clear the harmonic damper. With a non-ventilated /5 timing cover, the fork just cleared -- but not with enough room for safety. The '63 R50 with a /7 engine had about 3/16 of negative clearance. This was reduced to 1/16 simply by filing the ribs off the front of the /7 timing cover. To make things fit, an eliptical slice of tube was hacksawed from the fork brace. The opened-up tube was filed to a smooth curve, and test-fitted to the frame with the timing cover in place. Once the desired curve was attained, 1/8" mild steel was MIG welded over the hole, shaping it very carefully to exactly match the tube.
At this point, the engine/gearbox is in place, the drive shaft installed, and the front fork back on. Take the opportunity to put tapered roller bearings in the steering head; this is a bit awkward, as the outer race is a tight fit, but it is worthwhile (I had no problems with this. Kees). Now, you face all the really fiddly bits which take almost as long as the big job of engine, gearbox, drive shaft and fork. After much experimenting, two Dyna 6-volt twin-lead coils required for the 750's twin-plug heads were fitted under the tank between the top tubes. The voltage regulator and the starter relay also fit under the tank; careful routing of the original /7 wiring harness allowed all stock connectors to be used. There is adeqate room for a single two-lead coil, but not for the stock large twin 6v coils.
To fit the large /7 headlight, the /2 headlight mounts were removed, and the mounting holes enlarged by the simple expedient of removing the rubber grommets. New rubber pads were made to go between the mounting ears and the fork, and by leaving the rubber grommets out enough width was gained for the complete /7 headlight. However, the left hand mounting ear had to be modified so that the very large /7 ignition key/mounting bolt could be installed. The /7 instrument panel mounts nicely to the /2 top fork yoke, since the spacing between the handlebar mounts is the same. The rear portion of the instrument mount was simply trimmed off, and the instruments mounted without any rubber bushings. Much more simply, a /5 headlight including the instruments goes right in, or the /2 headlight, with a change in bulbs and some rewiring, could be used. Both would be more "period" and might be preferred by some.
At the rear the /2 wiring harness can be used for the tail light, splicing the wiring to the /7 main harness plug for stop, tail, turn and ground.
Finding a suitable battery and developing a battery tray takes some time. Originally a battery tray was made to bolt to the original tray mounts at the rear and to the bottom of the seat bracket at the front, offset to the left away from the drive shaft housing. There was then just enough room to install a YBL-14A 12 volt battery. Later, a Mk II version was made, somewhat simpler, that holds the battery in a central position.and is much tidier although the clearances are very tight. The small battery has presented no problems so far; next time we'll seek out a taller ATV battery which we're told is a better fit and holds more acid.
The /5/6/7 exhaust pipes with extensions mate up to a pair of R69S stainless mufflers. A complete purpose-made stainless exhaust pipe and muffler set is available for these conversions from EPCO, which would be better still. EPCO also makes a long-inlet muffler which allows use of the cheaper stock pipes shortened to suit.
How does it all work? Very well, but the brakes, remember, aren't up to current standards. However, the styling and sidecar capability of these frames is very attractive, particularly with the modern powerplant and 12 volt electrics.
Several MOA articles provided valuable research including August 1982, September 1982, November 1982, March 1983, and July 1991.
Question:
How should I attach a sidecar to my /2 BMW?
Answer:
This is an abstract from the official BMW workshop manual. Do anything you think is practical. For example, it's not very necessary to use the sidecar gearbox.
The subsequent modification of a solo motorcycle to accomodate a sidecar involves a number of technical changes wich in every case should be reserved for a special BMW garage [sic]..
1 Replace the bevel gear setin the rear axle drive. 4.33:1 for the R50 and 3.86:1 for the R60.
2 Exchange the transmision against another with sidecar ratio. (R50 and R60).
3 Install modified speedometer with ratio for sidecar operation.
4 Equip front and rear suspension with thicker springs. Set the swinging arm bearing on the front fork in the forward location on the fork. And the front wheel upper suspension mounting into the lower position of the fork.
5 Exchange brakelever without stop screw to one with a screwscrew. Srew in the stopscrew until a noticable braking effect is obtained, the back of until wheel just runs freely, and tighten the lock nut.
6 It is advisable to exchange the 25.6" solo handlebar against a 28" sidecar handlebar. In this case also use the longer control cables.
7 Exchange the wheels with lightmetal rims against wheels with steel rims. 2.15Bx18 front with 3.50-18 tire and 2.75Cx18 rear with 4.00-18 tire.
8 Replace the front engine mounting bolt by the ball pin to be suplied by BMW. For this it is necessary to remove the bushing in the right hand frame eye. The new bolt is supplied with a castellated nut, which must be secured with a cotter pin after tightening. Install the two eyebolts into the provided eyes on the right side front and rear. Remove the paint from contact surfaces for the eyebolts and tighten the nuts with 54 ft/lbs.
9 Remove the blinker light from right handlebar end. Disconnect lead from terminal K2(R) of the blinker unit and on its place connect the new lead for the blinker light on the sidecar fender. Seal opening in the handlebar with a suitable plug.
// Everything about the hydraulic sidecar brakes deleted //
When attaching the sidecar to the motorcycle, start with the under attachment points. Rock the motorcycle repeatedly sidewise to insure a perfect seat of the ball joints. Then attach the upper parts and take care to avoid any tension in the attachment points.
Recommended sidecar dimensions:
Toe-in 1.2" to 1.6"
Camber 3/8" to 7/16" with motorcycle and sidecar occupied.
The sidecar brake should take hold after the rear wheel brake has already begun to grip. In general, the total braking action of the front and rear wheel brakes of the motorcycle should be so proportioned to that of the sidecar that the vehicle always tracks well, irrespective of the load, when the brakes are applied.
The electric jack for connetion of the sidecar lighting is situated under the seat on the cross brace of the frame. The jack is energized as the light on the headlamp is switched on.