SHIM JOB
This is the most important, difficult and time consuming part of all. With the correct shim thicknesses you make sure that the gearwheels are properly contacting each other. Again, look in the workshop manual for the precise procedure. Here are some tips to help the amateur along. When you feel insecure about the whole business, or you don't have the proper tools, it is not a shame to bring it to a BMW mechanic. But when you get it back, I would pull the cover off and make a quick tooth contact patern check, just to be sure.
A note on orientation: You can position the pinion to the front and to the back, which means to the front and the back of the motorbike when the rearwheeldrive is installed
First, what shims should you buy? Hugget and Rabenbauer offer complete sets of shims with a small discount. That looks expensive at first, but you might end up with an almost complete set anyhow, when you are finished. The pinion shim is the only one where you have a chance of guessing the right size. According to H.J Mai in "1000 tricks fuer schnelle BMW's" the number that is printed on the gears indicates the size of this shim. So a +10 means a 0.10 mm shim between the bearing outerrace and the casing. BMW tells you to compare the number on the old gearset with the new set. Take the difference in account when you calcuate the shim. Now order the shim you just calculated and one size smaller and one size larger. There are also two shimsizes available that can be mounted between the bearings innerrace and the pinion shaft for negative numbers.
The bronce shim on the crown wheel is more difficult to guess. But you might be able to determine if it needs to be larger or smaller then the shim that was available, and then order all the sizes on that side of the spectrum. You can also make your own on a lathe when you have altered fosfor bronce in this size available. The shims that go under the large crownwheel ball bearing are virtually impossible to guess. So order a complete set of these.
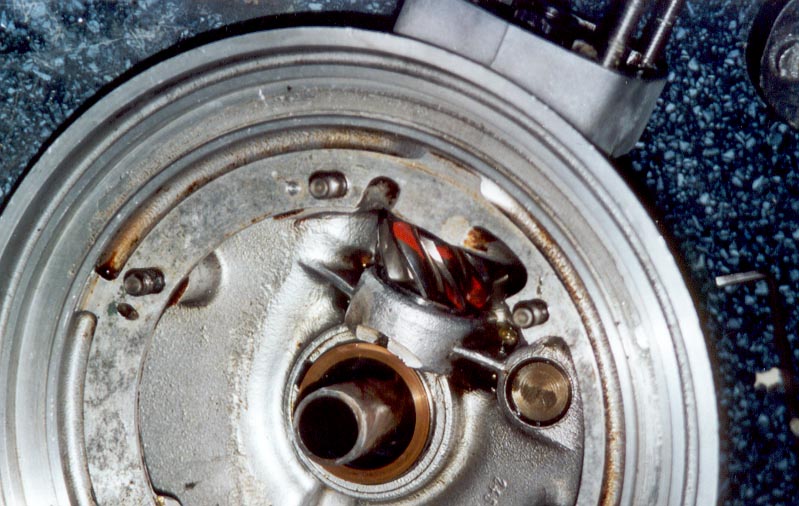
When I made a tooth contact pattern check on the old gearset, I found this. This is obviously very wrong. When I removed the pinion from the casing, I found a 1.2 mm shim, while the number on the gearset was +25. There were very obvious surface cracks on the corners of the teeth where those patterns are. Nonetheless it was still running quiet.
BTW, this was the only part that I didn't dismantle when I restored the bike. That was pretty stupid of course. When you restore a wreck, it is of no use to assume that anything is correct.
For the pattern check I used simple oil based household paint with some thinner. Smear it in a very thin layer on both sides of two or three teeth of the crownwheel. Then turn the pinion once in the normal direction, and turn it backwards, so you get patterns on both sides of the pinion teeth. When the patterns on both sides of the tooth are spread apart as in this picture, it means that the pinion position is incorrect. According to the theory you will find both patterns on either the frontside or the backside of the piniontooth, when the crownwheel position is incorrect, but in my experiments I couldn't confirm this. It's easier to check the crownwheel position with the toothplay.
For a Klingenberg gearset, as used in most BMW rearwheel drives, the pattern should be in the middle of the tooth, maybe with a slight bias to the front, but definately not touching the edge at the back. I know that the sidecar gears of the R25 use Gleason gears. You can see the difference in the shape of the pinion teeth. Klingenberg has a tooth that is wider in the front and narrower to the back. The Gleason teeth are the same width front and back. A good pattern looks like this:
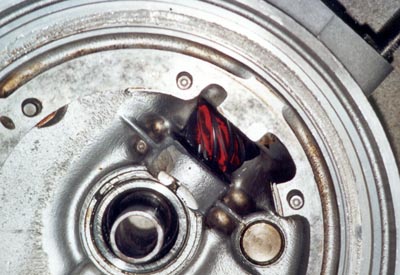
I did use a bit too much paint in this picture, wich makes it less conclusive. With a thin smear, it is very obvious what is good and wrong.
The paint is easilly washed off with some petrol. You must probably make several patern checks before everything is correct. I also make one final check, when everything is ready, just before I mount the drive on the bike. In that case, the crownwheel with bearing and oilseal is installed in the right position in the cover. You can now pull the cover and reinstall it whithout heating. Because I had troubles with the threads of the large pinion clamping ring, I got very confusing results, but when the threads were restored, it proved to be a very straightforward affair.
The next shim is the bronce ring between the crownwheel and the needlebearing. It is not just a shim, but also acts as an axial load bearing. The correct thickness is determined via the toothplay. To meassure the toothplay I use this setup:
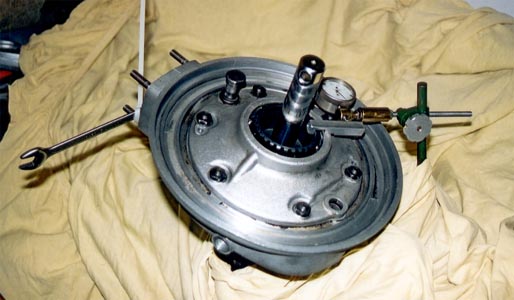
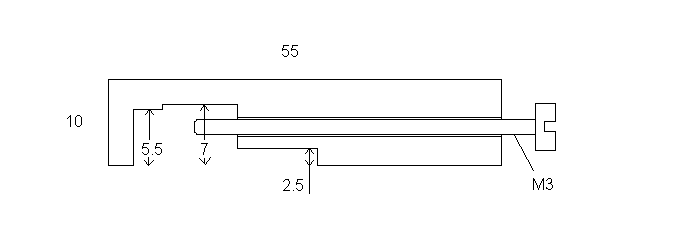
The wheelaxle, combined with a steel tube of 20 mm inner diameter (the same as used to press the pinion ball bearing) is used to clamp the rearwheel drive in a vice. The pinion is blocked by mounting a 14mm ring spanner on the pinion shaft and then tying the spanner to one of the studs. To meassure the crownwheel movement, I made a simple aluminium adapter that clamps on the wheel splines. Now you can meassure the toothplay. It should be between 0.15 and 0.20 mm, when meassured at the outerdiameter of the crownwheel. In this picture the casing is closed, but you can also meassure with the cover removed. Anyway, you should be sure that the crownwheel is resting on the bronce ring and the casing is not hot. Here are the dimensions of my clamping adapter:
When you have all the available bronce shims, you probably still haven't enough. Those shims come in steps of 0.1 mm, while the toothplay has only a variation of 0.05 mm. And I was under the impression, that changing the shimheight by 0.1 mm was changing the toothplay about 0.15mm. You you will probably need to grind a shim down to the right size. You do this with some fine emerypaper on a glassplate. Check regularly with a micrometer that you are keeping both sides parallel. Check often, because bronce grinds down surprisingly fast. Clean the shim before you put it back in the rearwheel drive, you don't want silicone carbide in there.
The last shim is the shim under the large ball bearing of the crown wheel, that regulates the axial play of the crownwheel in the casing. This play should be about 0.05 mm, a very little bit. The workshopmanual describes how you can meassure this with a depthgauge and two prisms. But even when you have those meassuring tools, it won't be easy. A vernierscale, like on those depth gauges has an accuracy of 0.05mm (+/- 0.025 mm). You must make two meassurements and subtract these from each other. With a little bit of bad luck you are 0.05 mm out. I don't have those tools, so I went for a trial and error method.
I removed the pinion, so it wouldn't interfere with the crownwheel. Then I choose a rather thick shim and mounted the crown wheel + bearing + shim + gasket in the cover and pressed it all the way in, until the cover had cooled off. Now I mounted the cover on the casing, feeling all the time if the crownwheel still turns. When it binds, you can play with different sizes of bronce rings or large bearing shims, until it just turn, with all the screws tightened. Now you have zero play. It's not so easy, becasue there is a gradual scale between tight and just turning. Anyway, you should end up with the correct bronce shim and a large bearing shim that allow free rotation of the crownwheel, while a combination of shims that are together just 0.05 mm thicker results in slightly tight rotation.
You probably need a shim that is again not in the normal series. You can't grind these, becaus they are too large and thin. You must stack two shims of smaller sizes, until you get at the right combination. For this, you need to know exactly how thick they are. The advertised sizes are just an approximation, and you must meassure them with a micrometer. But these shims have a burr, you can feel it with a fingernail, that interferes with the meassurement. You can use an accurate steel ball (from a ball bearing) to help you:
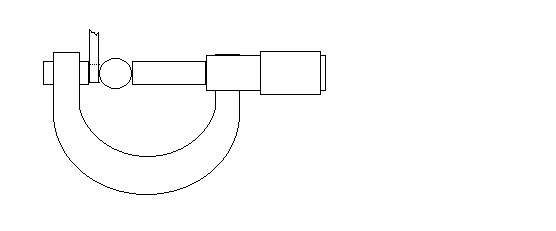
The burr isn't a problem when you install the shims, because there is room enough. When you think you have all the correct shimsizes, make a last contact pattern check and toothplay meassurement, with everything installed, exept the oilseals, just to be sure.