ASSEMBLY AND DISSASSEMBLY
The workshop manual explains very well how to work on the reardrive. But here are some extra tips.
After removing the cover from the casing, I first make a tooth contact pattern check on the old gears for two reasons. First it doesn't harm to get some practice. Second, you need to know if it was correct in the first place. When choosing shims, the manual tells you to compare the numbers printed on the old and the new gearset. but when it was completely wrong to begin with, that doesn't make sence anymore.
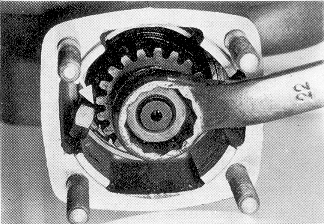
The nut on the pinionshaft is very tight, so you need a special tool to keep it from rotating. A usefull trick from "1000 tricks fuer schnelle BMW's" is shown in this picture.

As usuall on the BMW, everything is a tight fit. So, in case of doubt, heat helps.
As you can see in this picture, it doesn't need to be high tech. You can also see that you can work almost anywhere, although you do need a stable and clean worktable.
Heat is good, but watch out with heating bearings directly. They are easilly overheated, which reduces the steels hardness.
To remove the large needle bearing for the crown wheel, heat the case and hold it upside down, it just falls out. The small bearing of the pinion has a tighter fit. Here it helps to strike the casing on a block of wood after heating. The shock will free it.
You need a special tool to unscrew the large pinion clamping ring. I made one from a suitable piece of steel tube. Normally it has four studs of 6x6 mm, but in my case the ring was butchered into a custom shape. So I had to make a custom shaped tool. When it is very tight, heat helps again.
The bearings from the crown wheel are easilly removed, just follow the manual. The pinion bearings are more difficult though. The double ball bearing can be pulled of with a standard bearing puller if you want to use a new one. But when you want to reuse it, you must somehow let the puller only act on the inside bearing race. I managed by cutting a suitable flat ring into an U shape. But even then I had to clamp the puller in a vice to prevent the legs from spreading out. I didn't manage to remove the inner race of the pinion's needle bearing. So I bought a new bearing instead.
I mounted the bearings with the 10 ton press of our local garage. That is a lot safer, easier and quicker then bodging with amateur tools. You can use suitable sockets as press tools, only for the double ball bearing you need a stout steel tube with 20 mm inside diameter.
When you are mounting the bearings, make absolutely sure that they are perfectly seated. No dirt should be catched in between. Also make sure that the large screwthread of the ring that clamps down the pinion is still intact. In my case it worked alright, until it catched on some irregularity, stopping about 1 mm from the double ball bearing. It took some time before I understood what was wrong, in the mean time throwing up my shim job, because of the inconsistent postion of the pinion. That nearly drove me mad.
When installing the cover on the casing, the manual says to heat it first, so that it slides over the large crownwheel bearing when you tighten down the six screws. But apart from the bearing recess, the cover also has a centering ring that fits easilly in the case opening. But now the cover is hot and the case is cold, so it binds during installing. Thus it takes longer and before the cover is fully seated it cools enough to grip the bearing and clamp it very tight while you tighten the screws. That is not healty for a bearing. I see three solutions. Keep the cover hot while mounting with a butane burner. Or heat the case together with the cover. But I choose to mount the crownwheel first in the cover, using heat to let it slide in. While it cools of, I press it down with my thumbs to make sure that the shim(s) are fully flatened. Then I mount the cover plus crownwheel in the casing. Finally I heat the whole assembly again, until I can press on the crownwheel with my hands to let it seat in its normal position.
Wait with mounting the oilseals until you are completely ready with the shimming job. They are easilly damaged and they hinder when you are feeling for the tooth play.
On assembly you need something to protect the oilseal from the wheeldrive splines. A very good tip from the Rabenbauer website is to cut an empty Coke can in two halves. It has the perfect diameter and taper. Cut it with normal scissors and dress the edge until it is smooth. Oil the seals well when installing.
According to Rabenbauer's website again, the pinion oil seal should be mounted with the open end facing out, towards the driveshaft. This is also visable on those beautifull drawings that show the cardandrive with cutouts to demonstrate the innards. It was not visable in the parts diagram or the workshop manual. When mounted this way it prevents oil migrating from the driveshaft to the rearwheeldrive. Other leaks are probable along the threads of that large clampring and along the splines of the driveshaft coupling. Use some sealant to prevent this.