FIG. #1
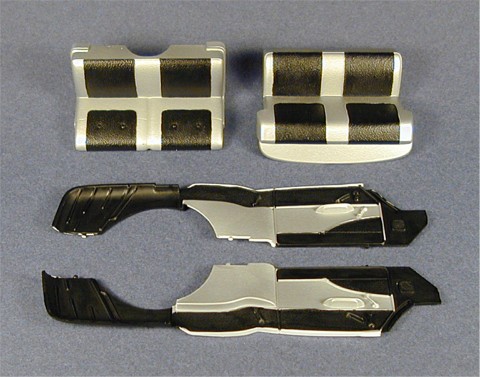
FIG. #2
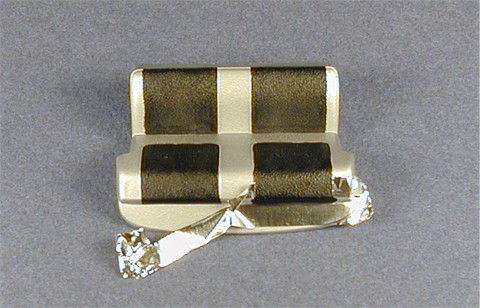
FIG. #3
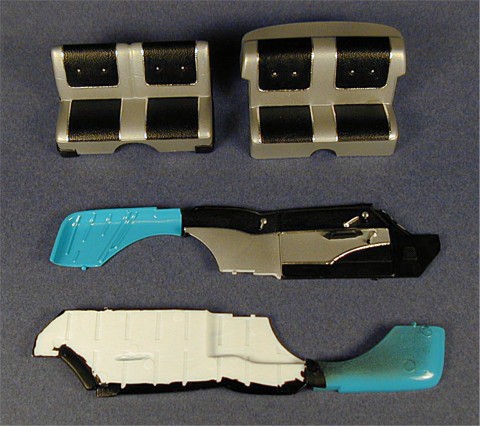
FIG. #4
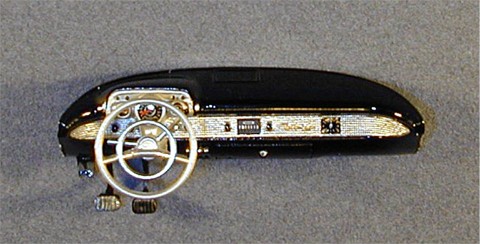
FIG. #5
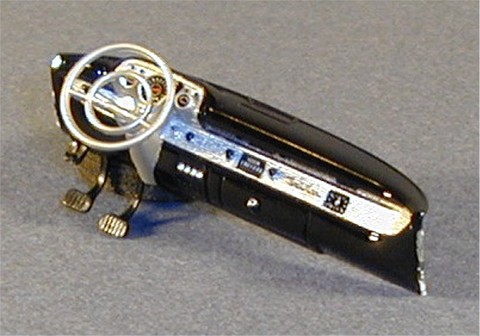
FIG. #6
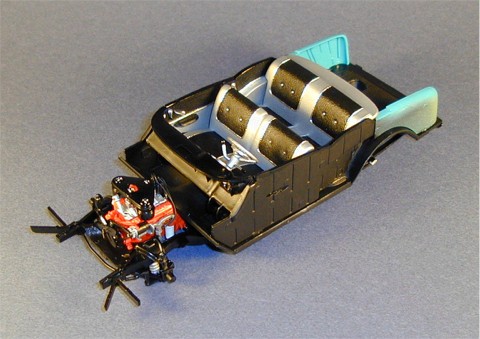
FIG. #7
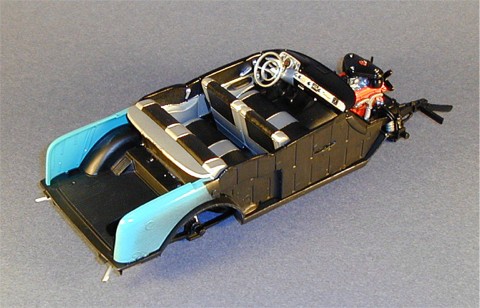
FIG. #8
The interior on my Turquoise/Ivory Chevy will be Silver & Black, an interior combination that, along with Ivory & Silver, can be considered acceptable no matter what the exterior color of the car is. The rest of the interior combinations are more color keyed to match or accent the exterior color of the car. For the Silver, Model Master Silver Chrome Trim would not be a good choice as it is too shiny. I ended up using some MCW '63 Chevrolet Satin Silver lacquer because it seemed to be a good balance of what the interior color appeared to look like. Not too metallic, not too dull. If I was using a hobby paint I would use a regular Silver paint, not the Chrome Silver type. Another advantage of using lacquer comes later on when I'm painting the Black with enamel paint. If I make a mistake the enamel can be removed easily from the surface without damaging the lacquer and requiring the Silver to be touched up or repainted.
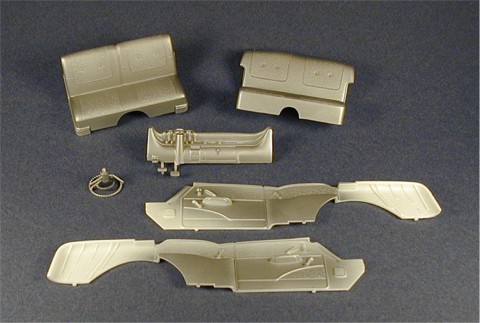
Remove all of the parts listed in Step 5. The front seat (# 54) has the most apparent mold lines to be removed. I used a flat riffler file to remove the mold line at the top back edge close to where it joins part # 55 and sanded down the heavy mold lines on the sides of the seat with coarse, medium, then fine sanding sticks. Do the same sanding on the sides of the rear seat (# 55). Remove mold lines from the steering wheel (# 60), steering column and stalks (#59), and the parking brake handle (# 96). Check all pieces for flash, wash them in soapy water, rinse, then dry thoroughly. I chose to assemble the front seat (parts #54, 55, 56 & 57) to paint it as one unit.
First off, the areas marked "X" on the instructions for the trunk areas of the interior side panels (#51 & 52) should be painted the exterior body color. I initially didn't observe this until I had the side panels painted and trimmed with metal foil. I backtracked and masked those areas off then corrected my mistake. You get to read this and learn from my mistake so you get to do it the right way. Paint these areas first before proceeding with the interior color applications.
I painted the seats, interior side panels (# 51 & 52), steering wheel and column, and the dashboard gauge area (# 58) much the same way as I painted the wheels in the previous lesson - by skipping the primer and fogging the Silver lacquer onto the pieces gradually building up the color. I sprayed 4 light mist coats followed by a slightly heavier mist coat all in one step. In this instance Silver is my primary interior color. Spray your primary color, whatever it may be, completely covering the steering wheel and column, all of both seats, the center sections of the side panel pieces, and the gauge area and column of the dashboard piece (Figure # 1). After about 15 minutes the pieces were dry enough to handle. If you're spraying with hobby enamels adjust your painting method and drying time accordingly.
Next I painted the seat insert areas and the interior side panels with Model Master Black Chrome Trim (Figure # 2 - notice I left the top edge of the interior side panels unpainted to illustrate where these will later be painted Gloss Black). Since almost all of the surfaces are textured I hand painted these without worry of brush stroke lines showing. I also was able to paint everything free hand with the exception of the rear seat package shelf. This I masked with a strip of Bare Metal Foil before painting (Figure # 3 - shown with foil mask pulled off half way). Use the raised trim lines on the panels and seats as guides for painting and don't be overly concerned with maintaining a perfectly straight line because we will be covering these molded in trim lines with Bare Metal Foil later. The only real tricky spot is on the lower half of the seats where the trim lines aren't really molded on at all. Take your time and paint the area borderlines as straight as possible. You may want to mask the edge where the seat bottoms and seat backs meet to get a clean straight line there.
Once the paint was dry I broke out my Bare Metal Foil and a sharp #11 X-Acto blade. This was a step where a lot of patience and care was needed for two reasons - first, metal foil sticks much better to smooth, glossy surfaces, which this isn't. Second, the foil strips to be cut are very thin and delicate. I applied the foil to the trim areas by pressing it down with my finger then burnishing it down around the trim with a toothpick. Next I carefully cut along the mold lines of the trim with the sharp blade using very little pressure making sure to complete and connect all my cuts. I carefully lifted the cut foil away from the trim watching for areas still connected where I missed a cut. When I found any I rubbed the piece back down onto the surface and sliced it before continuing. Once the scrap foil was removed, I pressed the foil trim down on the trim mold lines to make sure any areas that may have been lifted by removing the scrap foil were laying down. DO NOT RUB THIS DOWN WITH YOUR FINGER!!! It's not stuck onto the surface very well so you'll probably rub it right off. Just press it down. Once I had all the foil trim pieces on I used a size 20/0 sable hair brush to lightly apply some Clear Gloss paint over the foil, mostly over the ends, to help stick it down to the surface. I repeated these steps with the two molded trim lines on each of the interior side panels. Be careful not to brush the gloss onto any painted surfaces, try to only cover the chrome foil. This work was a little tedious and precise but the results add a tremendous amount of detail to the interior.
Enough with the chrome foil for me. If you want to continue and foil the door handles and window cranks then go ahead. On my interior panels the foil was not sticking at all, making it very difficult to trim the foil cleanly. I opted to paint the door handles and window cranks with Model Master Silver Chrome Trim using a size 20/0 sable hair brush. At this time I also painted the four buttons on each of the two seats. Since these are small items/areas to paint brush strokes are not a problem and the Silver Chrome Trim looks very convincing. After these dried, I painted the knobs on these with Gloss Black paint along with the top edges of both interior panel pieces. When painting the top edges of these make sure to also paint the back side as well. Later when you put the body on the chassis you don't want white plastic showing if the panel backsides are visible at all (Figure # 4).
On to the dashboard. I masked the gauge areas and the steering column bulge on the underside of the dash with Bare Metal Foil, brushed off any lint from the surface, then airbrushed the dash with Tamiya Gloss Black spraying a light coat at first to give the next coats something to grab on to, then I followed it with 3 heavy coats of paint. Make the last coat a wet one so that orange peel will not be a problem, particularly on the most visible area - the top of the dashboard. Let this dry for a day before handling. Once dry, I painted the mesh area of the dash panel face including the ignition, radio knobs, and light knobs with Silver Chrome Trim using my 20/0 sable hair brush (as with almost all of my detail painting) as well as the four vent control switches on the underside of the dash to the right of the steering column and the glove box button. Next I painted the radio face, clock, and gauge faces Black Chrome Trim, as well as the four small knobs above the gauges in the gauge pod. I also painted the tops of the five knobs on the dash panel and the top edge of the ignition Black Chrome Trim along with a small black dot on the glove box button. Next I used Model Master Gold to color the "Bel Air" script molded on the dash panel face. Now, using dry brushing techniques, I painted the gauge, radio, and clock details with Silver Chrome Trim. Once dry, I painted the three gauge needles with Model Master Chevy Engine Red. I let the paint dry for about an hour then mixed up some two-part epoxy and flowed some onto each gauge face and the clock to simulate plastic lens covers. I usually drop the epoxy on with a toothpick covering the entire surface. Look at the gauge from the side and see of there is too much glue protruding out from the gauges. If so, dip the toothpick into the glue and remove some of the epoxy until it is level with the gauge. Make sure to work quickly before the glue starts to harden. You don't want to touch the epoxy once it starts to harden otherwise you risk the surface drying irregularly instead of smooth and flat. Set the dashboard down so that it is resting level and let the epoxy set up. Overall, the raised detail of the gauges was not bad, but some gauge decals included in the kit would have been nice here.
I glued the painted steering wheel to the dashboard piece then painted the inner horn ring, shift lever, and turn signal stalk Silver Chrome Trim. Once dry, the handles on the ends of the shift lever and turn signal stalk were painted with Gloss Black. The center of the steering wheel is a "Bel Air" insignia, but the actual piece has none of this engraving molded on. I painted the area Gloss White and left it at that. The final step in the dash assembly was covering the steering wheel rim with Clear Gloss (Figure # 5 & 6 - completed dash and steering wheel assembly).
Building up the interior onto the chassis, I glued on the rear bulkhead panel (# 61) then both seats followed by the interior side panels. I attached the brake lever (# 96) to the dashboard piece then painted it Black Chrome Trim. I fitted the dashboard into the slots on the interior side panels then glued it in place as well as gluing the brake lever into the chassis floorpan. Once dry, I painted the backs of the interior panels, back side of the dashboard, and the rear bulkhead panel Black Chrome Trim. Wipe off any fingerprints from the glossy dashboard and you're done (Figure # 7 & 8).
The next lesson will cover polishing the body and applying Bare Metal Foil.
- Leon Tefft