FIG. #1
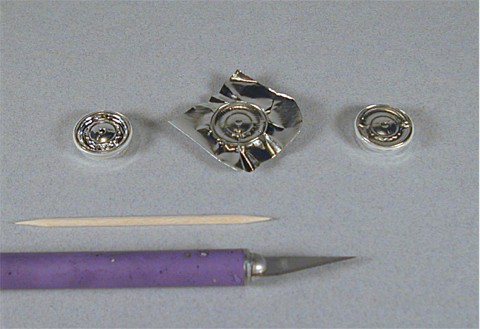
FIG. #2

FIG. #3

FIG. #4
Before anything, let me vent my two gripes about the wheels. First, the wheels represented (spinner style hubcaps) on the 1:1 car cover body color painted rims so as the outer edge of the painted rim is exposed and flush with the tire. The wheels in the kit have an edge that places the chrome plated wheel/hubcap in a position where it doesn't mount flush with the tires by a noticeable margin. Compounding the problem is that the area that is meant to be painted to match the body color is chrome plated. Secondly, the whitewall inserts are WAY too skinny. They should cover about half the width of the tire but only cover about one third. Curiously, the tires are molded with a ridge line in the center of the tire width where the whitewall should extend to. Painting this accurately along with the whitewall insert pieces will leave a noticeable gap between the whitewall pieces and the tire so I don't think that is a good option. If not for the fact that I am sticking to the Box Stock build up I would trade these tires for American/SATCO's excellent Firestone Deluxe Champion whitewalls which are far more accurate. That would take care of the tire problem. As far as the hubcap problem, not much can be done there, however we will disguise the problem and make it more presentable.
First I removed all the parts needed to complete the build up along with the already painted spare wheel (# 91). I don't care much for rolling or loose fitting wheels so I glued the axle spacers (# 90) into the rim backings (# 89). These, along with the spare wheel rim backing (# 92) I airbrushed Model Master Titanium then set them aside to dry.
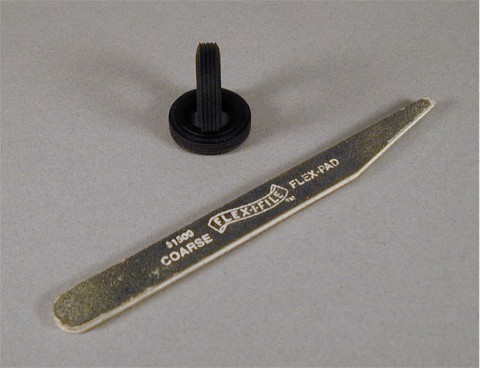
Next I scuffed the tire treads to add a touch of realism to their appearance (Picture # 1). All five tires were scuffed with a coarse sanding stick. I hold the sanding stick at a 45 degree angle to help keep it from slipping off the surface and scuffing the side of the tire. These tires are very pliable so not much sanding was necessary. After scuffing, wipe them off to get the rubber residue out from between the tire treads.
The most difficult step in the wheel assembly is painting the chrome wheels (# 518) but it's well worth the effort. With either extra fine sand paper or an extra fine sanding stick, lightly sand the chrome off the outer edge of the wheels as well as the narrow top edge of the outer wheel lip. Sanding with medium or coarse paper will make the surface too rough and might make flat spots. Next, clean the wheels and mask them for airbrushing. For this type of use where a clean separation line is needed I only use Bare Metal Foil. Cut a square of foil slightly larger than the wheel, lay it down, and rub it onto the wheel face. Dampen a sharp point toothpick and use it to rub the foil carefully down into the crease between the outer wheel edge and the outer wheel lip (Picture # 2 - shown L to R: bare wheel, masked wheel, trimmed and masked wheel). Moistening the toothpick will make it more resistant to tearing the foil. Once you have the four wheels done, trim the foil using a fresh sharp # 10 X-Acto blade. Very little pressure is needed to make the cut. Let the blade do the all the work for you while you concentrate of keeping the tip of it in the crease travelling smoothly in a circular motion. Try to trim the wheel in one motion if you can rather than a section at a time. Fortunately the crease is slightly indented which makes trimming the foil easier. After removing the trimmed off area carefully rub down the edge of the foil mask on the rim with the toothpick. Cutting BMF, even with a super sharp blade, tends to leave the edge slightly pulled up from the surface requiring you to go over it again to flatten it down, otherwise you risk paint seeping under the foil. If you develop a tear in the foil, you don't have to start all over, just take a small piece of foil, rub it down over the torn area to be repaired, trim it again, remove the trimmed off area, then carefully rub it down flat.
Once the wheels are masked, brush them clean of dust prior to airbrushing. DO NOT PRIMER THE RIMS! If you primer before you paint, once you remove the foil mask the primer will be visible. Paint the wheels body color. Users of automotive lacquers will be cussing me out right about now wondering what the heck I'm doing advising them to spray a hot solvent paint onto bare plastic. Not to worry! Simply proceed with patience. I do this all the time for small parts. Lacquer dries so quickly the hot solvents do not have time to eat into the plastic when you spray them very lightly. First I sprayed on two very light mist coats, almost fogging the paint on. Following this I sprayed on two slightly heavier light coats. After this, by the time I got to the fourth wheel, the first one was already dry. Each mist coat is a barrier for the next coat to come. Two more light coats, then one moderate coat. Make the moderate coat just wet enough to provide some gloss to the finish. Mind you, this painting process was done in one session without breaks in between coats which took me a total of about 15 minutes of spraying. Keep moderate coats to a minimum to avoid burying the delicate foil mask under a thick layer of paint. That will make removing the foil mask more difficult.
If you're using a hobby acrylic or enamel paint use the steps above combined with extending the drying times in between coats depending on what type of paint you're using. Again, concentrate on just enough paint to get a good color effect and avoid burying the foil mask under a thick layer of paint.
Make sure the paint is dry before you remove the foil mask. For my lacquer finish, I waited about one half hour. Poke the mask with a toothpick towards the center of the wheel and peel the foil away from the painted surface at a sharp angle in a circular pattern parallel with the outer rim surface rather than just pulling the foil off and away from it. This will help keep the separation line clean. Also, the paint is not well adhered to the wheel surface so pulling the foil off may also pull the paint off the wheel. Just a few areas of the wheels required a bit of touch up painting which I applied carefully with a size 20/0 sable brush with no problem. Otherwise, the mask worked excellently with no visible separation line. The final step was to clean off some sticky foil backing glue left stuck on the chrome after removing the foil from the wheels. For this I used a Q-tip moistened with 70% isopropyl alcohol. Don't use this excessively or it will eventually eat into the chrome plating.
I then placed the whitewall inserts into the tires followed by the wheels then the wheel backs (including the spare wheel). These all fit snugly so I chose not to use glue to attach these together. Next I removed the wheel spinners (# 519) from the parts tree. Wipe any fingerprints off the wheels before attaching these. I used a two-part epoxy to attach these although the spinners seemed to snap into place to where I thought glue wasn't even necessary for this but glue them on anyway for insurance against accidentally losing any of these. Avoid using a super glue to attach these or it may fog the chrome when it dries. Touch up the spinners with Model Master Silver Chrome Trim where they were separated from the parts tree and detail paint the center of the spinner caps with Tamiya Clear Red (several coats). Once this is dry, paint the small raised hash mark line in the center of the spinner cap (intended to represent the Chevrolet emblem) Silver Chrome Trim. That completes the wheel assembly (Picture # 3 - regular wheel, spare wheel, and Titanium painted back of wheel; Picture # 4 - wheel close up). When you put the wheels on the chassis later on try to position them so the areas where you touch up painted the spinners are facing downward so they are less likely to be observed by anyone viewing the model.
Next lesson will be the start of the interior build up.
- Leon Tefft