FIG. #1
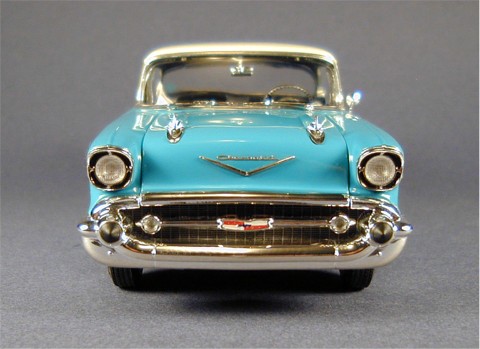
FIG. #2
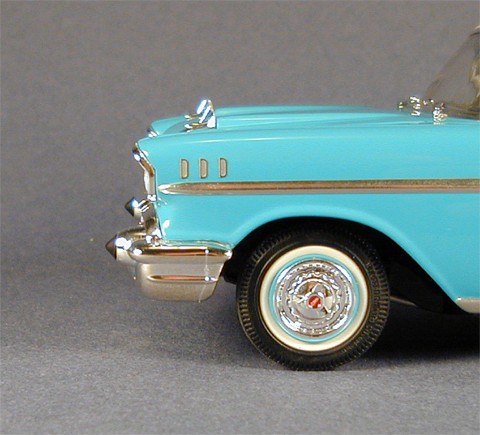
FIG. #3
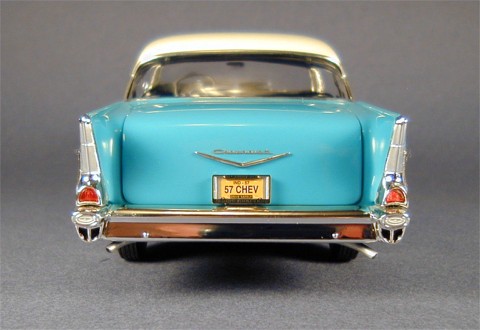
FIG. #4
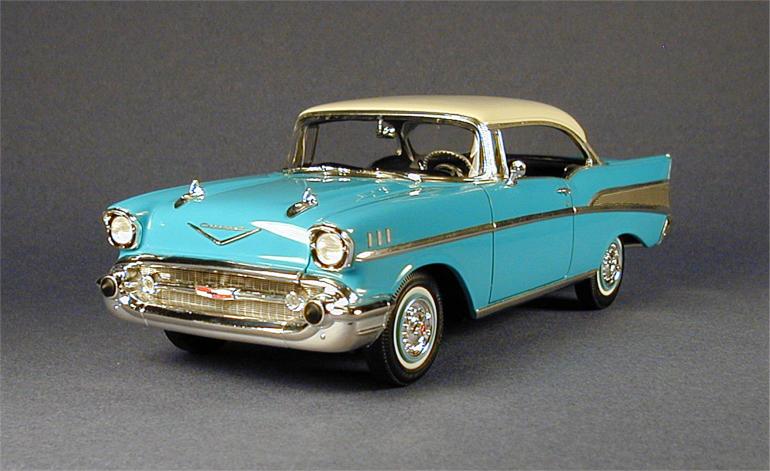
FIG. #5
The first thing to keep in mind about photoetch parts is that they are very fragile and easily bent, particularly scripts. If you have them on a model then your days of effectively cleaning and polishing the model are over. Cleaning with Q-Tips or cloth is a sure fire way to snag photoetch pieces resulting in dislodging, damage, or loss of the piece. So, for this reason, it is critical to thoroughly clean the surface BEFORE attaching any photoetch parts. I went over my entire model with Novus # 1 and a soft cloth making sure to eliminate any dirt and fingerprints. I didn't need the Novus # 2 because I got the paint glossy enough with my polishing kit, but use the # 2 if you need to before the # 1. For chrome pieces like the bumpers and so forth I used Q-Tips to eliminate dirt in hard to reach areas. Get the whole model clean now, put on the photoetch pieces, then one last quick cleaning to wipe off fingerprints while handling during the photoetch installation steps (Figure # 1).
One more thing about photoetch pieces - the tiny and delicate nature of some of these items makes it extremely difficult to attach these correctly without needing to reposition them after they are on. Of course, when you reposition an item you then have glue smearing that is usually visible, resulting in a poor appearance. Throughout all my lessons I've pointed out various benefits of lacquer paint over hobby paint and this lesson is no different. I use only epoxy glue to attach photoetch parts for the following reasons :
1) If a mistake is made positioning an item on a lacquer painted surface I can remove it before the epoxy is dry, completely wipe off the epoxy with absolutely no damage to the paint, and start over again.
2) Epoxy provides a strong bond with the need to put less glue on, meaning less chance of glue being visible around edges when the piece is applied to the surface.
So, one last time, give lacquer a try. There's no great mystery to it. It's as easy to use as any other paint but provides a number of benefits over hobby paints including the low cost of supplies and high gloss performance that doesn't wear with age. I only recommend it so much because mastering a lacquer paint job will advance your modeling skills to a higher level of quality, accuracy, and hopefully enjoyment.
OK, I'm off my lacquer soapbox (for now anyway).
I decided that the photoetch "V" crests (# 4) did not look realistic. The crests are not flat on the real cars but instead are three sided like the molded chrome pieces (# 503 & 510) so I used those instead. This is yet another example with this kit that having a photoetch piece on your model is not necessarily the same as having the BEST piece on it. After scraping the chrome off the backs I attached both crests on the hood and deck lid with epoxy. The deck lid crest lied flat on the surface but the two ends of the hood crest did not. I did not want to use epoxy and have to hold each end down for 20 or 30 minutes while I waited for the glue to bond (even with 5 minute epoxy) so I used my superglue.....CAREFULLY. I applied a very thin layer of superglue on the blade tip of my X-Acto knife wiping the glue off of the underside of the blade so none would get on the hood surface. I then slid the blade under the crest, rubbed on some glue to the underside of the crest, removed the blade, then pushed down the crest to the surface and held it steady until it dried. This was much more time saving than using the epoxy for this part of the step. The key is to not have too much glue on the blade. You don't want it squeezing out around the crest edges when you press it down on the hood.
Once the crests were on, I applied the "Chevrolet" scripts (# 6). To get these off the fret without bending them I placed the fret on a flat metal surface and pinched them off with my X-Acto knife. Using sprue cutters like Xuron pliers can twist the piece and bend it. If you pinch the piece off with a knife use caution as the knife tip may break and fly off. Eye protection is recommended. Once I had the scripts off I needed to remove the attachment points. There's only one way I know of to do this effectively on such a fragile piece - the old faithful Dremel. I used a 3/32" high speed cutter tip at 3,000 RPM to gradually wear down the points. I also did the same for all the other pieces to be applied as well.
To glue the scripts onto the surface, I first laid them on to see if they required any bending to get them to lay flat. The deck lid script was fine but the hood script need to be bent slightly. I carefully did this with my fingers. Try not to bend it in one spot but rather bend the entire script equally to avoid any sharp crease bends. I then mixed up some epoxy, held the "T" end of the scripts with a pair of fine point tweezers, and applied a very thin layer of epoxy to the underside of the scripts with a toothpick. If you get glue globs remove them with a dry toothpick. I held the script with the tweezers just above the surface judging with my eye as to where I wanted the piece to be positioned. When I had it where I wanted it I laid down the "C" end of the script first, brought down the rest of the script, then carefully removed the tweezers. It is important to not have ANY glue on the tweezers or else they will become stuck to the script and will pull as you remove the tweezers. Take your time and use the appropriate glue. I use 5 minute epoxy, but if you want to not feel rushed then use 15 minute epoxy. Don't get frustrated if you goof up. This is a very difficult task to accomplish perfectly. I personally applied and reapplied the "Chevrolet" hood script on my model 8 times before I got it positioned correctly with no visible glue smears. I was able to do this with no damage to the paint because of the lacquer finish (Figure # 2).
Next I applied the rear fender scripts (# 9) and badges (# 10) in the same manner as above. The instructions incorrectly show the driver side badge in front of the script when in fact the badges on both fenders should be behind the scripts closest to the tail lights. The center relief portion of both badges can be painted white.
Next was the three hash mark pieces on each front fender (# 7 & 8). Using the pilot holes I drilled early on, I placed and positioned the center piece followed by the surrounding two pieces. Work on one fender first, then the other (Figure # 3).
The door and trunk locks (# 13 & 14) went on next. For small items like these I prefer to dab a tiny amount of epoxy onto the surface in the proper location then drop the piece on with tweezers and position it correctly with either a toothpick or with the tip of my X-Acto knife. Position these so that the keyhole slots are vertical.
The last item to go on was the rear license plate frame (# 15). While this was still attached to the fret I painted the relief areas on the surface with Model Master Black Chrome Trim. When it was dry, I scraped the surface with my X-Acto knife, removing the excess paint from it but leaving the paint where I wanted it - in the relief areas. This left the "1957", "Chevrolet", and both bow tie badges visibly highlighted. Scrape gently so as not to scratch the metal surface of the plate frame. This simple technique provides a great amount of detail with little effort. I then removed the frame from the fret, cleaned up the attachment points with the Dremel, and attached it to the plate mount (# 97) with epoxy. Both ends overlap so use the epoxy on the top and bottom edges only (Figure # 4).
I left all the trim pieces (scripts, crests, badges, hash marks, and the grille) on my model silver. I have photos of Bel Airs with these items silver, gold, or both silver and gold. I'm not sure if these are symbolic of certain available option packages or if it's just a matter of personal preference. If you want them gold then now's the time to paint them.
Put all your tools away and get the Q-Tips and polishing cloth out one more time. Wipe off any fingerprints accumulated from handling during these last steps and you're done. Use extreme caution around the photoetch pieces! If you have dust in these fragile areas brush it off lightly with a sable hair paint brush.
And that, ladies and gentleman, is one of an infinite number of ways to build a 1957 Chevrolet Bel Air (Figure # 5). Thanks for following along. I hope it was worth your while.
- Leon Tefft