FIG. #1
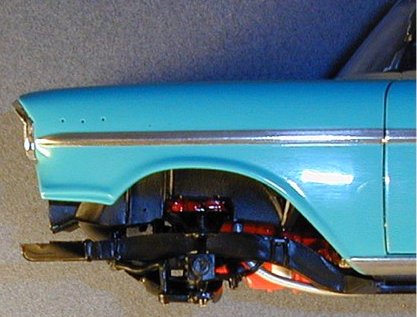
FIG. #2
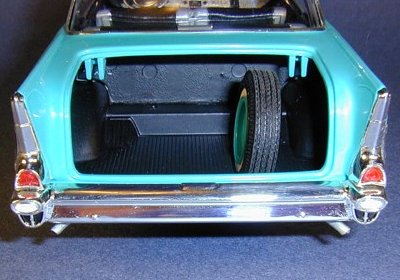
FIG. #3

FIG. #4
Before I forget, the last interior component to add is the rear view mirror (# 514). Clean the inside of the windshield thoroughly before attaching the mirror.
Right about now seems the right time to join the body to the chassis. I test fitted this first to check how everything lines up before applying any glue and verify that I should wait to install the front bumper. Before this, I glued the rear wheels onto the chassis since they appear to be properly aligned when I test fitted. I thoroughly cleaned the inside of the windows and the rear view mirror and dusted off the interior and trunk before joining the body and chassis. Slide the two tabs at the rear into the slots in the body first then work the body down over the chassis from there. I didn't use glue for the two rear tabs since they are secured well on their own. After nestling the body down, I applied glue to the slotted tops of the two firewall areas of the chassis then held them in place until dry. At this point there appeared to be an unnatural gap between the forward part of the chassis and the body. This is apparently the way it is meant to be since even with this gap the frame rails running along the body under the doors were parallel with the body when properly seated (Figure # 2 - plainly showing the gap before gluing). I then glued the pins at the front of the chassis into the mounting holes on the body.
I glued the spare wheel into the well in the trunk at a slight angle to the right. Photo reference I have shows this is the proper position when the wheel is secured in place Figure # 3).
Next I glued the radiator to the chassis. From there I went to the four underhood hoses where you have your choice of the rubber or plastic versions you can use. Both types have seam lines, however these are very difficult to remove from the rubber hoses. Another problem is that Chrome Silver enamel paint which I would apply to the clamp ends on these hoses won't dry on rubber and I don't care for acrylic Silver paints. The plastic hoses can be made smooth more easily and painted properly. For these reasons I chose to sand the seam lines off and paint the plastic radiator hoses (# 72 & 73) and discard the rubber versions. I then installed them followed by the two rubber heater hoses (# V74 & V75) which do not require painting.
Next I painted the battery (# 67) Black Chrome Trim then painted the two battery clamps Model Master Steel and the six battery caps Bright Yellow. The plans say these should be Red, however I have numerous photos of original Delco batteries - all showing yellow caps. When I test fitted the battery its placement was too high, blocking the hood from seating properly on the body. I removed the two mounting pins, sanded approximately 1/16 inch off the bottom of the battery, repainted the sanded area, then glued it in the proper position in the engine compartment.
Next is the steering rod assembly (# 30 & 31) which I glued together and painted Semi-Gloss Black. This was then positioned into the firewall first, then to the steering rod arm as indicated in the instructions. This installation completed the engine compartment assembly (Figure # 4).
Next I attached the front bumper to the body. I left the front wheels off until after this point so that I could more easily reach the underside of the bumper to reinforce it to the body with extra glue. Once secure, I added the front wheels to the chassis. I'm happy to report that all four wheels are positioned properly within the wheel wells and appear to pose the car with the proper ride height all around with no tweaking necessary. Kudos AMT!
Next on were the chrome accessory pieces for the body, those being the door handles, antenna, side view mirror, and the windshield wipers. I opted for the chromed plastic wipers instead of the photoetch versions mostly because I think the chrome wipers look better as well as being more sturdy when mounted on the body. I painted the wiper blade surface area Black Chrome Trim. All these items required sanding and touch up painting and were attached with epoxy. Make sure you clean off the surfaces underneath these items before you attach them.
The last item to go on my Chevy was the rear license plate mount (# 97). I airbrushed this with Model Master Metalizer Aluminum before gluing it to the rear deck lid. Attach the front license plate mount if you wish.
Finally, the decals were added, including the rear license plate, trunk jacking instructions (# 6), and the radiator decal (# 3). I omitted the window sticker (# 7) and decal # 8, which I believe represents a showroom feature tag attached to the dashboard, commonly hanging from a radio knob on a string. I'm not certain that's what that decal actually represents though. I don't see it listed on the instruction sheet anywhere. Regardless, I omitted # 7 & # 8.
If you're not building the photoetch version, then add the crest trim pieces (# 503 & 510) then detail paint the script emblems on the body with Silver Chrome Trim. Allow this to dry well before polishing the body.
The next and final lesson will cover the addition of the remaining photoetch pieces, final polishing and clean up, and pictures of the completed model.
- Leon Tefft