FIG. #1
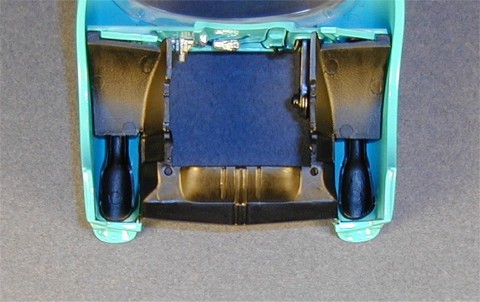
FIG. #2
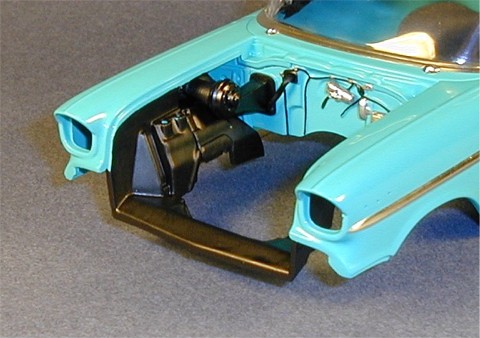
FIG. #3
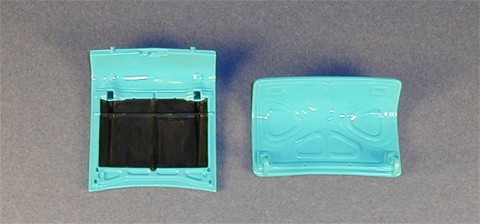
FIG. #4
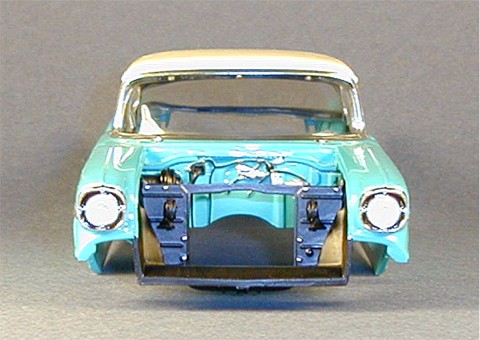
FIG. #5
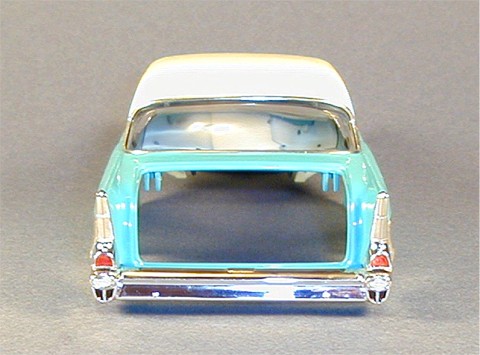
FIG. #6
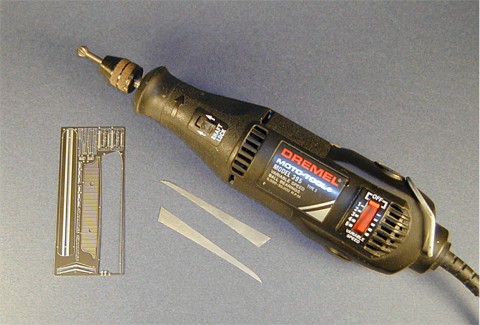
FIG. #7
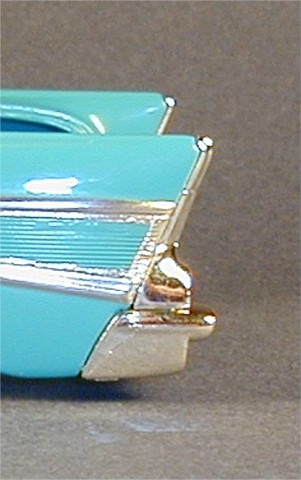
FIG. #8
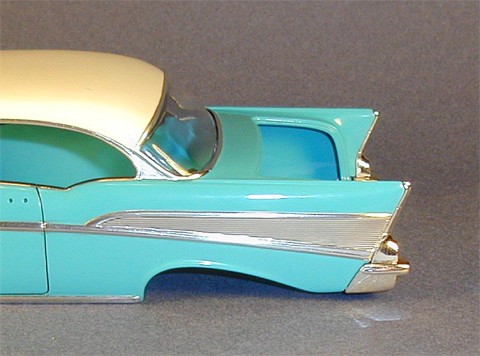
FIG. #9
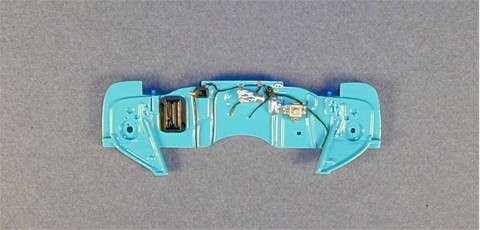
Remove parts # 68 & 69 and glue them together. When dry, file down the separation line then sand it smooth. Test fitting this to the firewall showed me that it wasn't a good fit so I sanded the outer edges a bit with medium then fine sanding sticks until it fit into the location on the firewall. I painted this assembly Model Master Semi Gloss Black. Next, remove parts # 65, 66, 80, and 81 and file down all the mold lines. These I painted Model Master Black Chrome Trim. Remove part # 78 and # 79 and file off the mold lines. Part # 78 - Model Master Silver Chrome Trim. Part # 79 - Model Master Steel. Set these aside to dry.
Detail paint the firewall next. There are four engraved lines representing wires that I painted Black Chrome Trim. On these are four molded clamps I painted Model Master Magnesium. To the left of the brake cylinder is a rectangular box I painted Silver, then both ends I touched up with Ivory. Above this item is a small plate that should be painted Silver, then dotted twice with Black Chrome Trim to represent screws. Paint the area where the fan assembly attaches and the small square to the upper right of it Model Master Semi Gloss Black. Finally, attach parts # 78 and 79 (Figure # 1).
Fitting these parts into the body at first looked to be a bit tricky, but it wasn't at all. First glue the firewall to the body. Next, place both air ducts (# 80 & 81) into the fenders then glue them to the firewall. Next, the fender well pieces (# 65 & 66) have tabs that fit onto the firewall ends at the rear and reliefs at the front edges that line up with the fender well sections molded to the body's engine compartment. Next, glue the fan box assembly to the firewall and fender air duct. Finally, remove the hose (#74) and position it into the proper holes in the firewall with tweezers. Once you have it where you want it, apply some superglue through the attachment holes from the back side of the firewall to secure it.
A bit more detail painting will complete Step # 7 by covering the fender wells and front engine compartment interior with Black Chrome Trim. I used a size # 1 sable hair brush and applied the paint along both inner and outer sides of these areas (Figures # 2 & 3 - Note in Figure # 3 the difference in the gloss appearance between the heater box and the fender wells).
Here's about where I start to stray from the instructions and do a few odds and ends. While I had my Black Chrome Trim and # 1 sable brush handy I painted the underside area of the hood with Black Chrome Trim using the illustration as indicated in the instructions in Step # 10. The hood has defined borders that make painting fairly easy (I failed to paint the "bar" in the center of the underside section body color so I just covered it with the black paint. If it were more noticeable I would have corrected it. Don't tell anyone!). The deck lid, to the best of my knowledge, should be left entirely body color. I don't have a photo of a '57, but I have a photo of a '56 with the same deck lid pattern and the entire underside is body color (Figure # 4). I then added the latch (# 83) to the hood which was painted Black Chrome Trim.
Going to Step # 8, I removed the radiator, radiator wall, and two horns (parts # 70, 71, 76, & 77). I glued the two horns to the front of the radiator wall then filed the pins down even with the back surface of the wall. This assembly and the radiator I then airbrushed Model Master Semi Gloss Black. When dry, I painted the radiator cap, drain plug, and the 8 screw heads on the front of the radiator wall Silver. Glue the radiator wall into place on the body. The radiator will be installed onto the body after the body is joined with the chassis.
Flipping the hood over, I took the gunsight ornaments (# 500 & 501), test fitted them to the hood, and discovered they extended appx. 1/16" from their mount areas. I sanded 1/16" off the back of these until the front tips were flush with the hood, painted the sanded backs Silver Chrome Trim, then glued them in place when the paint was dry. I then removed the trim piece (# 502), touched up the two spots with Silver Chrome Trim where the part was attached to the parts tree, removed the chrome from the mounting holes, and glued this to the hood (it would have been nicer if these two spots were on the bottom of the trim piece to make them less noticeable. Not many ways around this problem without sending the parts off to a chrome plater to be redone). The mounting pins on the hood were too large so I had to trim them down a bit to allow the chrome trim piece to fit properly. I use epoxy for most chrome parts to avoid the fogging sometimes caused by super glues. I also try to attach as many of the body parts as possible before mating the body to the chassis because it's easier to handle and it's possible to reach the backs of these items for adding or reinforcing them with glue.
While the Silver Chrome Trim was handy, I painted the backs of the red tail light lenses. To me this makes lenses look better and also obscures any injection mold or chrome irregularities on the lens housings of models that may be visible through the lens.
This is not the case with the headlights though. The headlight housings (#506) have four sections around the headlight lenses on each of them that should be painted black. These are actually the air inlets for the air ducts behind them that ultimately flow into the car's interior. To paint these inlets evenly without rough edges, I first painted as much of these inlets without getting too close to the edges with Tamiya Black. The upper inlets are so thin hardly any painting on these areas was needed, but the lower inlets have more surface area. When the Black was dry, I then covered the inlets with two good coats of Tamiya Smoke. The Smoke flows up next to the edges evenly and gradually and eliminates the need for precise painting in these tricky areas. The Smoke dries glossy, but in my opinion it's a good trade off for not having roughly painted edges. You could go an extra step and cover this with some flat clear paint, but if you get any on the surrounding chrome it will dull it. I left it as is.
After the Smoke dried, I added the headlight lenses to the housings by gluing them in place with Tamiya Clear being careful to make sure the scribed lines in the lenses were lined up evenly. Once dry, I installed the headlight housings into the body. I first scraped some chrome off the housings where they join the body then glued them in place. After the glue set up, I turned the body over and dabbed some epoxy onto the housings and body to better secure them (Figure # 5).
The rear bumper should be installed next to help place the upcoming tail light trim pieces properly. First paint the four triangular sections under the reverse lights the same manner as above with the headlight housing inlets using the Tamiya Black and Smoke. The reverse lights I painted Gloss White, but only the inner two "ring" sections. The third outermost ring section should be left chrome plated. I scraped the chrome off the two tabs that insert into the body, placed the bumper into position, then applied superglue to the tabs to secure the bumper.
The rear tail light lenses required a bit of filing to fit into their trim pieces. Once adjusted, I glued these in place with Tamiya Clear also. When dry, I scraped the chrome off the backs of the rear tail light trim pieces and glued these to the body being careful to align these with the body while also fitting them into the recesses molded into the top of the rear bumper (Figure # 6).
One last step to this lesson, and it'll be the first photoetch pieces - the side trim panels (# 2L & 2R). Removing the pieces properly from the fret is the first hurdle in keeping the pieces looking good. If you cut these off with a wire cutter type tool you could wind up twisting the cut and bending the photoetch part. I remove these by placing the fret on a hard surface and "pinching" the parts off the fret with a sharp hobby knife. Two things here - make sure the surface you're doing this on is HARD! If not, the fret will flex and could bend the piece you're cutting off. Also, work gradually with the knife. You don't want to snap the blade under pressure and have it flying off. Wear protective eye wear if you have to.
Once the two trim pieces were off the fret, I trimmed the attachment tabs off the parts with a Dremel motor tool fitted with a # 100 cutter set at appx. 2,000 RPM working "with the grain" grinding the tabs off being careful not to gouge into the parts (Figure # 7). You could also use a diamond point grinder, sanding disc, or even a drum sander attachment. The side trim pieces are large enough parts that the tabs could be removed with a riffler file, but it is much more time consuming and you have a much greater risk of accidentally bending the parts. If you don't have a Dremel or other high speed motor tool, you should definitely consider obtaining one before you have to trim delicate pieces like script emblems.
Test fitting the trim panels showed me that they didn't quite fully cover up the entire side of the body as they should, so I had to add a small bit of Bare Metal foil at the rear edge of the body to fill the gap (Figure # 8). About 1/4 inch is all you need. The body curves inward at the rear edge here so when you glue on the photoetch trim piece you want it stuck to the body, not the chrome foil, otherwise the trim pieces could straighten out and pull the foil with it. Keep the foil at the rear edge to a minimum. I glued the trim pieces on with slow drying superglue applying it to the forward half of the piece being careful not to get too close to the edges to prevent the glue from seeping out and corrupting the surrounding foil trim. The slow curing allows proper positioning of the trim pieces. Once dry, I applied more glue to the back half of the pieces and secured them to the body. Make sure you hold down the pieces on the curved rear edges to make sure they don't lie unnaturally away from the body (Figure # 9).
That's it for now. Next up will be adding the front end and wheels, mating the body to the chassis, and engine compartment detailing.
- Leon Tefft