FIG. #1
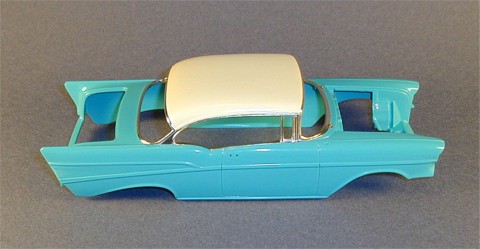
FIG. #2
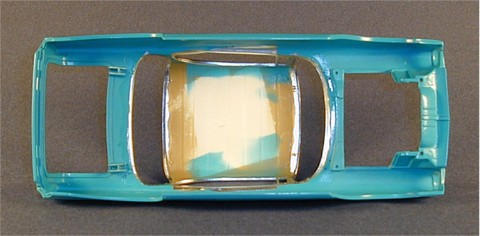
FIG. #3
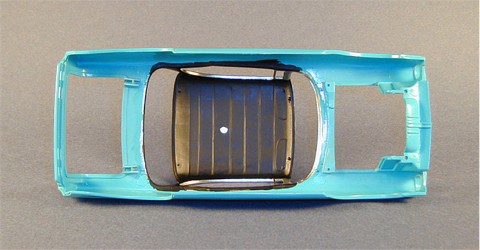
FIG. #4
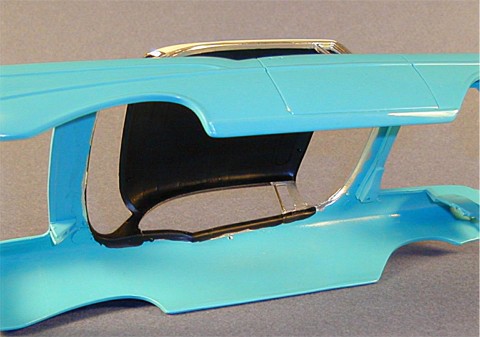
FIG. #5

FIG. #6
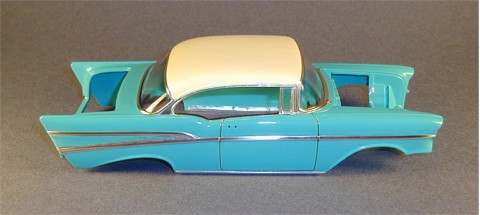
FIG. #7
My polishing kit of choice is LMG's, although others such as Detail Master's and Millenium's are pretty much the same. On glossy finishes I never use anything more coarse than the 3200 grit sanding cloth to begin with. From there, I follow the grits up to 3600, 4000, 6000, 8000 & 12000. I cut the cloth squares into three pieces then use each cloth to polish two car bodies. Here are a few tips to use when working with a polishing kit:
1) - When you're using one of these kits try to keep in mind that the first sanding cloth you use does all the real work; the remaining sanding cloths polish out what was accomplished with the first cloth. Sometimes it's hard to tell if you have all the orange peel removed until you get to the 6000 grit cloth where the surface starts to take on a shine. If you detect orange peel, stop there and go back to the 4000 or 3600 grit cloth to remove it Then proceed up the grits again.
2) - Concentrate on one area at a time working from the hardest to reach areas toward the easier ones. Do the roof, trunk, left side, right side, hood, etc., counting each one as a separate area. When doing a side, for example on the Bel Air, I'll start at one end working to rub out the orange peel on the body next to the trim lines and edges. Once that is well sanded, I'll sand the rest of the open flat areas of the body panels. Rub out all of the surfaces to be polished with one grit before proceeding to the next grit cloth. Don't do the roof completely then start on the sides with the 3200 cloth. Edges of the cloth that stray onto polished adjacent surfaces while rubbing out another will scratch it up.
3) - Sand the trim areas of the body that will be foiled along with the rest of the body! How many times have you seen a beautifully polished body with Bare Metal Foil trim that looks rough and mottled? That's because the orange peel wasn't removed before the foil went on. Foil's reflective qualities when applied over orange peel only make matters worse.
4) - Remember that the cloths are designed to cut into the surface on their own so you don't have to use a great deal of pressure when rubbing out the finish. If you find yourself really bearing down on the surface you're only wasting your own energy and making the process more tedious. If you feel that the cloth you're using isn't working as well as you think it should then you need to go back to the next coarser grit cloth before proceeding on with the one you're using.
5) - Vary your sanding patterns. If you do the roof, left side, right side to start, reverse the order with the next polishing cloth and do the right side, left side, then the roof. You get the best performance from a new cloth. By the time you reach the end of your sanding with that cloth it is already slightly worn down. If you always sand in the same pattern the area where you start may appear better than the area where you finish.
Besides the body, we'll also polish the deck lid and hood. My model didn't have excessive orange peel so I started out with a 3600 grit sanding cloth. I never wet sand, although many people do. Early on I tried wet sanding but I could not see the surface imperfections very well because of the water obscuring the view. I get excellent results dry sanding, less messy, and just as quick. The only drawback is it wears down the sanding cloths faster. If you're dry sanding, stop frequently and wipe off the cloth to unclog sanding particles. I usually have an old pair of sweatpants on while I'm sanding and I wipe the cloth clean on them.
Before the outside, smooth down any primer or paint overspray on the underside of the body. I used a 4000 grit cloth to do this. Check especially areas close to where foil will later be applied because if you have a rough surface the foil will have difficulty adhering to it. I also used fine and extra fine sanding sticks to smooth the inside surfaces of the vent windows.
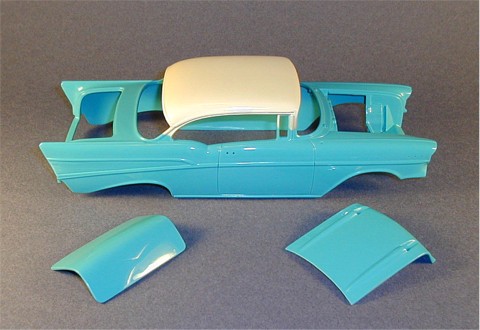
I polished the body, deck lid, and hood in about 3 hours (Figure # 1). The most difficult areas were in the creases on the front fenders and next to the body side trim lines. When you polish the body use your fingernail to get the sanding cloth into these creases. I went over some of these a second time. Outside of that, I had little trouble polishing out the body due to my method of applying the paint to begin with. Only two areas equired a bit of touch up paint on sharp edges where I sanded through the paint but these were repaired without being noticeable.
After the touch up paint was dry, I buffed out the body. I like the swirl & haze remover in the LMG kit, but I've recently started using something better - Novus # 1 & # 2 liquid polishers. It seems to perform better and leaves less dried residue behind when wiped off. For this use, since the body was rubbed out with 12000 grit cloth, I only buffed the finish with the Novus # 1 Plastic Clean and Shine liquid.
Now the foil. Using another new sharp #11 X-Acto blade, I applied the foil in the following steps: upper half of windshield and sides, lower half of windshield, upper half of rear window and sides, lower half of rear window, both vent windows, both side windows, and finally the trim on top running the length of both doors. This took care of the "greenhouse". I applied the foil but overlaying it on the surface and pressing it on lightly with my finger. Once I had it covered with no creases visible, I cut the foil covering open areas so that approximately 1/2 inch could be folded under the body to provide an anchor to help secure it to the body. I folded these overlaps under the body and burnished them down with my finger and a moist toothpick.Once I had this secure, I burnished the foil down over the trim with the moist toothpick being careful to work out any creases or bubbles that developed. Any areas that were not too large where the foil did not cover, particularly in sharp corners, will be touched up later with Model Master Silver Chrome Trim. Excess foil was then trimmed with minimal pressure and a steady hand tracing my X-Acto blade along the molded lines of the body. Afterward, I burnished the cut edge down smooth with the surface using the moist toothpick. Once I had the whole greenhouse done, there were about eight tiny areas where foil did not cover where it should have that I touched up with Silver Chrome Trim, which blends in fairly well with the foil. If you have an area that is too large to cover with paint then patch it with a small bit of foil.
Two things to note here - vent windows are always tricky to foil and this car is no exception. Remember to cover the whole area between the vent windows and the windshield. Also, there is a deep crease on the upper edge of both windows between the side trim and the trim molded on the roof. DO NOT FOIL THE MOLDED TRIM ON THE ROOF. It looks like the it should be foiled, but only the lower trim on the side should be foiled. In this area I laid the foil on the surface pressing it on with my finger then sliced the foil in the deep crease before burnishing it down with a moist toothpick. Overall, with all the contours of the surface and the amount of surface area to be covered, this is a somewhat difficult body to foil. Patience is definitely required (Figure # 2).
Once done, I coated the foil overlapping on the underside of the greenhouse with Clear Gloss to "glue" it to the surface more securely (Figure # 3). I do this because sometimes when I install windows the foil sometimes gets pulled away and bunches up, damaging it. If you have excessive amounts of foil overlapping trim them closer to the edges before coating them. After this dried, I painted the interior surfaces to match the interior color of the car using a Floquil 770 sable hair brush to minimize brush strokes, in my case, Model Master Black Chrome Trim. Once dry, I foiled the interior dome light then painted the bulb area with Gloss White (Figure # 4 & 5).
I decided to install the glass here since, once in place, it will help to keep the foil trim more secure. The separate packaging for the glass kept mine free of damage in the kit box. Be careful removing the vent windows from the sprues. The attachment areas are a bit thick. I installed the vent windows first and found the fit was too tight. I trimmed a bit of plastic from the upper edge of the vent frame, touched it up with Silver Chrome Trim then allowed it dry before putting the window in again. (If you're reading this through before reaching this stage of construction trim and fit these before you apply any foil to this area. I should have done it myself but I anticipated the fit would be better). Once I fitted and snugged the glass into the frame I ran a line of super glue along the back and bottom edge of the windows. I used Zap-A-Gap and it didn't fog the glass. I use super glue on the glass pieces because they are susceptible to loosening when you twist and spread the body over the chassis/interior and the super glue provides a nice grip. Next I fitted the windshield in place and ran a line of super glue along the top edge. Once dry, I clamped the bottom edge of the glass to the body. This did not lie completely flat up against the underside of the body but was snug against the windshield frame. I ran super glue along the bottom edge and again did not have problems with fogging. The rear window was a better fit than the windshield and did not require clamping. I ran lines of super glue along the top and bottom edges of the rear window. Again, no fogging problems. Make sure NOT to glue BEFORE clamping the windows or you'll squeeze glue out onto the visible surface and ruin the glass. Also try to avoid holding the glass in place with your fingers. If you reposition your fingers with glue accidentally on them you'll damage the glass with fingerprint marks. Once everything was completely dry I touch up painted the glue areas along the edges of the glass with the appropriate colors.
Back to the foil, this time on the exterior trim of the body. Lots of handling while painting and installing the windows left my surface area dirty and oily from fingerprints during handling. I cleaned off the body before applying any foil to make sure it stuck well to the surface. I did both side trim spears using three pieces of foil each - front fender, door, and rear quarter panel. When I did the split trim pieces on the rear quarter panel I left about one quarter inch of extra foil on the area where the photoetch panel will cover later. This way when the panel is fitted there won't be any Turquoise body paint showing through any gaps between the photoetch panel and the foiled trim pieces. Don't leave the whole panel area on the body though or the photoetched panel will not be secure when you epoxy it on later.
Two more spots to cover - the rocker trim panels on the lower edge of the body. I applied the foil leaving plenty of foil overlapping on the underside then brushed the underside area with Clear Gloss to secure it (Figure # 6). Notice the front of the rocker panel foil does not overlap the edge of the wheel well.
The last step to wrap up this lesson is shadowing the door seams. The only thing I use to do this on all my models is Tamiya X-19 Smoke. It's dark enough to provide a realistic shadow effect and it's clear enough to leave the edges smooth and even without any abrupt or jagged edges that a solid paint might leave. When I apply this over lacquer, I stir the paint first rather than shake it to avoid bubbles that will inevitably flow into the seam. I flow the paint into the seams wiping off any excess with my fingertip as I go along. After the paint has set up, but before it has dried very hard, I moisten a Q-Tip with 70% isopropyl alcohol and rub it lightly over the seams to remove excess paint from the body surface. Rub lightly enough so the Q-Tip doesn't get into the seam and remove the paint from there. The alcohol removes the Smoke without damaging the lacquer, but if you have painted your model with an acrylic enamel hobby paint you will damage the finish with the alcohol. Brush very carefully to avoid getting paint on the surface areas. After you Q-Tip the surface with the alcohol there will be a mild haze that, once dry, can easily be removed with a soft cloth and polish such as Novus # 2 then # 1 after the Smoke is thoroughly dry. Tamiya Smoke appears best when you have deeper seams to fill. This is where rescribing the seams early on during body preparation before painting pays off (Figure # 7).
- Leon Tefft