
Home
| About | Links
1967 GTO main | 1967 Ram Air GTO Retrospective | 1968 GTO
Auto to Manual Swap | Muncie Rebuild | GTO trunk
Jeeps | Minibike | Other Rods
1967 GTO main | 1967 Ram Air GTO Retrospective | 1968 GTO
Auto to Manual Swap | Muncie Rebuild | GTO trunk
Jeeps | Minibike | Other Rods
1967 Pontiac GTO Convertible Restoration
(well, the start anyway)
(Click on pix to see larger size)The Story:
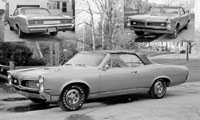
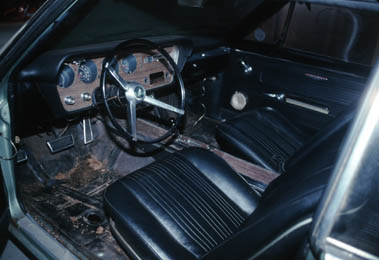
The guy I purchased it from said he bought it in the mid 70's in New Jersey. The car was restored in the late 70's and was in pretty good shape when I purchased it. The owner said he rebuilt the engine and he also managed to save most everything original, even the AM radio.
This specimen still has the original engine, drivetrain, and suspension. Most of the mechanicals are in great shape too. Luckily, the frame was in perfect shape, and still is. No rusted bolts or rot or scale. Even the brake lines came apart nicely when I replaced the wheel cylinders in back. Over the years however, the trunk has rusted pretty badly from the inside out. The rear quarter panels and lower front quarter panels also bubbling.
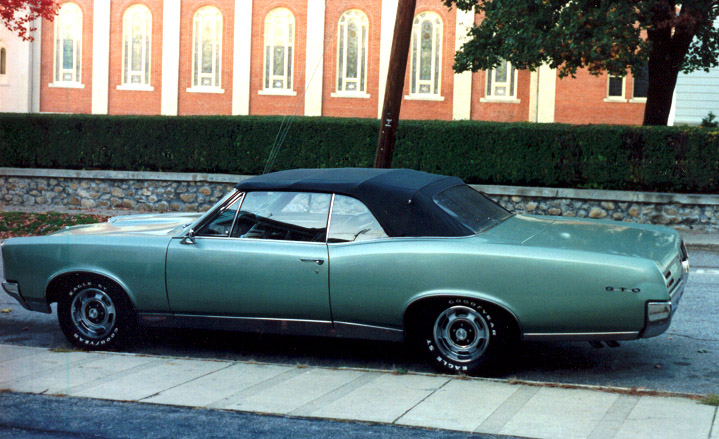
This photo is from about 1991, after I found a set of Rally I rims at Carlisle. I think I paid an average of 20 bucks each for 'em. I ended up gettng 6 though since a couple were slightly bent. I still have them and would like to get them straightened.
Also featured in this photo is a replacement top and top frame from a wrecked Lemans. I got the works for 100 bucks and just stapled the top in to the tack strips in the back well.
In
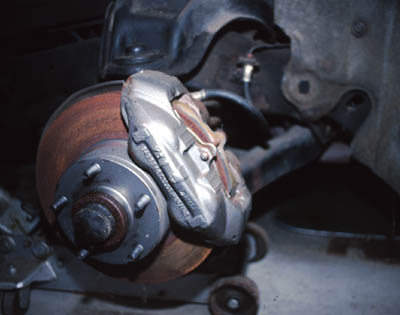
2000 I moved from my home and I had
to move the car. So, I rebuilt the brakes with new stainless sleeved
calipers and new one piece rotors. I ended up driving it to my new
house with no license plates. Couldn't find a decent price for a 100
mile tow.
I sent away for the documentation and billing history of my GTO from Pontiac Historical Services. This is a great service which verifies the numbers of your Pontiac. It also tells you exactly how your car was optioned when built, how much the retail price was, and where it was shipped.
This is a list of what my GTO came with for options:
342 AM Radio, pushbutton with manual antenna
452 Wire Wheel discs. (These were more expensive than the Rally I rims!!)
472 Center console
501 Power steering
521 Disc Brakes (includes power brakes)
532 Softray windshield
F70 x 14 Redline Wide Oval tires
781 TurboHydramatic (M40)
It has a rally clock too, but it's not on the PHS stuff. I wonder if someone added it later in its life.
The zone and dealer code is:
Zone: 29
Dealer: 276
I've looked on the ultimategto.com site for who dealer "276" was, but it's not ID'd yet. Check out ultimategto.com and go to the text topics to look up your dealer number.
The assessment:

October 10th, 2004
Fired up the GTO this weekend. I started it about a year ago but only for about 30 seconds. This time I fixed the tremendously leaky transmission just so I could move it around under it's own power. After a couple minutes, it idled really nicely, even on the 4 year old gas. I can't believe the carb isn't gummed up solid. I took it for a spin around my block with all the kids in it with the top down. Very nice!
I was poking around the thing for the first time in 4 years. Wow is this thing dirty. And mice have completely taken over. The dried urine is really bad. I wish I hadn't let it go this far.


I've started some of the disassembly of the GTO. I intend to do some sheet metal work and start with the trunk. I removed the rear bumper and tail lights and then the gas tank. The tail panel looks like it's going to need replacement. It was replaced in it's first restoration in the 70's and it's going to need another one since the pitting is pretty severe. Since no full quarters are available, I think I'll patch the rear lower quarters. I'm a little afraid of all the bondo in there, but I think it's mostly from dings and dents. But I'll just have to grind away to see what's there.
It needs a full trunk kit. This trunk rusted completely from the inside out. No rust at all on the outside. Too bad.

Okay fans, I've got the Lincoln SP135 Plus. This MIG welder features infinite variable "heat" setting. I thought this would be best after reading many comments from others on the Performance Years Forums. I fired the MIG up for the first time and laid down some beads. First impressions: It is difficult! Sheet metal especially! I've got some scrap sheet and it's very thin, perhaps 22 or 24 guage. After a couple of wild heat and wirefeed choices, I narrowed it down to get that buzzing sound with fewer pops. No matter what I still burned some holes, but I found that I could back up and fill the holes with little difficulty. I am concerned though that the beads are very tall. I may try to raise the heat. I'll keep practicing until I get the patches from Ames. Then it'll be time to do some real work.


This pic shows two pieces of sheet metal butted together and then welded. The bead is pretty tall but penetration seems good. I stitched the weld also to keep heat down, but some warping still occurred.
Need to do very small "stitches" to keep the heat down.
Got the patch panels. I measured the trunk panel and it's 21 gauge. The panels are okay, but you can tell the manufacturers don't have big presses. They press one section and then move the panel and press another section. You can see lines where one press ends and another is used. So they will need definite smoothing and shaping.

Work is slow since 10 degree weather is not condusive to motivation. But, I've started to sand away to see what's under that old green paint. I knew the rear part of my driver quarter was patched and slathered with bondo, but I found some holes on the lip. And I'm starting to get overwhelmed on what I should do. I didn't expect to need hundreds of dollars more in panels. I wonder if I should just:
- go crazy with home made little patches,
- Get a "skin" and cut out the small parts I need and patch,
- Cut out the whole panel and
reskin it,
- wait until full quarters are put out someday.

It's too cold to work, but I'm trying to gather the body stripping tools I'll need. Budget it tight so I'll try to do as much body repair with what I've got. (trunk, rear quarter patches)

Started to take apart the Goat. I decided to tear it down so I can concentrate on patching the body from the doors back. Once done, I'd like to pull the engine, rebuild it, take the body off the frame, repaint and rebuild everything, then put 'er back together. I cling to no illusion this will be easy, but I realize I have to start somewhere.
So, I started. I took off the top frame (not shown) and it fell on my head while I was pulling out the last bolt. Ouch, that thing is heavy. Behind the rear seat back, I pulled out a mouse nest the size of a couple of basketballs. What a giant mess they made. Unfortunately, they used my seat foam and stuffing for their nests.
I have done some work! Just a little. I've started a new page for it, the trunk page.
Visits to this page since November 2004

1967 GTO main | 1967 Ram Air GTO Retrospective | 1968 GTO
Auto to Manual Swap | Muncie Rebuild
Jeeps | Minibike | Other Rods