 FROM FRONT...
...TO BACK

FROM FRONT...
After waiting for all the seperate packages to arrive, I had to make sure all the parts where here. I knew there was a lot of different peices to this kit but had no idea that there were THAT many.
 The first thing I did was to weld on the Extreme front shock towers and the trac bar drop bracket. I then painted the frame with POR-15. After the frame was painted I put the rear bump stops and their mounting plates on in place of the old rubber things. That is all I have done to the frame.
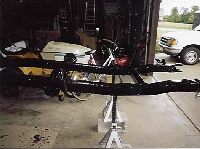
Since I took my suspension off the frame and completely apart to paint it, I had everything disassembled prior to the instalation. I found it to be fairly easy that way. I started by mounting as much as I could to the front axle. The first thing on was the strut arms with the new 7 deg. urethane C-bushings. They didn't want to compress. I was told that you should spray some silicon or lithium grease on them before instalation. I didn't know that untill after I squished them. I had to get two bolts one inch longer than what is used to hold on the front caps. Since the C-bushings are new they didn't allow the caps to get close enough to the strut arms to use the old bolts. I used the longer bolts to pull the caps close enough to the arm and after I got the regular length bolts in, I took the long ones out and put in the rest of the regular ones. By doing this and having a nice 1/2" drive impact, I was able to get the strut arms back on the axle without too many problems. Be sure you get the caps all the way against the arms, otherwise you won't be able to get the lower coil spring mount on. Once yo do get the cap on, you can reinstall the lower coil spring mount. Be sure they go on the same way they came off. There is a right and a wrong way. And it is very obvious. Before you tighten the coil spring mount down all the way thread in your Rock Crawler coil and position 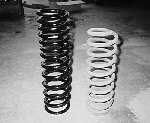 correctly. Then you can finish tighening the mount. Now is a nice time to put the front bump stops on the axle. One nut on the bottom and the old ones came off, and then one nut on the bottom and the new ones were on. That was real easy. I also took the time while the axle was on the ground to take off the old brake lines, clean out the axle breather, and install the new braided stainless steel lines provided in the Wild Horses kit.
 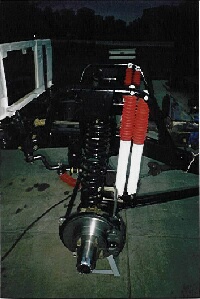 Basicly I had the front axle ready to back on the frame. It took two people do get the axle up to a level where is lined up with the frame. Once the alxe is colse to the frame I put the rubber strut arm bushings on the end of arms and slid the arms back in their mounts. I put the rubber cap on the strut arm, a washer and the then the nut and tightened them down till they were snug. Then I moved to the springs. Since I already had them in the correct position, I held them in place and reinstalled the bracket that holds the springs in their mounts. The 14 pc. bushing set came with trac bar bushings, but since I bought a new adjustable one I didn't need them. The only reason I would need them is if I wanted the get rid of the yellow bushings that are on the trac bar now. I had already taken the old trac bar off the axle so all I had to do was put the new on the axle. I suggest installing the axle end first and then, making sure you have the other end adjusted close to where it should be, install the frame end. Now that the front axle was located, I could That is the front end. Minus the drop pitman arm. I had taken the steering box off the frame for painting so I had to put the steering box back on the frame and figure out how the pitman arm went on. That is the front end.
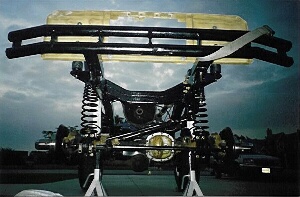
The rest of the kit has to do with the rear axle and such. Just like the front axle and componants, I had the rear axle off the springs and the springs off the frame. This made it a lot easier. The first thing I did was to mount the new 11 leaf pack springs on the axle. These should provide about 3.5" of lift.  Of course something had to go wrong right away. I couldn't get the spring pins in the perches on the axle. After a little rheeming, they went in fine. Then it was just a matter of tightening the U-bolts down to a satisfactory torque. Now that the spring ends were in the air I put the new urethane bushings in the axle ends and the shackles. I then put the shackles on the springs and slid the axle assy. under the frame. I lowered the frame down to the springs and pressed thefront of the springs in their mounts. Then it was a matter of aligning the shackles and getting them in their mounts. Once all four points were mounted I tightened all the bolts up.
 The next thing I did was to put the new bumb stops on. While taking the old ones off, I ended up breaking both boltsoff on both sides. Well I had to drill them out and tap them to the next size up. This didn't help any because now the mounting plates that I got with the Wild Horses bump stops. So I had my dad take the bolts into work and get the next size up. He also borrowed a counter sink for the holes in the plate. Now the bump stops went right on as intended. The last thing I did was to take the axle breather off and open it up and put it back on with the new extended, braided stainless steel lines provided in the kit. Since I have a new fiberglass body I didn't really feel like cutting large holes in the inner fenders to mount the rear shock tower. So I have no shocks on the rear of my Bronco.
BACK to my Bronco page.