|
|
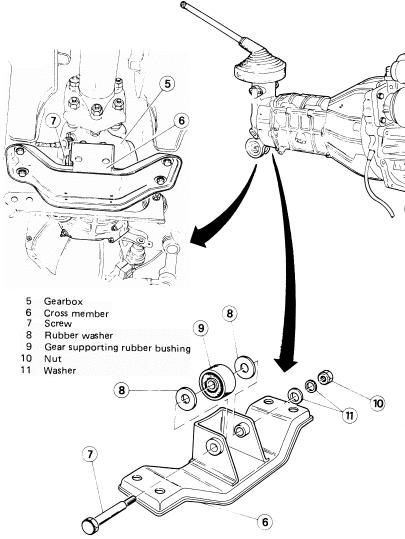
First of all it is not necessary to remove the tranny from the car to replace this bushing (#9 in the Figure). With a bit of imaginative shopping you can fashion an inexpensive �press� from a length of allthread rod, some washers, nuts, and a short section of pipe, or, in this case a PVC plumbing adapter. The entire process was not too painful and made a huge difference in the feel of the car--shifting, take off, braking, bumps, backing uphill, etc. are all now much smoother and solid. Please note, before you attempt this job, take sufficient time and care to secure the car solidly on strong jackstands before crawling under the car.
I found the required PVC pipe adapter at a local hardware store. One side was threaded internally, the other was not. The numbers on the end of it said �COLONIAL USA D-2466 SCH 40 PVC-1 CAV A 2-1/2� NSF-PW�. It was ca. 5" long x 3-5/16" OD x 2-7/8" ID (smooth end) x 2-5/8" ID (threaded end). I believe it was intended for mating iron pipe to PVC pipe. Chose the adapter with replacement tranny mount bushing in hand � the ID of this adapter was just slightly larger than the OD of the bushing. I knew the bushing could easily pass thru this �receiver� and the receiver had enough meat on the non-threaded end to butt up solidly against the tranny housing, and enough meat on the threaded end to hold the largest washer solidly. I didn�t need to hone out the inside like another guy did, but I did cut off a 1-1/2" from the threaded end with a hacksaw because it didn�t actually need to be that long. (It needs to be only slightly wider than the bushing.) I also needed the extra manuverability because the master cylinder on my car is right down there by the side of the tranny mount which makes it a little tight. Additionally, for this reason I removed the bushing towards the passenger side.
Other tools needed for the extraction are a 1 ft. section of 1/2" allthread rod, three nuts (two for double-nutting one side, the other for squeeze action), and various washers. One washer should be large enough to cover the threaded end of the PVC receiver (3" OD x 1-3/8" ID x 3/16") and another just slightly smaller than the tranny housing (2-1/2" OD x 1-1/16" ID x 3/16"). (When buying these washers take along the replacement bushing and PVC receiver for sizing.) Buy two of each and stack them to give extra strength--I noticed mine bent a little. Since these washers have large center holes, buy smaller washers to stack to give the nuts a good seat. The large center holes actually help because the inner hole of the bushing is offset, and this gives adequate play.
Raise the rear of the car and place on jackstands. Make sure it's secure!
Drop the tranny crossmember (#6) by removing the four 13mm bolts and the two 13mm nuts for the front driveshaft section bearing. This lets the rear of the tranny drop down far enough to work.
Remove the bushing�s thru bolt (#7), set aside the tranny cross member (#6), and arrange the receiver and assorted washers and allthread rod and start wrenching. In my case the washers dished, the nut got difficult to turn and I thought something was going to break. I kept at it and sure enough, the bushing moved slightly, not with a snap or a bang, but a subtle release. From there it was easier but still tedious wrenching until it was out.
I kept the replacement bushing in the freezer overnight, but it still didn�t �just slip in.� By the way the larger gap in the bushing goes toward the top so the inner metal tube where the thru bolt goes sits offset more towards the bottom. When mounted, the tranny�s weight will push down on the outer section, making the inner steel tube end up almost in the center of the circle.
I tried reversing the operation to press in the replacement bushing, but managed to get the bushing in crooked. Since the new bushing�s rubber was in much better shape, I couldn�t get the allthread rod centered enough to get a good square push. To straighten it out, I used the propane torch on the aluminum tranny housing. After that it was easy to hammer in straight with a block of wood.
[So obviously don't use the "allthread rod" method for inserting the new bushing. I've had success inserting new bushings using the following technique. 1) Clean the tranny opening and bushing shell with sandpaper and then lube both well with WD-40. 2) Drill a 1" hole in a 3" section of two-by-four to accommodate the bushing's inner tube. The drilled hole should be offset a bit so the two-by-four sits squarely on the bushing. 3) Combine the bushing and two-by-four and press into the tranny opening using C-clamps. Apply even press and make sure the bushing does not get cocked! Finally, if you have to use heat the get the new bushing in, don't use so much heat that you cook the rubber!-- RHH.]
In all this job took about three hours, not counting the shopping, or the busted crossmember mounting bolts extraction. Good Luck!