
 1. First aquire a
helmet. If this is your first time painting one, you should get one that
is older, because you are bound to make mistakes. The first step is to
take apart as much of the helmet as possible. It is not totaly nescessary,
but it will give you more professional results, because you won't see paint
ridges near the molding and plastic parts if they are removed prior to
painting.
1. First aquire a
helmet. If this is your first time painting one, you should get one that
is older, because you are bound to make mistakes. The first step is to
take apart as much of the helmet as possible. It is not totaly nescessary,
but it will give you more professional results, because you won't see paint
ridges near the molding and plastic parts if they are removed prior to
painting.
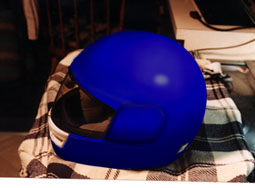
 2. Here is a picture of a helmet
with as much molding and plastic vents taken off as possible. On this model
the mouth vent is not detachable without breaking some plastic tabs, so
it is left on. Also, you will notice that the ear piece is plastic. You
must be extremely careful when painting plastic because the primer will
eat through the plastic if applied too thick. This will also happen if
you paint plastic helmets, which is why you shouldn't. The next
thing you should do is to mask off the areas that you do not want painted.
This includes the front mouth vent, the interior cloth padding, the chip
strap, any bolt threads, and any molding that was not removed. Use high
quality masking tape to tape off the areas, and also note that 2 inch tape
saves alot of time when masking large areas.
2. Here is a picture of a helmet
with as much molding and plastic vents taken off as possible. On this model
the mouth vent is not detachable without breaking some plastic tabs, so
it is left on. Also, you will notice that the ear piece is plastic. You
must be extremely careful when painting plastic because the primer will
eat through the plastic if applied too thick. This will also happen if
you paint plastic helmets, which is why you shouldn't. The next
thing you should do is to mask off the areas that you do not want painted.
This includes the front mouth vent, the interior cloth padding, the chip
strap, any bolt threads, and any molding that was not removed. Use high
quality masking tape to tape off the areas, and also note that 2 inch tape
saves alot of time when masking large areas.
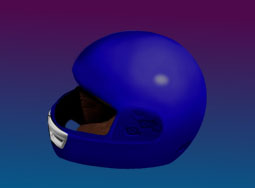
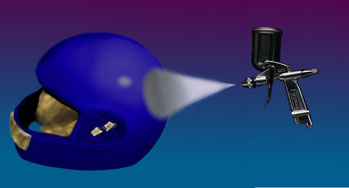 3. Here is a picture of the
helmetwith all the nescessary parts taped off. You must now prep the helmet
to prepare it for the primer coat. To do this you must scuff the basecoat
of the helmet to give it some tooth for the primer to adhere to. You can
do this with a scotchbrite pad or some sandpaper in about the 400 grit
range. If the helmet has alot of scratches and is in poor condition a scotchbrite
pad won't help. In this case sand the helmet, but do not sand into the
fiberglass. A final wet sanding with about 600 grit paper should be given
to give the helmet a smoother finish. In this picture you also see a top
feed detail gun made by Iwata. It is expensive but very quality peice of
workmanship. It is showing the spraying of the primer coat. See your local
jobber to determine which primer is best for you, and stick with one system
for best (safest) results.
3. Here is a picture of the
helmetwith all the nescessary parts taped off. You must now prep the helmet
to prepare it for the primer coat. To do this you must scuff the basecoat
of the helmet to give it some tooth for the primer to adhere to. You can
do this with a scotchbrite pad or some sandpaper in about the 400 grit
range. If the helmet has alot of scratches and is in poor condition a scotchbrite
pad won't help. In this case sand the helmet, but do not sand into the
fiberglass. A final wet sanding with about 600 grit paper should be given
to give the helmet a smoother finish. In this picture you also see a top
feed detail gun made by Iwata. It is expensive but very quality peice of
workmanship. It is showing the spraying of the primer coat. See your local
jobber to determine which primer is best for you, and stick with one system
for best (safest) results.
 4. This picture depicts the
helmet after it has been given a couple coats of primer.You should then
fill in any scratches that were initially present in the helmet with body
filler. This is depicted by the green patches. Sand these patches down
after they have hardened. Prime the helmet again with a couple coats and
then give it a final sanding with about 800 grit paper.When the helmet
is completely smooth with no knicks scratches or gouges you are now able
to give the helmet a base coat.
4. This picture depicts the
helmet after it has been given a couple coats of primer.You should then
fill in any scratches that were initially present in the helmet with body
filler. This is depicted by the green patches. Sand these patches down
after they have hardened. Prime the helmet again with a couple coats and
then give it a final sanding with about 800 grit paper.When the helmet
is completely smooth with no knicks scratches or gouges you are now able
to give the helmet a base coat.
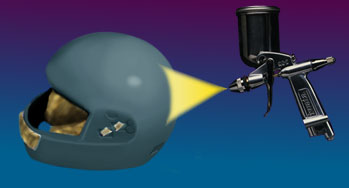 5.This picture depicts a yellow
basecoat being applied to the helmet. give it a few good thick coats as
this is the main color coat and you want to get good adhesion to the primer.
5.This picture depicts a yellow
basecoat being applied to the helmet. give it a few good thick coats as
this is the main color coat and you want to get good adhesion to the primer.
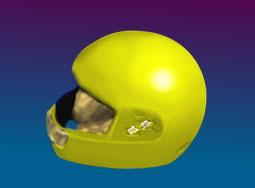 6. This is it, the helmet
has its basecoat and is ready to be detailed.
6. This is it, the helmet
has its basecoat and is ready to be detailed.