Finishing the Custom Dash
Well, when I got the dash from New Hampshire (where my dad did the wood work) it was busted on the left edge. UPS must have dropped it! Although they would have paid to have it repaired, I'd have to run around and get cost estimates. I just fixed it my self.
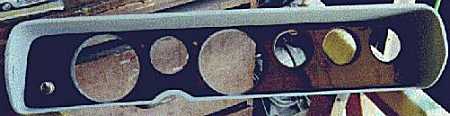
Here you can see how the gauges mount to the fiberglass and the wood sits around it. That way, it looks like they are just recessed and mounted to the wood.
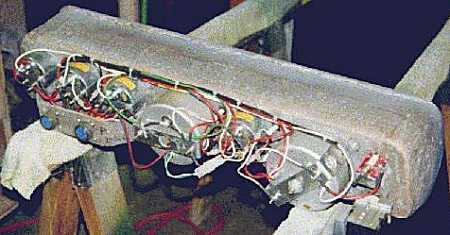
Here is a view of the wiring that I had to do. What really makes it look complex is the amount of wires required for the grounding. Keep in mind that due to mounting the gauges on fiberglass, they are not grounded and ground wires need to be provided. Autometer gauges require two different grounds, one is the body ground that is for the light, the other is the gauge ground that has a terminal at the back of the gauge.
In this scan you can also see that I fabricated a fiberglass bracket that holds the electrical connectors. The connectors are Mil-Spec and are real costly, but are the best you can use.
In the upper right of this scan, you can see the 2-speed wiper switch that I got from "Wireworks". This ended up being a bad idea. What it does is enable a "one speed" wiper work in two speeds due to the resistor that is mounted on the switch.
I ended up finding a "two speed" wiper assembly (actually, Snarfy found it) and the required two speed switch.
The wipers in the older Chevys work by having the switch provide the ground!! Due to this, a ground lug has to be attached to the body of the switch in order to get it to work.
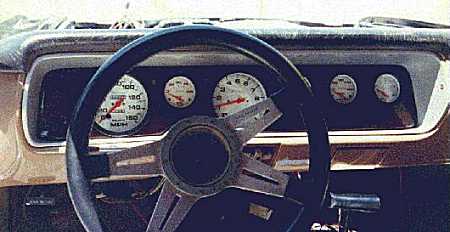
Here is the assembly in place. It's held in at the same points as the original and I used flat head stainless allen head screws.
What was a pain about the flat head screws is that a bevel has to be put in the fiberglass for them to sit flush. The ones along the lower edge can't be done with a standard drill and I had to use my 90 degree attachment in order to get in there.
If you haven't already noted, there isn't an ignition switch on the dash as would be on the original. This is no problem due to my having put in a tilt column out of a 72 Monte Carlo. The ignition switch is on the column now.
The temperature gauge does two functions due to there being two sending units. One is at the typical engine water temperature location and the other is mounted in the pan of the TH350 trans. The switch that controls which sender is looked at is mounted on a small panel at the B&M Megashifter. I mounted a LED adjacent to the gauge that is lit when the switch is set for trans temperature.
In spite of the Speedo gauge going to 160, I really don't think that I'll ever see that kind of speed! What happened is that Autometer only makes that size and style speedo in the 160 MPH style. I contacted them and they were willing to do up a custom one in a lower speed rating, but I really don't have the money right now.
One of the things that I didn't think about when ordering the gauges was if there would be any room left over for a radio. There isn't any!! The gauges can be ordered in a smaller size, but I really wanted the larger ones, just for the look.
The changes to the cars wiring was extensive, but it's all done now. I was already into the wiring in a big way due to converting to the other steering column.
Wes.
I can be reached at:
Wes Vann [email protected]