Miniature University Workshop: Spring Gardens
Lesson #3
Instructors: Naga, Jo, and Melissa Darnell
Email Jo with Palm Tree questions: [email protected]
Email Naga with Tissue Flower Arrangement questions: [email protected]
Email Melissa with questions regarding other projects: [email protected]
Flowers and Plants
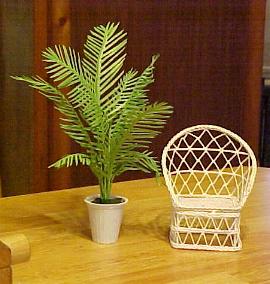
Potted Palm Tree
Materials/Tools Needed:
2 inch masking tape
20 gauge wire
green paint
scissors
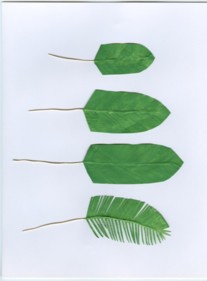 1.
Using the pattern, cut as many frons as you would like in the tree,
mine has 8..
1.
Using the pattern, cut as many frons as you would like in the tree,
mine has 8..
2. Cut 2 wires 6 inchs for the taller ones, then 1/2 to 1 inch shorter for all others..
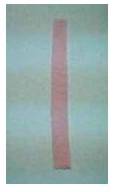
3. Fold tape over the wire leaving about an 3/4 inch above the end of the wire..
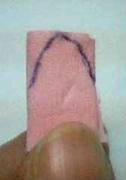
4. Cut to shape then paint...
5. After paint dries feather cut each side to the center close to the wire..then cut out,remove, every other strip to form the fron...then cut remaining tips to a point...
6. I found if you curve the wire to form a fan it is easier to remove the strips..
7. You will need to touch up the paint after cutting...
8. Wrap the stems with tape, I used green floral tape for that..
9. Then put the stems together to form the tree and tape together securely..and plant in a pot!!
hugs
jo
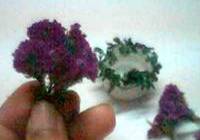
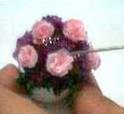
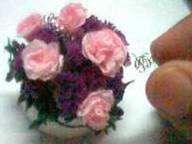
Tissue Flower Arrangement

Materials/Tools Needed:
Mini pots/bottle caps or make your own pots with white fimo/paperclay
Mini dried green leaves or moss
Any dried violet coloured flowers
Pink coloured tissue / toilet rolls/ crepe paper (use any other desired colour if preferred)
Thread (pink preferably to match the tissue colour)
Clear drying glue
Stainless steel scrubber (used for washing utensils)
White acrylic paint (optional)
Fine point brush
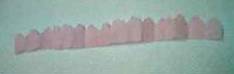
1. Cut tissue or toilet roll in strips 2cm wide, 14 cm long.
2. Fold the tissue into two then keep folding till the end.
3. Draw a petal shape on the folded paper & cut along the petal shape.
4. Separate tissue into single ply. Take one end of the tissue and first roll tightly to form the inner petals.
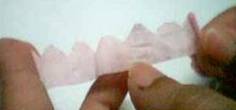
5. Continue to roll the rest of the petals till you get the shape of the rose.
6. Tie the rolled rose tightly with a string.
7. Trim the bottom of the rose carefully - cut away excess paper & string.
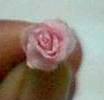
8. Make about 10 roses following the above method.
9. Arrange the dried green leaves or moss in the mini pot around the edge only & glue it in. Leave the center of pot empty for the dried violet flowers. Let it dry completely.
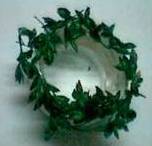
10. Cut a bunch of the dried violet flower & glue it in the center of the pot. Trim away any flower that sticks oddly out of the circular arrangement. You can add additional flowers if there are any empty spots in the pot. Ensure that the arrangement looks balanced. Look at any flower arrangement pictures for further reference.
11. Arrange the roses individually, ensuring they are sporadically placed & glue it in. Use a tweezer/needle or any sharp pointed edge to open up the rose petals after completing the arrangement.

12. Cut small pieces of the stainless steel scrubber slightly tug at it to give that curly look.
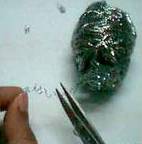
13. Glue these “curlys” in between the arrangement.
14. If you wish, dip your brush into little white acrylic paint and with gentle strokes brush against the dried violet flowers to give additional colour details to your arrangement.
Note : If you do not wish to get into the hassle of making the tissue roses, you can buy readymade ribbon roses ( the mini ones of course).
Happy miniaturing,
Naga
Pipe Cleaner Flowers
Materials/Tools Needed:
wire
colored pipe cleaners
strong scissors or wire cutters
white/school glue
1. Start with either a wire wrapped in green or painted green.
2. Add a dab of glue on the end of the wire.
3. Cut a short length of colored pipe cleaner and wrap it around the glue end of the wire.
4. Cut off the extra pipe cleaner so that you now have a fuzzy flower!
Easy Ivy and Ivy Topiaries
Materials/Tools Needed:
green or brown cotton string
white/school glue
parsley flakes (found in the spice section of any grocery store)
miniature pot
air-drying clay
small stick or twig from a real tree
small styrofoam ball
1. To make ivy, dip a length of green cotton string into glue. Pull the string through the glue until the entire length of the string is covered with glue.
2. Pour a small amount of parsley flakes onto a sheet of scrap paper.
3. Lay the string in the parsley flakes, rolling the string slightly to coat all sides with flakes.
4. Repeat all along the string until the entire length is covered in parsley flakes. Set aside to dry, then arrange on the sides of garden walls, up the sides of a dollhouse or miniature building, etc.
5. For ivy covered walls, coat the wall thickly with glue, then sprinkle heavily with parsley flakes and let dry.
6. To create an easy ivy topiary, paint a small styrofoam ball green and let dry.
7. Coat the styrofoam ball with glue, then roll it repeatedly through a pile of parsley flakes to cover it in "ivy". Let dry completely.
8. Poke one end of the twig into the ivy covered ball, then press the other end of the twig into a miniature pot filled with air-drying clay. Let the clay dry completely, then coat the top of it with glue and sprinkle on dirt or a thin layer of moss.
Quick Cattails
Materials/Tools Needed:
wire
wire cutters or strong scissors
white/school glue
cocoa mix
Toadstools
Materials/Tools Needed:
polymer clay in cream, beige, apricot, and red
white acrylic paint and cotton bud (also known as a Q-tip)
1. Dip the end of a length of brown painted wire into glue.
2. Dip the glue end of the wire into a packet of cocoa mix to coat the glue with the cocoa. Let dry.
3. Trim the wire to length, then glue on some green paper leaves to finish!
Toadstools
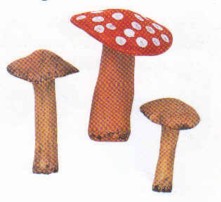
Materials/Tools Needed:
polymer clay in cream, beige, apricot, and red
white acrylic paint and cotton bud (also known as a Q-tip)
1. Mix the cream and beige polymer clay to achieve a mottled brown color.
2. Roll out a short tube of clay and cut to the length you'd like your toadstool stem to be.
3. Roll out a small ball of the mixed clay, then flatten slightly and add to the top of the stem.
4. Bake the toadstool in an oven according to the clay package's directions and let cool.
5. Use a fine-tip paintbrush to add brown and white lines along the edges of the toadstool top.
6. To make red toadstools with white spots on top, use apricot for the stem, red clay for the top, and add white spots of acrylic paint using a Q-tip or cotton bud once the toadstool has been hardened in the oven.