Miniature University Workshop: Traditional Room Boxes
Lesson #4
Instructor: Melissa Darnell
Email Melissa with questions: [email protected]
More Inspiring Room Boxes and Vignettes
Today, we will be focusing on some of the design details that make room boxes and vignettes by master artisans such as Mrs. James Ward Thorne, Eugene Kupjack and his son Henry, and Brooke Tucker truly masterpieces in miniature. Settings done by these artisans are extremely highly valued, displayed in some of the finest museums worldwide, and worth several thousand for even the smallest of settings (Ms. Tucker's vignettes are currently priced at around the $2,000 mark, and her larger room boxes range from $10,000 to $30,000 each!). Whether you choose to create your room settings for profit or personal pleasure, my goal is to help all of us learn exactly what makes these artisans' works so inspiring. So let's get started!
Structurally Interesting Details...
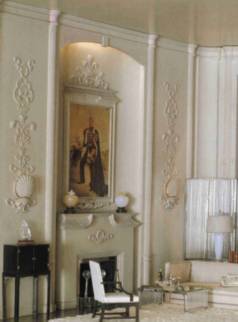
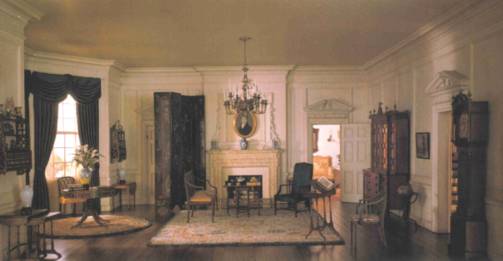
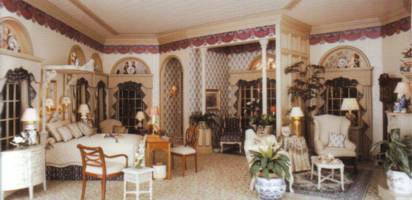
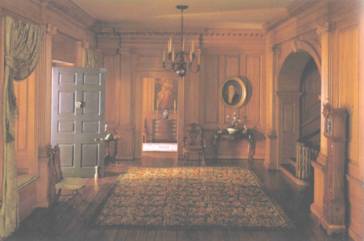
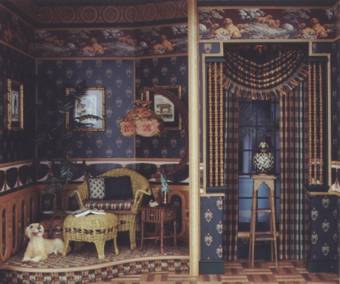
When studying room settings done by these artisans, I'm always struck by the fact that the best settings always employ several structurally interesting features. One feature often used is the wall nook (not to be confused with a niche, which is a decorative opening in a wall for displaying art in), which immediately changes the typical room shape from its basic three walls and makes it more interesting to view. You can also position furniture inside a wall nook plus add framed art for more interest, like Mrs. Thorne did in the first room below with a fireplace and framed art, or make the nook feel like its own small room, as Ms. Tucker did with both her room and vignette pictured below. Nooks are especially effective in small vignettes, as Ms. Tucker often does in her put-abouts (her name for her framed vignettes...see her entire collection of Put-Abouts at www.brooketucker.com/putabouts.htm, many of which employ two side-by-side nooks which create the feel of looking into two small rooms).
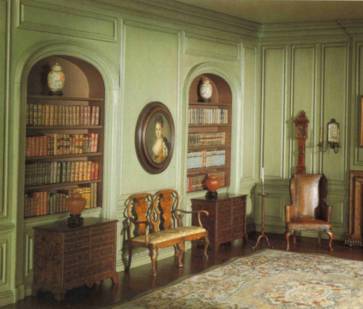
Another version of the wall nook is the niche, a decorative insert in the wall that can be used for displaying sculptures, framed art, or even used as built-in bookcases (see below for two examples by Mrs. Thorne):

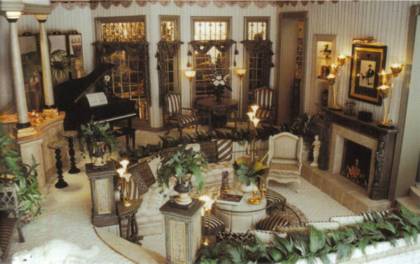
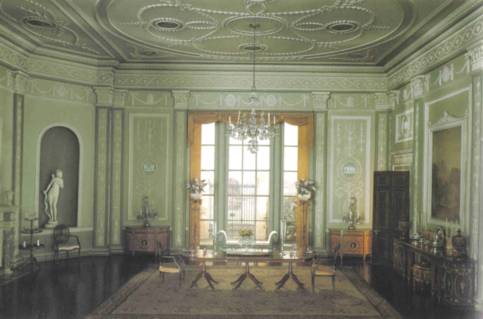
The third version of the wall nook is the floor-to-ceiling bay window, which is basically a three-sided nook with windows. These are a great way to let in lots of light from either a natural or artificial light source (we'll talk more about artificial light sources later in today's lesson). Bay windows can be simply an interesting feature in a room, as the one in the Thorne room pictured first below is, or become the focal point of the entire room by centering it on the back wall:
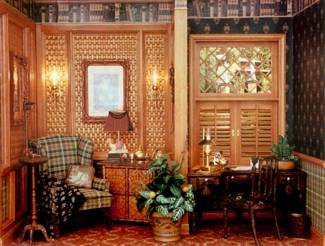
You can also break up the perimeter of your room by using columns, soffets (partial upper walls), and half walls (partial lower walls). This technique is perfect for suggesting either an entirely separate room at the back or side of your setting (see the first picture below of a Tucker room that uses a pair of columns with a soffet to create a small sitting room towards the back of the main setting), or to suggest perhaps a hallway with an entrance (see second and third pictures below of Thorne rooms that use this technique to create a hallway and library at the back of each setting).
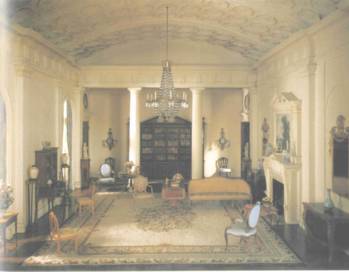
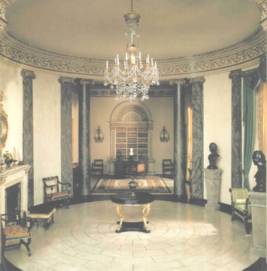
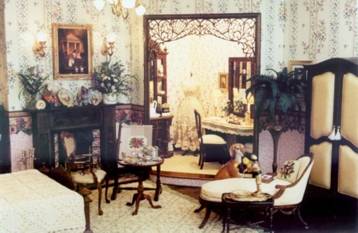
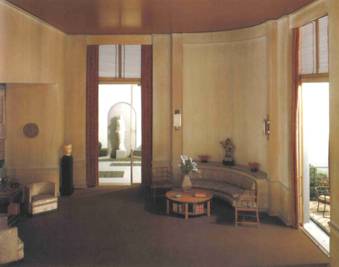
Or you could actually create an entirely separate room at the back or one side of your setting. Mrs. Thorne was famous for doing this, allowing another room to appear through a doorway or open door, and it's a truly wonderful technique because it makes the viewer wonder "what's in there?". It also makes the viewer feel that the setting isn't just a room in a box, but part of an entire house. Below are one example of a Thorne room featuring doorways that allow the viewer to peek into parts of other rooms, followed by an example of a Tucker room that has a second room to the side, separated from the main setting by a pair of columns and soffet and a full side wall, but made effectively viewable through a decorative window set into the side wall of the secondary room:
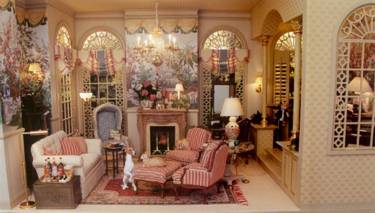
Yet another structural feature that makes rooms really take on added dimension is through the use of different floor levels. Ms. Tucker uses this to great effect in both her vignettes (see first picture below for example) and room boxes (see second picture below of a contemporary living room that features a sunken seating area). This makes the setting much more interesting, allowing the viewer's eyes to travel up and down on higher and lower levels of focus, and breaks up would could be an otherwise monotonous furniture arrangement. Changing the floor levels also helps accentuate the feeling that the raised or lowered area of the room is truly a separate room on its own (see the Tucker room above for an example of how the steps leading into the secondary room help make that secondary room feel very separate from the main setting).
* Note: with both the separate room technique and changing floor levels, it's still important to remember that both the main setting and secondary rooms are still both visible at the same time, so the interior decorating schemes used for both areas must be complimentary and preferably "flow" (accomplished by using the same colors and or patterns in both rooms). This helps the eye to travel smoothly and naturally from the main area to the secondary room without creating a jarring sensation in the viewer's mind.
Jazz Up Your Walls...
I think we all know how to use chair rails, wallpaper, wallpaper borders, and paint to decorate our room box and vignette walls. But I did want to point out one interesting thing I've discovered in studying the masters' settings. They tend to use a lot of decorative moldings along the cornices (the space where the walls meet the ceiling), the baseboards (where the walls meet the floor), and especially around windows, doors, and niches. This really helps a room to feel complete, and is worth the money spent for these items. Another detail that Mrs. Thorne seemed especially fond of was plasterwork on the walls (see below for three examples). As discussed yesterday, you can use the same five techniques for creating plasterwork on the walls as you do for ceiling work, but you may want to create false walls from posterboard or cardstock if doing plasterwork on the walls. Otherwise, you'll soon find that the awkward angles you'd have to work in would put a real pain in your neck!
Bringing the outdoors in...
One of my favorite techniques for making a setting feel realistic is by making the outdoors part of your setting. There are several ways to do this, some easier than others, all worth the time and effort. The first technique is to simply use pictures of outdoor scenes from magazines or the internet outside your setting's windows. The trick to making this look real though, is to use windows with plastic or glass panes (instead of just an empty window), then have that window's wall set back from the outside of the box by about an inch. Cover the box's inner wall with the magazine picture (which should be at least an inch or two larger than the window opening on all sides), then light the space from above with a bright bulb to simulate sunlight.
The second method of creating a realistic outdoor view is to set aside 3 or 4 inches of space outside your window or door for an outdoor setting. Cover the ground of this outdoor scene just as you would in creating any other outdoor scene (using polymer clay or paperclay for a cement balcony or porch, or grass-like groundcover available in train and hobby stores), then choose a photo of an outdoor scene is that scaled properly (in other words, you wouldn't want to pick a picture with a huge piece of furniture featured close to the camera that is obviously too large to match the size of actual furniture used in your room). The outdoor photo also needs to be quite large (read on to understand why). Glue the photo to a piece of cardstock or poster board using a glue stick or permanent spray adhesive, and make sure no wrinkles or bubbles form under the photo. Then you insert the photo into your outdoor area and curve it to surround the area with a smooth view instead of the flat walls of the box. Tape the edges of the photo to the outer side of your setting's wall, then fill the area with the appropriate miniature outdoor furnishings and plants as you choose. As with the first method, light the area from above with a bright bulb to simulate sunlight. See below for several examples of this technique used in the Thorne rooms. The first example shows a view created by using fake grass covering for the ground, with a miniature brick gate and miniature plants set in front of a painted outdoor view. The second example shows a miniature balcony with patio furniture, plants just past the balcony, and the entire area is surrounded by a photo of a panoramic view of Paris with the Eiffel Tower in the distance. A third Thorne room shows a small outdoor Japanese garden with plants that are set right up against the curved scenic backdrop photo.

The final technique is the most realistic of all, and provides additional interest for the viewer. You can create an entire outdoor setting, complete with things like ponds, trees, an exterior view of the "building" that the main setting is set within, birdbathes, and more. The outdoor area can even become a focal point for the setting, as demonstrated in the second photo above depicting an outdoor area featuring a sculpture, garden wall, cement path inset with rectangles of fake miniature grass, and miniature shrubbery. Below is another excellant example of this, done by Brooke Tucker for one of her rooms. You have to turn the entire structure of the room around to see this view (otherwise you only get glimpses of it through the main setting's windows and opened doors), but it provides yet another way to enjoy the artisan's creation. Ms. Tucker used the flat outdoor photo technique for this view so that viewers can be allowed to see the outdoor scene easily.
And that, ladies and gentlemen, concludes both today's lesson and this week's workshop on Traditional Room Boxes. I hope you found this week's lessons to be interesting, inspiring, and helpful in creating your own miniature masterpieces, and welcome any comments or questions! All pictures of Thorne rooms were used from the book "Miniature Rooms: The Thorne Rooms at the Art Institute of Chicago," and pictures of Ms. Tucker's rooms were derived from her website at www.brooketucker.com or from the book "The Dollhouse Book," by Stephanie Finnegan. Both are available at Amazon.com and most fine bookstores.
Many mini hugs,
Melissa Darnell
Co-owner