Miniature University Workshop: Traditional Room Boxes
Lesson #3
Instructor: Melissa Darnell
Email Melissa with questions: [email protected]
Inspiring Room Boxes and Vignettes
For the next two days of lessons, I thought we could focus on taking a look at some basic details and techniques that makes great miniature room settings so great. So I'll be featuring a variety of photos of both miniature and real sized rooms, pointing out some of their details that we can recreate for ourselves in any room box or vignette, and then I'll even provide you with directions for HOW to recreate these details. So without further ado, let's get started!
Ceilings
When it comes to ceilings, I just hate to see a plain expanse of white (or any other solid color, for that matter). Some of the most stunning rooms have really great ceiling murals, plasterwork, and other great decoration that just make them a real pleasure to behold, even in miniature! So let's take a look at some of the ways we can decorate our miniature setting ceilings!
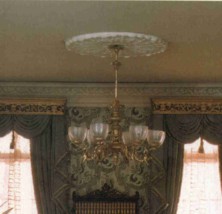
The easiest and most typical ceiling decoration used is the ceiling medallion, often paired with a chandelier for added drama. Of course, there are a wide variety of pre-made miniature ceiling medallions available worldwide, but why buy one when you can make your own easy as pie? Here's how!
How to Make Your Own Plaster Ceiling Medallions
Based on the Project in "Dollhouse Accessories, Fixtures, and Fittings," by Andrea Barham
Materials/Tools Needed:
1 package of Fimo, any color
fine casting plaster (look for Plaster of Paris or similiar product at any department store or arts and crafts store)
decorative plastic, wood, or metal finding (such as a decorative small belt buckle, a knob for a drawer pull, or large button)
water
1. Begin by carefully cleaning off your decorative plastic, wood, or metal finding and drying it thoroughly.
2. Press the decorative side of the finding into Fimo that has been well warmed and formed into a round shape (you can knead the Fimo with your hands or set it on a radiator for a few minutes to warm it and make it easier to work with).
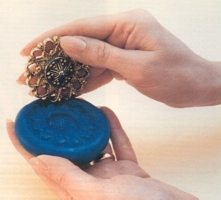
3. Carefully lift and remove the finding from the Fimo, making sure not to tear the dough.
4. Bake the Fimo mold according to the package's directions. Let cool completely, then scrub the inside of the mold with water to make sure any loose Fimo is removed. Dry completely.
5. Mix a small amount of plaster according to its package's directions until it is a creamy thickness.
6. Dribble small amounts of the plaster into the mold until it is filled up to the top (this helps prevent air bubbles). Holding it on a flat surface, tap the mold firmly until no more air bubbles rise to the surface.
7. Set aside somewhere safe until the plaster is completely hard inside the mold (about 20 minutes).
8. Carefully remove the plaster medallion from the mold. If the medallion doesn't come out easily, use a blunt knife to help lever it out.
9. Now use a sharp craft knife to smooth the edges of the ceiling medallion. If the back of the ceiling medallion isn't smooth, use sandpaper to lightly sand it smooth.
10. If the ceiling medallion is to be used with an electrical light fixture, carefully drill a small hole through its center. Your new ceiling medallion is now ready to be added to your setting's ceiling! Just use any good strong glue (not white or craft glue, use an industrial strength glue instead) to attach it.
* Note: this technique can be used to make copies of any item that has a flat back, including decorative door surrounds and half columns. To create items that have two sides (such as fully rounded columns), use a product meant for this purpose such as Hobby Time's Mouldin' (available at most arts and craft/hobby stores).
Ceiling Murals and Borders
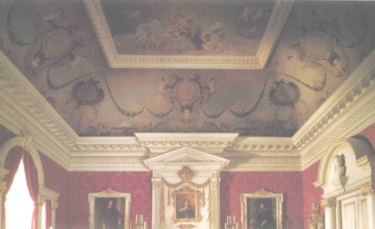
Another technique for ceiling decoration that is fairly simple to do is the ceiling mural or ceiling border. This is a fairly simple technique to do in both real scale and miniature, yet makes for a wonderfully interesting ceiling in any room (see below for an example of this technique, an actual sized room from the Wilson Castle in Proctor, Vermont, USA). This room has a curved cornice that has been decorated with either a wallpaper border or a hand painted design, and the ceiling itself is also decorated with a gently curving similar border.
To make your own decorative ceiling border, simply use miniature scale wallpaper borders directly on the ceiling along the cornices! If you're not sure that you want to permanently feature this design, you can also make a "false ceiling" from white cardstock paper, cut to fit the exact size of your setting's ceiling (this also makes it easier to decorate a ceiling instead of trying to decorate the ceiling once it's already in the room box or vignette). Lay out your wallpaper border along the edges of the ceiling, cut all lengths of border to fit exactly (be sure to miter at the corners... this is done by cutting the ends at a 45-degree angle), then glue into place on the ceiling for instant decoration!
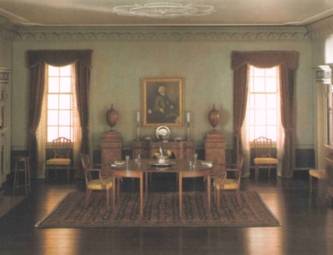
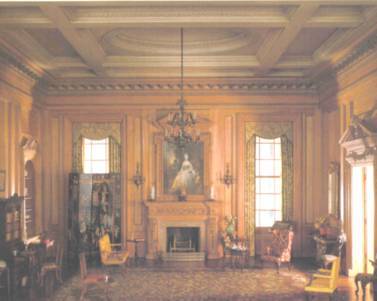
As previously mentioned, there is also the ceiling mural or painting technique that has been utilized in many a great castle or mansion. These paintings were a way to immediately show of the owners' great wealth, as it took a lot of it to have artists paint them! But you can decorate your miniature setting with this type of ceiling decoration for only the cost of a magazine or a couple of color printed sheets of paper! See below for one square shaped room by Mrs. James Ward Thorne that features an entire ceiling covered in a highly detailed mural:
To recreate this look for your own setting, simply decide what theme of painting you're looking for, whether it's classical gods, angels and cherubs, religious scenes, or simply a sky view. Then go to www.google.com, click on the "Images" tab, and type in keywords relating to the theme of painting you're looking for (note: remember to mind the copyright law on this issue though... if you're creating a room setting to be sold, you may want to consider painting your own original ceiling decoration using stencils instead). Print out (or cut out the magazine image), cut the image to fit your false ceiling, spray the backside of the image with a permanent bond spray adhesive or use a glue stick (school/white glue tends to make the image bubble up and wrinkle), then attach to your ceiling. Let dry, then spray with a coat or two of matte finish clear acrylic seal. Let dry, then install into your room!
Now we come to the style of ceiling decoration that is nearest and dearest to my heart... plasterwork. When it comes to miniature rooms with good ceiling plasterwork, Mrs. James Ward Thorne excelled. Below are just a few of her rooms that feature truly stunning plasterwork designs to inspire you:

And the best part is, not only are the possible designs only limited by your imagination, but there are also five different methods for creating miniature plasterwork ceilings ranging from super easy to super intricate.
For simple designs such as the first one pictured above, you could use the easiest method: plastic doilies. You can cut these to the size and outer shape that you need, lightly spray paint them, then spray permanent spray adhesive on the back and attach it to your ceiling for instant plasterwork decoration. Simple, right?
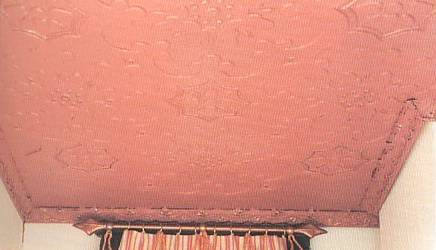
The second method of creating miniature plasterwork ceilings is by using either embossed paper or anaglypta to cover your ceiling. Anaglypta is a type of life sized wallpaper featuring a hard, raised design, comes in many patterns, and can be applied just like regular wallpaper (wet prepasted anaglypta with water, let sit for 20 seconds, then cover your false ceiling with it and let dry, or coat the back with wallpaper paste and apply to false ceiling) to cover your ceiling with an instant design that simulates miniature plasterwork. Once the wallpaper paste is dry, be sure to either paint anaglypta (as shown in the photo below of a ceiling for a victorian dollhouse) or give it a couple of coats of clear sealant to protect it against dirt and dust. Embossed paper (available in most arts and craft supply stores in the scrapbook supply section) is used the same way, simply cut to fit your ceiling, apply permanent bond spray adhesive to the back, then cover your false ceiling and let dry before coating with paint or clear acrylic seal to protect.
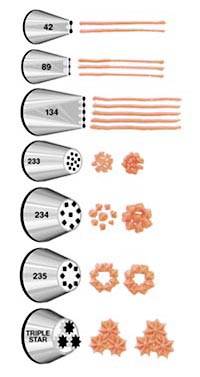
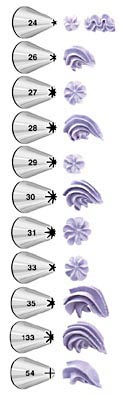
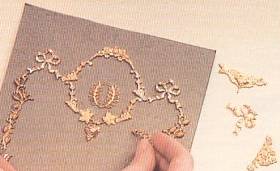
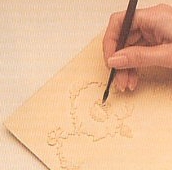
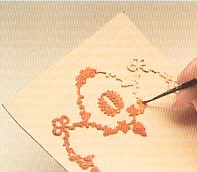
The third method is to decorate your ceiling by hand with real plasterwork using a cake decorator's bag and cake decorating tips. There are hundreds of tips available in all sizes, making this an excellant way to create custom designs quickly and easily. Start by cutting out a piece of wax paper to the exact size of your false ceiling. Next, draw out a basic design onto your false ceiling and place it under the wax paper as a guide. Fill your cake decorating bag with a small amount of plaster (should be mixed to a creamy consistency similar to cake frosting; mix only small portions of plaster at a time because it hardens very quickly), then squeeze out your "plasterwork" onto your false ceiling along the design lines you drew. If you make a mistake, use a butter knife to cut and scrape away the portion of plaster that is to be replaced, then continue as before. (* Tip: if you start working from the center of your design and work your way out towards the outer edges of the design, you'll be less likely to smudge the plasterwork with your hands or fingers as you work.) Let harden, then paint to match your ceiling. Let the paint dry, then carefully peel and glue one section of the design at a time onto your false ceiling using a good strong industrial strength glue. Once you've applied the entire plasterwork design to your false ceiling, let the glue set overnight before installing your new ceiling into your room box or vignette. Pictured below are two Thorne rooms featuring bandwork on the ceilings (wood molding soaked in water and curved before attached to the ceiling in an intricate design), which could easily be made using a small round cake decorating tip. Once the plaster hardens, paint either white to match the ceiling or a shade of brown to look like wood molding.) Below are just some of the possible shapes you can make using cake decorating tips:


A fourth method for creating ceilings that appear to be decorated in plasterwork is by using flat-backed jewelry pieces such as flower and leaf shaped rhinestones and flat metal charms (you can find these packed in themed sets that include cupids, hearts, butterflies, and more...available in the craft section of department stores like Wal-Mart plus arts and craft stores in the jewelry making section). Draw your basic design shape (such as a rectangle or circle in the center of the ceiling) onto your false ceiling using a pencil, then practice arranging your jewelry pieces until you've found the most pleasing arrangement. Glue all pieces into place, let dry, then either paint the entire ceiling one color or simply paint the pieces a different color than the ceiling instead for added interest.
The fifth and final method for creating intricately detailed plasterwork ceilings is the most difficult and time consuming, but once finished will become truly a work of art. You can create tiny details such as garlands of fruit and flowers plus vines with intricate leaves by making them individually using polymer clay or Fimo. Simply create your fruit, flowers, and leaves as you normally would with this medium, bake according to the manufacturer's directions, let cool, draw out a basic design with a pencil onto your false ceiling, lay out each item onto the design until you've found the most pleasing arrangement, then glue into place. Once installed, your ceiling will become a stunning eye catcher sure to draw out many "oohs" and "aahs".
Another ceiling decoration style with many possible variations is the use of molding and beams to create a design over the ceiling. Below are two examples of this. As you can see in the pictures on the next page, this style uses beams arranged in a type of grid design, then the sides of the beams are decorated with decorative miniature cornice molding for a very rich feel. This is a bit more time consuming to do, as each beam must be measured, painted, and cut to fit within your grid design, then many lengths of cornice molding also have to be measured, cut, painted, and installed. But the end result is beautiful, don't you think?
For added architectural interest, you could choose to create a shaped ceiling like the one featured below. This room by Mrs. Thorne has a gentle curve to it, and is covered in many octagon shaped molding sections (which could also be made using the plaster cake decorating style described earlier).
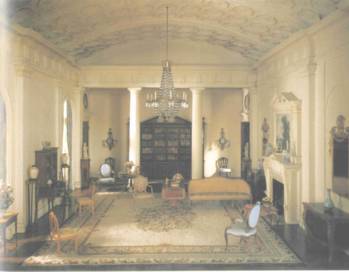
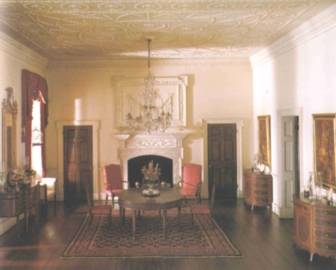
Or you could even feature a ceiling dome in your room setting, which can be created with the use of a plastic bowl shaped object (take a close look at packaging that toys and other items come in, small plastic bowls that you mix in, or even try your hand at creating a shallow bowl from polymer clay, Fimo, paperclay, or paper mache!). Once you find your bowl shape and have it cut and ready for inserting, spray paint it white, then trace around its lip onto your ceiling. Cut this traced shape out, then tape or glue the plastic bowl shape into place. You can then add plasterwork around the edges or even inside the curve of the dome to help tie it in with the rest of the ceiling (see second picture in this lesson for an example of a Thorne room that features a ceiling dome). You can even feature a chandelier that hangs from the center of the dome (just remember to drill an opening in the center for wiring to pass through if you're using a working light fixture).
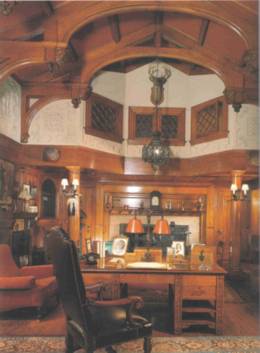
Yet another way to fill up those upper recesses of your room box or vignette is with interestingly shaped exposed trusses or beams, like the room pictured below:
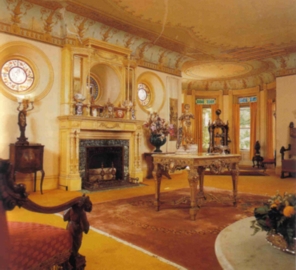
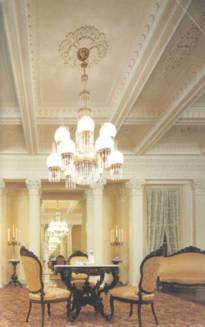
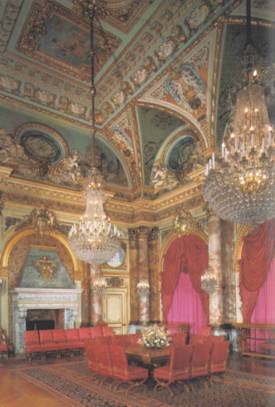
And as a final option in ceiling decoration, why not try a mixture of many techniques? The room pictured on the following page is the vaulted dining room of The Breakers mansion in Newport, Rhode Island, USA. This room's ceiling features arched window openings called loggias, ornate moldings, a gold painted ceiling medallion, and paintings set within frames of plasterwork painted gold. In a regular sized home this would be well past overdone, but in this particular room with its 2-story dining room, it's simply stunning!
There are many, many ways to decorate ceilings to help them become worthy of interest in your room boxes or vignettes. The best places to look for inspiration are in interior decorating books showing real sized homes. Tomorrow, we'll learn how to include more architecturally interesting features in our miniature settings, how to create realistic outdoor views for doors and windows, and how to add drama to our walls.
Remember: you are limited only by your imagination and your determination to find a way to recreate something in miniature! As you can tell by the lessons this week, this topic is a personal favorite of mine, so please be sure to send me pictures of anything you create using these methods!
Many mini hugs,
Melissa Darnell