Miniature University Workshop: Traditional Room Boxes
Lesson #2
Instructor: Melissa Darnell
Email Melissa with questions: [email protected]
Electrifying Your Room Box or Vignette
Entire books can be (and have been) written on the subject of miniature wiring. Today's lesson, however, won't be that long. Instead, I'll just touch on the two main types of wiring available, show a few pictures on how to install each type of system with descriptions for each, and provide some basic guidelines. Additional links to help you further will be provided at the end of this lesson with more detailed directions. Also included in today's lesson is a project on how to make your own working wired chandelier for those interested in taking today's lesson further.
To electrify or not...
First, you must decide whether you want to electrify your room box or vignette. There's no doubt that real, working lights, chandeliers, wall sconces, and the actual flicker in a fireplace will add a lot of realism to any setting and help set the mood. However, do keep in mind that if you are only worried about lighting the room for viewing purposes, you can always either include several real windows along the sides of your setting or even replace the ceiling of your room with a clear glass or plastic roof for natural lighting.
What kind of wiring should you use...
If you decide that you definitely want to electrify your setting, the next thing to consider is what you made the room box or vignette out of. The two basic types of wiring systems for miniature settings are round wire and copper tape, and both have their pros and cons. Round wire is just that, small round wire wrapped in protective plastic coating. Copper tape is thin and flat, and comes in both a single row or two side-by-side double rows, and with or without clear protective Mylar plastic over the rows. If your room box or vignette is made of wood, I would heartily recommend that you use copper tape in the double row, plastic covered version, as this is very simple to put in place. For foam core board rooms, it's usually much better to use the round wire because copper tape requires small metal grommets where all the lines of electricity intersect, and these grommets often will not stay well in foam core board.
Creating the Electrical System Layout...
Once you've decided what type of wiring is needed for your setting, now is the time to decide on the layout of your room. For me, this seemed very backwards at first, as in real life decorating I'm used to wallpapering the walls, then putting in the furniture, THEN deciding where to put lamps and such. But when it comes to creating miniature settings, you have to decide on where to put the lighting first, as this layer needs to be done BEFORE you paper the walls. So take a look at your room and decide where you'd like the lighting to be at (you can decide exactly what style of lighting to use later). Use a pencil to mark the spots on the walls where you want light sources to be or to plug in at, and don't forget to mark the center of the ceiling if you plan to put some sort of overhead lighting source up there.
Round Wire Systems...
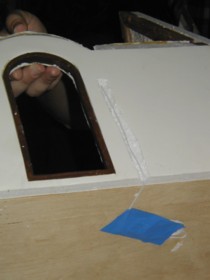
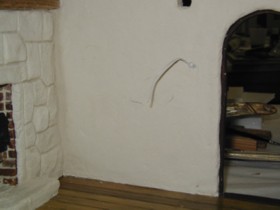
Now, if you're using the round wire version in a foam core board room setting, you'll need to lightly dig out a shallow "ditch" in the walls and ceiling for the wire to run in, which should be done on the outside of your room box or vignette (these ditches are easier to cover on the outside and will be less visible than trying to cover them up inside your room setting). Below are two pictures of a Rik Pierce project in progress, kindly shared by Laura Isabella, showing an example of this:
In the first picture, Laura says "Here we see a great technique for electrical wiring through foam core. The foam core is dug out to allow the wire to move freely inside of the channel and the hole through the wall is made with a Dremel and 5/64th inch bit.. The excess wire is rolled up and taped to the bottom of the dollhouse to keep it out of the way." In the second photo on the right, Laura says "Here is the wiring hanging out on the inside wall for a small wall sconce. Note the very small *loose* knot to help the wire from accidentally being pulled back into the channel." On the next page is a third photo showing the same channel now covered with heavy paper tape. Since this is the outside wall of a cottage she created, the paper tape was later covered with paperclay. But for a room box or vignette you could also cover your taped channels using wallpaper or sticky plastic covering (commonly known as Contact paper or shelf liner paper).
Once all the wall wires are put in, you'll need to connect them together to create a line circuit. The connecting lines of wire can be hidden underneath the room around the edges of the floor using the same channel method. Don't forget to leave one end of the wire circuit extra long so that the circuit can be connected to a transformer later on.
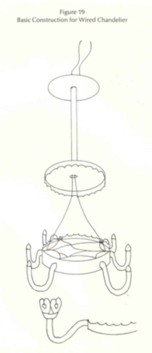
For you more ambitious members out there, here's a project I found for making your own working wired chandelier, featured in the book entitled "Make and Furnish Your Own Miniature Rooms," by Marian Maeve O'Brien. I hope you enjoy it, though unfortunately I haven't gotten to try this project yet, so please be sure to share any problems you may encounter and solutions that you discover with the rest of the group!
How to Make Your Own Working Miniature Wired Chandelier
Materials/Tools Needed:
1 length soft brass tubing, .090" OD
1 length soft brass tubing, .125" OD
tubing bender or grooved 1/2" dowel
tubing cutter or fine-toothed jeweler's saw
small screwhead countersink
1 flat-back filigree medallion-type jewelry finding, 30 to 60 mm, to be used as a ceiling plate
2 30 mm flat-back stone settings with swedge holes, center hole not more than 1/8"
4 pearlized white plastic rings
4 gold bell caps
4 miniature lamps with attached wires
1 length 24 or 26 gauge insulated wire, 18" long
G.E. Silicone Seal
brass paint
Aron-Alpha or Krazy glue
epoxy glue
florist's wire
bread dough for making roses, or flowers and leaves removed from old jewelry
plastic doily for ceiling decoration
1. Cut one piece of the .125" tubing about 1/16" shorter than the overall height you want your chandelier to be. You will have to adjust the height to your room dimensions. Solder (or cement) one end to the ceiling plate. To the other end solder or cement one of the stone settings with the open side down. This will be the stem with the ceiling plate and one half of the "junction box" (the place where all the wires will connect).
2. Next, form the arms from the .090" tubing by bending the ends of the full length to a 90-degree angle. Make sure not to kink the tube. This is best done with a small tubing bender; however, we used a grooved 1/2" dowel rod to make the bends. The tubing may be cut best in a vise, with a tubing cutter or with a fine-toothed jeweler's saw.
3. Now cut the tube 1" back from the center of the hole in the bent end. This will give you two arms about 1" long for a chandelier having about a 3" spread across the arms. Now repeat the bending and cutting procedure from the remaining piece of .090" tubing to give you the necessary four arms. The inner edges must be reamed (sanded smooth) to eliminate sharp corners, which would cut through the insulation of the wires. A small screwhead countersink is ideal for this purpose, or, as a last resort, your fingernail file. Just twist the pointed end firmly in the hole.
4. The remaining stone mounting should have a turned-up, perforated filigree edge. Find four openings that are equally spaced around the edge and check to see if the straight ends of the arms will enter. If not, the openings may be enlarged with a round file, or if you have a Dremel, a small rotary file will do it in a jiffy. Fit the arms exactly as you want them; that is, the straight end goes into the stone mounting about 1/8" with the prongs of the mounting up and the butt end of the tube also up. Set one at a time using a tiny bit of Krazy glue to hold them in place. Since this dries very quickly, the arm can be held in place while it sets.
5. When the four arms are glued in place, let them "set up" for a bit and then do a permanent job with Epoxy glue to strengthen the bond.
6. Next, cement the plastic rings into the bell caps. Form the caps up and around the rings with your fingers first; just press the sides up making sure that the bottom holes are centered. Glue together lightly. Glue these assemblies to the ends of the arms leaving about 1/16" of tubing sticking up through the bottom of the cap-and-shade assembly.
7. When these subassemblies are thoroughly dry, you are ready for the wiring. Take each of the lamps and push the pair of "pigtails" (wires) through the arms of the cup end so that you will have four pairs of wires coming into the stone mounting, which now becomes a junction box. A very small amount of Epoxy glue at the base of the lamp will set it permanently straight on the arm. Strip 1/4" of insulation from the end of each wire and join one of each pair of wires together. This should give you two groups of four wires each - one wire from each lamp going to one group and the other wire from each lamp to the other group. Now take two 9" lengths of about 24 or 26 gauge insulated wire and join one to each of the groups of four. This will give you two groups of five wires each. These connections must be soldered.
8. Before soldering, connect the two long wires to a 12-volt transformer to check the lamps and connections. They should all light. Try tapping the fixture lightly here and there; if you have a flicker, there is a poor connection somewhere. It must be found now and corrected. It is a good precaution to test each lamp for a short time before wiring it into the fixture.
9. When this is done, the two five-wire soldered joints must be well insulated. For this, use G.E. Silicone Seal. Be generous with it to make sure that all bare wire and solder are well covered. Pack the wires down into the lower half of the junction box so that the other half will close down tightly. Be careful not to rub the insulation from the wires.
10. When the insulation is dry, draw the two long wires through the stem and join the two halves of your junction box by either crimping the edges or gluing lightly with Epoxy.
11. This completes the base chandelier, electrically lighted. To make it appear gas lighted, simply add a chimney to each of the lamp cups.
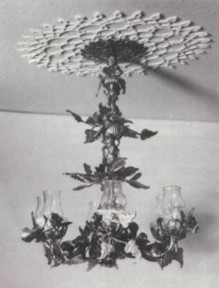
12. In the photograph (at the beginning of this project) you'll see a motif of rose vines on a typical mid-Victorian ornate brass six-light working chandelier. Thin florist's wire was wrapped around each stem from the bottom of the cup to the center post and secured with Epoxy. Another length was loosely wrapped from the ceiling plate to the base and glued in place.
13. Simple bread roses might be used for decoration, or you ay have some appropriate small plastic flowers removed from an old costume jewelry available. These are applied at random on the base, stem, and all arms of the chandelier with Super glue. Cut apart the leaves on the findings, make some of the stems short and leaving others a bit longer. Glue these in the same manner uniformly on the florist's wire that forms the vine down the stem and arms. You may want to glue some on the ceiling plate and junction box as well.
14. When all the leaves and roses are placed exactly as you would like them, go back and glue all contact places with Epoxy. This will give a permanent bond, and you will take no chances of anything loosening or falling off the fixture when you wire it into place in your room.
15. When all glue is dry, paint the entire fixture except the pearlized rings and bulbs with a good quality brass paint and wire into the room. The center of a plastic doily was used for the ceiling medallion. Just glue on, cover with gesso, and paint the entire ceiling the color you want.
Copper Tape
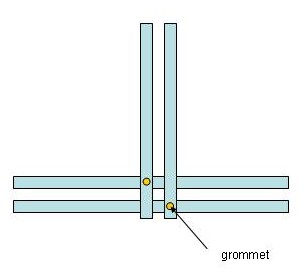
If you're using copper tape for a wood room setting, you can simply stick the tape to the walls inside the room. Start with a line of the tape along the baseboard area of the walls, and go up and over any doorways that you may have included in your room. Then put in the lines of tape for the wall lights you have marked, making sure to fully overlap the end of the new line over the main line of tape that goes around the room. Then insert a grommet over where each line of copper overlaps. Only insert ONE grommet per copper line, or your system won't work. See illustration below for how to position the grommets for each of these intersections in your copper tape system:
For both round wire and copper tape systems, you'll need a transformer. This controls the volume of electricity that is supplied from your house electrical socket (or wherever your room setting's system will be plugged into for display) to your room setting's system. The transformer is important because if you get too small a transformer, your room setting's system won't have enough electricity to light it up, but if you don't use a transformer at all, your room setting's system would receive way too much electricity and short out! So here's how you figure out what size transformer you'll need (note: you might want to wait until you have chosen all your light fixtures before purchasing a transformer so you'll have the necessary info needed below):
1. Count up all the amps that each light bulb in your room uses. Remember, this is the number of amps used per BULB, not light fixture. For instance, a chandelier has several light bulbs so you'll need to count up the number of amps used by each bulb in it.
2. Multiply this number by 2 to double it. This provides "room to grow" so that you'll have some leeway in case you want to add more lights or use light fixtures that use more bulbs later on.
3. Choose a transformer that is the closest in size to #2's figure.
Now connect your circuit system to the transformer, making sure that all exposed wires are securely wrapped with black electrician's tape (available at all hardware and building supply stores). Plug in one bulb (your kit may come with one) into the system to test it out. If it doesn't work, check all the intersections (for copper tape systems) or connections (for round wire systems) to make sure they are connected fully and properly, then try again.
Smaller Scale Lighting...
For 1/2 scale rooms and vignettes, you may need additional lighting sources in order to fully light your room for display. If you don't want to fill the room up with so many lighting sources that your setting looks like a light fixture store, try using hidden lights along the inside edge of the box's decorative outer frame. These can be bare bulbs since they won't be seen, and you can do a whole row of them for plenty of light directed right at your setting.
For 1/4th scale rooms and vignettes, the hot new trend in lighting systems is LED. This is the type of system typically seen in your car stereo system (the kind that lights up the numbers on the radio at night). It produces a much smaller amount of light perfect for setting a realistic mood on a tiny scale, and can be run on a battery. Personally I've never tried this system and it's still pretty new as far as usage for miniature settings, so you'll need to look online for more info about its usage and availability.
For additional, in-depth directions to help you learn the art of wiring in miniature, please visit these links below:
Really great 1/12th scale dollhouse wiring how-to article: http://minifan99.tripod.com/TheOcelotsBuildADollhouse/chapter_three_wiring.htm
How to wire a 1/144th scale room: http://members.tripod.com/minifan99/White_Christmas_Room_Update/wiring.htm
I hope today's lesson was helpful in getting inspired to try tackling electrifying your room box or vignette. It was certainly a learning experience for me in putting it together! I'd especially love to see all the variations that you may come up with in creating your own chandeliers, as the possibilities are only limited by your imaginations!
Many mini hugs,
Melissa Darnell