Miniature University Workshop: Traditional Room Boxes
Lesson #1
Instructors: Gene Fisk and Melissa Darnell
Email Gene with room box project questions: [email protected]
Email Melissa with all other questions: [email protected]
Creating the Basic Room Box
Room Boxes and Miniature Rooms Vs. Vignettes
I thought it might be a good idea to start today's lesson off with a quick look at the difference between a room box (or miniature room) and a vignette just in case there's any confusion. A room box, also commonly known as a miniature room, is generally pretty deep in size. It allows the viewer to see an entire room (even though the front wall is still missing so you can look into the room from the front), and has enough depth in the room so that the owner can easily rearrange the setting. Room boxes can also be stacked on top of each other to create a dollhouse, but because of their size, they require more room to display than a vignette does. One way to display room boxes at their best is to recess them within a wall at eye-level, a method made popular by the late Mrs. James Ward Thorne of Chicago, Illinois, creator of the Thorne Rooms which can be seen on display at the Art Institute of Chicago. You can also see a couple of these rooms plus read more about Mrs. Thorne online at http://rds.yahoo.com/S=2766679/K=Thorne+rooms/v=2/TID=i021_20/SID=e/l=WS1/R=10/H=0/*-http://www.dollreader.com/ For more online examples of several of my personal favorite miniature room boxes by Brooke Tucker, be sure to view the commissioned scenes at Brooke Tucker's website at http://www.brooketucker.com/showcase.htm.
A vignette, on the other hand, is much smaller. It is really a shadow box that only shows a small portion of a room, such as one full wall along the back and shortened walls on the sides. An easier way to think about it is that typical vignettes show about as much space as a walk-in closet. Vignettes also usually aren't as easy to rearrange the settings in a pleasing way. However, vignettes are easier to display in a home on a side table or even hung on a wall. Brooke Tucker has also created a fine selection of vignettes (which she calls "Put Abouts" because they can be put about anywhere), available online for viewing at http://www.brooketucker.com/putabouts.htm
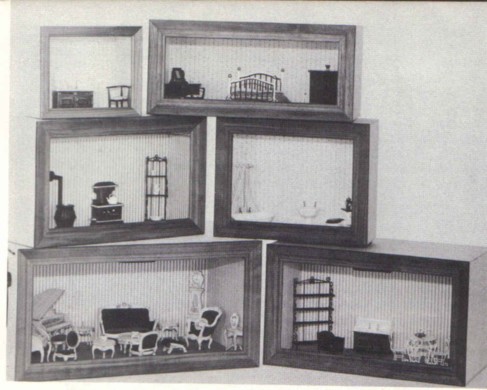
Pictured below are several examples of empty 1:12 room boxes in various sizes, starting at a 10" x 8" square room box (top left) all the way up to the largest at 24" x 12" (bottom left), just to give you an idea of the variety of sizes YOUR room box or vignette can have!
Creating the Basic Room Box, by Gene Fisk
Your room box could be made using 1/4th inch thick wood or foam core board. If using wood, consider using plywood that has been finished on one side so that the outside of your box will have a nice surface to it without having to spend a lot of time sanding and finishing it yourself. A relatively new product out that makes a good choice if you don't mind painting the outside of your box is MDF, available at most building supply stores.
1. For a room box which measures 12" across the front, then you must start with a back wall which measures 18 inches this allows room for the angling of the walls outward. Any angle will work except a 90 degree angle. So let's make the back wall 18 1/4" using a ruler to help you cut straight edges lay back aside while we do the sides.
2. Now we shall cut the sidewalls, each wall should be 12 1/8" plus the desired height for our room which should be 10-12". Okay now is the time to decide on placement of walls and windows. If you wish to cut doors and windows into your box do it now.
3. Measure and cut a top and bottom for your box. If you are going to electrify your room box do so before papering (tomorrow's lesson shows how to do this). Now is the time for painting or wall papering your box. Much easier to do this now than after the room has been assembled.
4. Glue the back wall to the floor. If you wish you may use your straightpins (for foam core board room boxes) to hold in place until it is dried. (If using wood or MDF, nail walls together as well.) Now assemble the walls at the desired angle remember a 90 degree angle will not work. Now glue and pin or nail the sides in place and allow to dry.
5. Now we put masking tape over the exposed cornors of the roombox to neaten them (or sand the ends if using wood). Paint or paper the outside of box to suit your decore.
Hope you enjoy your roombox.
Gene
GSOLFOT
* Note: This is a great basic project for creating a room box using forced perspective. Remember that these 1/12th scale measurements can easily be altered to fit any scale you prefer. If using foam core board to build your room box or vignette, Rik Pierce suggests that you could also use short pieces of barbeque bamboo skewers like nails to "nail" the walls and floor together more securely. Thin stiff plastic, available at most building supply stores, can also be cut to fit the front of your room box and topped with a frame of decorative molding for a nice touch. Or if creating a vignette from foam core board (which is lighter than wood), try using a picture frame with glass and mat board to create a decorative glassed front for your completed vignette. To do, simply purchase your picture frame and mat board from any store (make sure the picture frame is at least 2 inches wider than your vignette box on either side, then choose a color coordinating mat to fit inside the frame). Take out the cardboard back of the picture frame and trace around the front open end of the vignette box onto the cardboard backing, then cut this opening out using a strong sharp craft knife. Repeat on the mat board as well. Then fit the mat board into the frame behind the glass, and you can glue or tape your vignette (once completed) to this matted frame for a quick and easy yet elegant glass framed front!
Many mini hugs,
Melissa Darnell
Co-owner