Miniature University Workshop: Spring Gardens
Lesson #1
Instructor: Melissa Darnell
Email Melissa with questions: [email protected]
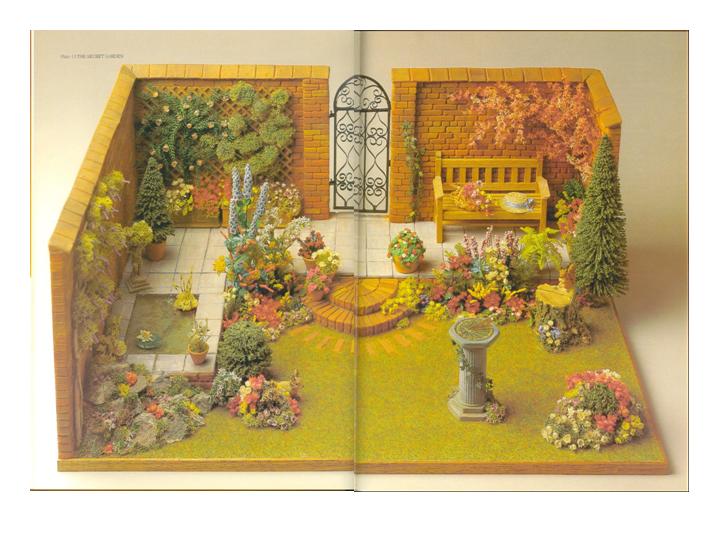
Secret Garden Setting
Picture used from the book "Making Miniatures in 1/12 Scale," by Venus and Martin Dodge.
Materials/Tools Needed:
2 sheets of foam core board (styrofoam sandwiched between two sheets of posterboard)
1 sheet of plain styrofoam (like the kind found packed within boxes for appliances - check your local appliance store to see if they have some to be discarded)
terra cotta or brick red colored acrylic paint and paintbrush
white or gray acrylic paint and paintbrush with tiny tip (for painting the lines between the bricks)
sharp craft knife
white/school glue
gray and white polymer clay
hot glue gun and low temperature glue sticks
grass paper (available at train and hobby shops)
empty soda can and tin snips (for creating a wrought iron gate; could also use brown colored polymer clay instead to create a wooden gate)
unused coffee grounds
toothpicks
1. Begin by deciding how large you want your garden to be. Then cut a square or rectangle from the foam core board to your desired size. This will be the base for your garden. The 1/12th scale one pictured above has a base that is 13.5" x 19.5".
2. Next, decide how tall you want your garden walls to be, and where you want them at in your garden. Cut the walls for your garden from the plain styrofoam. A typical garden wall is about 8 feet tall, so a 1/12th scale one would be 8 inches tall, a good 1/2 scale wall would be 4 inches tall, and a 1/4th scale garden wall would be about 2 inches tall.
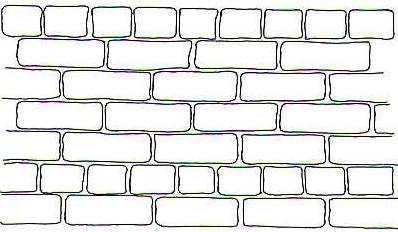
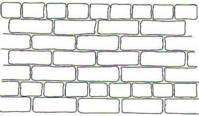
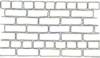
3. Right click, save, and print out the brick wall pattern below for your chosen scale, lay it over your brick walls, and use a ball point pen to trace over the pattern. Be sure to press firmly enough to leave an indention on the styrofoam beneath the pattern. Repeat on both sides of each wall.
|
1/12th Scale (1"=1') Brick Wall Pattern |
1/2 Scale (1/2"=1') Brick Wall Pattern |
1/4th Scale (1/4"=1') Brick Wall Pattern |
4. To make the top of the walls, you can use either brick colored polymer clay (roll it out flat, cut to a width that is just slightly wider than the width of your walls, cut lengths of this strip to fit over each wall, then use a butter knife to press in lines to create bricks, bake in the oven, then hot glue to tops of walls), or you can use thin pieces of styrofoam or cardboard for the tops of the walls.
5. To finish your brick walls, use shades of red and brown acrylic paint to color the styrofoam. Apply the paint thickly, wait a minute or two, wipe off the excess paint, and repeat if needed until the styrofoam is the color you want. Let dry, then use white or gray acrylic paint and a fine-tip brush to paint in the grout lines in between the bricks.
6. Once the brick walls are dry, attach them together by inserting short lengths of toothpicks or barbecue/bamboo skewers into the ends of one wall, apply hot glue to the end of the first wall, then press the connecting wall onto the glue and exposed ends of the toothpicks or skewers. The toothpicks/skewers will give the joints added strength. Repeat this method to attach the walls to the foam core board base of the garden.
7. To create the raised areas of the stone floor and decorative pond, make a paper template of these two connected areas for your garden. Cut out the template, then trace around it twice onto a sheet of foam core board. Cut out both pieces, then glue them together in a stack. On this stack, note which cut edges will be seen in your garden, then decorate these exposed styrofoam edges using an empty ball point pen to create indentions for grout lines to suggest bricks. Paint the same as you did with the brick walls. Cut out a square or rectangular opening for your pond, then glue the entire platform onto the garden base inside the brick walls.
8. For the stone flooring, lightly mix the white and gray polymer clay together. You don't want a marble look, so mix it together pretty well, but do stop mixing the two colors together when you have achieved a nice mottled look. Roll out the mixed clay using a rolling pin or large round dowel.
9. Cut the clay into squares. For 1/12th scale gardens, a good square measurement would be 1" x 1". 1/2 scale gardens look better with 1/2" x 1/2" squares, and 1/4th scaled gardens need 1/4" x 1/4" squares. 144th scale gardens need clay that is very thin, and cut to the shape of the final stone flooring area to be covered with lines for the square stones just lightly pressed into the clay (unless you enjoy the idea of cutting, baking, and gluing tiny individual stones!). Bake your appropriately sized stones, let cool, then hot glue in place.
10. To create the brick steps,right click, save, and print out the brick step pattern below for your chosen scale and cut this pattern out. Trace around the pattern onto a sheet of foam core board for the bottom (lower) step. Then cut the center half circle of bricks away from the outer circle, trace around the center half circle of bricks onto foam core board for the top (higher) step, and cut this top step out.
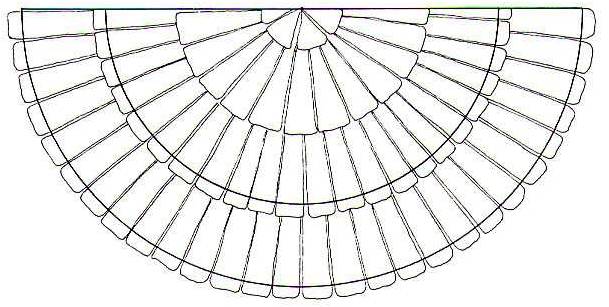
1/12th Scale Brick Steps Pattern
|
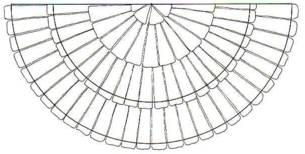
1/2 Scale Brick Steps Pattern |
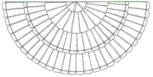
1/4th Scale Brick Steps Pattern |
11. Carefully peel off the posterboard from one side of the bottom step, and off one side of the top step as well. Now use the two pieces of the brick step pattern to trace brick grout lines onto the exposed styrofoam sides of the steps. Then hot glue the top step to the bottom step, making sure that both "brick" sides of the steps are facing up. Finish the steps by making brick grout lines along the edges of the steps, paint the same way you painted the brick walls of the garden, then glue the brick steps to your garden base.
12. Make a paper template of the remaining area of your garden base. Use this template to cut the grass paper to shape, then glue the grass paper onto your garden base to create a grassy covering. To create the small embedded individual bricks like the garden shown above, use a sharp knife to carefully cut the brick shapes into the base of the garden. Do NOT cut all the way through your base, only cut through the grass paper and top posterboard layers. Peel away these cut areas to expose the styrofoam below, then paint these exposed areas to match your garden's brick walls.
13. There are two ways to fill your pond. One way is to use resin, which is a bit more expensive. The other way is to use UHU glue. First paint the bottom and sides of your pond stone gray, then fill with either the resin or glue. If fish are desired, you could use either tiny fish created from polymer clay or simply cut a few fish from gold foil (like used for candy wrappers). To insert fish into your pond, fill your pond halfway full, arrange the fish on top of this first layer, then fill the pond the rest of the way up with resin or glue. If using glue, as the glue dries it will probably create bubbles. You may choose to leave these bubbles for a "frothy" appearance (especially if you want a fountain to be pouring in to this pond), or you can top the pond off with a piece of clear plastic cut to fit, which gives the finished pond the appearance of a smooth surface.
14. Stone boulders can be created in several ways. One way is to use more of the white and gray mixed clay (as used for the square stone flooring) to make boulder shapes. Another way is to use pieces of egg cartons cut and arranged, then painted gray.
15. Tree stumps can easily be created by using real wood. Cut a short section from a small tree branch, just above and below where smaller branches branched off from the original branch. Make your cuts uneven for an extra realistic appearance. Flip this cut section over so that the wider part is on the bottom, then glue your newly created tree stump into place in your garden, pressing down slightly as you do so.
16. The gate used in the garden above was purchased, but you can make one yourself using an old coke can and tin snips (be sure to wear good thick gloves to protect your hands!). Cut up one side of the can to open it out flat and remove the top and bottom ends of the can. Next, cut the outer frame for your gate and any horizontal or vertical lines you want to remain. Now cut several narrow strips from the can. You can then use needle-nosed pliers to bend these strips into curves to simulate wrought iron. Try different arrangements with these curled strips inside the horizontal and vertical lines of the gate frame, then hot glue them in place once you find an arrangement you like. Finish the gate by spraying it with two coats of black spray paint, then hang it at your garden's entrance!
The garden pictured above is simply there to give you ideas, you can design your garden to any style you prefer. You can make flower beds by spreading a thin layer of white/school glue for the bed, then sprinkle a heavy layer of coffee grounds over the wet glue to create mulch. Later you can then insert the wire stems of miniature flowers and plants into your flower beds, and even rearrange plants or replace them for the different seasons! Don't be afraid to take this basic project as far as your imagination will take you... turn it into a fairy garden, a setting for a tea party or outdoor picnic, add wall fountains using the mold making tips we learned from Mary Ann Stage last week, create a small vineyard or fruit orchard, or even grow a large vegetable garden in it. You could even electrify your garden by adding working miniature lamp posts or lanterns on top of the brick walls with the wires concealed inside the styrofoam walls. And look for the many projects to come later this week for ways to fill up your new secret garden with lots of flowers, plants, gardening tools, statues, and more!
Many mini hugs,
Melissa Darnell