Miniature University Workshop: Stained Glass Greenhouse
Lesson #2
Instructor: Melissa Darnell
Email for questions: [email protected]
Adding the Stained Glass
Materials/Tools Needed Today:
Gallery Glass window color paint
paintbrush
craft knife
cardboard
white spray paint
old newspapers or cardboard (for protecting area in which you’ll be painting at)
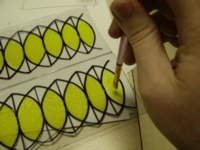
1. Squeeze out a small amount of the Gallery Glass window color paint onto a scrap piece of plastic.
2. Use the end of your paintbrush to lightly pounce the paint into the areas of the stained glass design that you want to fill in (“pounce” means to lightly bounce the end of your brush onto the plastic in an up-and-down motion to fill an area with paint). For the smaller 1/144th and 1/4th scale greenhouses, you can apply the paint using a regular paint stroke. Apply a light layer at first and let dry.
3. Now apply a second layer of window color paint, this time brushing it on to create a smooth finished surface once it’s dry. Let this second layer dry completely (it becomes more see-through as it dries), then you can decide if you’d like to make the color darker and less see-through by adding a third layer of paint if you wish.
4. If you would like your greenhouse to feature actual working doors, let the paint dry completely then use a craft knife to carefully cut out each door. To do this, you’ll need to make several passes with the knife, then you can bend the plastic along these cut lines to make the plastic break cleanly.
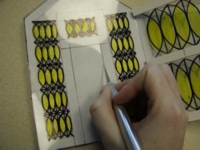
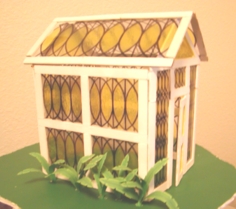
5. Now for that set of paper template copies you set aside yesterday! Start by cutting out all the stained glass design areas in the paper templates (this includes the large triangle shaped area under the roof peak of the end wall, plus the two rectangle panels in the door). If you plan to have working doors, you'll also need to cut out the inner frame work section for each door (the part of the framework that is actually attached to the surface of the door, see picture of finished greenhouse for example).
6. Trace around each paper framework template onto your cardboard (trace 2 times around the roof section template, and 4 times around each of the wall and door section templates). You should now have 2 roof framework sections, 4 side wall sections, 4 end wall sections, and 4 door sections.
7. Cut out all 14 cardboard framework sections using a craft knife.
8. Lay out your framework sections onto some old newspapers or cardboard in a well ventilated area, then spray paint each piece. Paint several light layers (instead of one heavy layer) to prevent the paint from running and dripping. Be sure to paint the two roof framework sections on BOTH sides (front and back), as the backsides of these sections will be seen. Let dry overnight while you rest up for tomorrow!