Miniature University Workshop: Furniture 101
Lesson #4
Instructor: Melissa Darnell
Email for questions: [email protected]
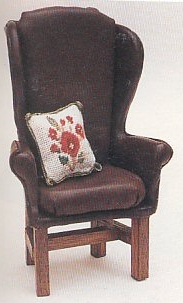
Leather Wingback Chair
Materials/Tools Needed:
1/16 inch (1 mm) scrap wood sheet
soft leather, 12" (305 mm) square
3/8 inch wooden dowel scrap
wood strip, 3/4 inch (6 mm) square
Epoxy resin
coarse sandpaper
thin packing foam
thick packing foam
clear shoe polish
tacky glue
French polish
wood stain
jigsaw
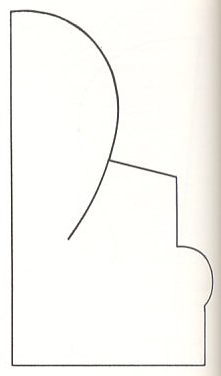
1. Start by printing off the wood template pieces below, resized to the scale you need (currently in 1/12th scale). Cut them out, then trace around them onto the scrap wood sheet.

2. Cut out the four pieces carefully using your jigsaw.
3. Sand off all cut edges.
4. Glue the sides of the chair to the side edges of the chair back using Epoxy, then glue the seat to the bottom of the first three pieces. Hold this arrangement in place using a gluing jig or makeshift jig made of children's Lego's until the glue dries.
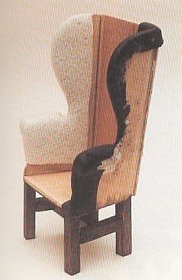
5. While the glue is drying, cut two 1 inch (25 mm) lengths of dowel. Now to create the curved arms of the chair, cut away a quarter from each dowel (place in a jig, cut halfway through the dowel along its length, turn it over one-quarter, and cut halfway through it again. Repeat for the second dowel, then glue both dowels onto the sides of the chairs for the armrests (be sure to have the curved arms hanging out away from the chair, not in towards the chair seat - see photo of completed chair for example).
6. Once the glue on the arms is dry, use sandpaper to round off the back ends of the arms where they meet the chair back so that they blend in with the rest of the chair.
7. Cut four 1 1/4 inch (32 mm) lengths of wood strip for legs.
8. Sand the legs smooth, then stain with your preference of wood stain color and let dry completely.
9. Glue the two left side legs onto the underside of the chair seat.
10. Measure the distance between these two legs and cut a strut from the wood strip to that measurement. Glue the strut in place between the two legs.
11. Repeat step 10 on the right side of the chair.
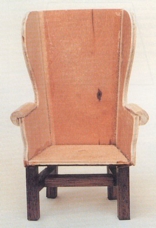
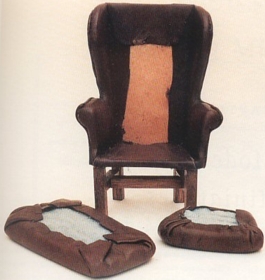
12. Measure the distance between the two side struts and cut a center strut to this measurement. Glue it into place, then give the entire leg-and-strut assembly a coat or two of French polish or clear brush-on acrylic seal to protect the wood. Your chair should now look like the one pictured below.
13. Cut two side foam pieces from the thin foam using the foam template below. Glue to the inner wooden sides of the chair, making sure to leave a small gap at the inner edge and bottom of each side where the leather will be glued to later on (see picture under step 17 for example). Fold the extra foam over the edges of the chair to the outside of the chair, arms included.
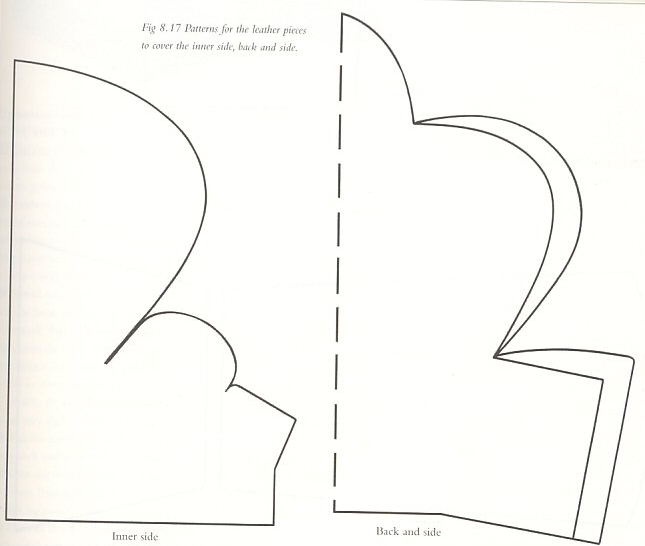
14. Use the left side upholstery template below (resized to your chosen scale, printed out, and cut out) to cut out two side leather pieces of upholstery.
15. Starting with the left inner side of the chair, glue the matching piece of leather to the exposed wood along the inner corner and near the chair seat using tacky/craft glue. Overlap extra material onto the back of the chair and the seat. Make sure that the corner of the arm lines up with the slit in the leather. Hold or clamp in place until the glue is dry.
16. Apply tacky glue to the curved edge of the outer side. Pull the leather to create a nice tension in it, smooth it over the edges, and hold or clamp it in place until the glue dries so that it can not draw up while drying. Continue doing this stretch-and-glue method until the entire inner side of the chair is upholstered with the leather, making slits in the leather where needed for a nice smooth fit and smoothing the leather over the rounded arms (make sure there's no lumps or bumps here). Also pull and glue the leather to cover the edges of the chair above where the legs are attached.
17. Trim off any extra leather around the bottom of the chair, and use a craft knife to smooth off any lumps on the outside of the leather.
18. Repeat steps 15-17 for the right inner side of the chair.
19. Use the back/side upholstery template (pictured after step 14 on the right side - resize to your chosen scale, print 2 out, cut out, flip one over and tape the two halves together) to cut one outer back and side piece from the leather. Fold and glue down along the pattern's inner line to neaten the edge (glue the rough side of the leather to itself when doing this step). Then glue the piece to cover the outer back and sides of the chair, pulling to create a smooth tension in the leather. There should be enough "give" in the leather to cover your chair completely. Pull the top flap over the top of the chair and glue to the inner back. Then fold the bottom flap under the chair seat and glue in place there as well. Trim off any extra leather around the legs.
20. Measure and cut a piece of leather large enough to fold over the front edge of the chair seat, then glue this piece in place to the top and underside of the seat (you just need to cover this front edge for a finished neat appearance).
21. Use the back and seat foam templates below (resized, printed, and cut out) to cut a back cushion and seat cushion out of the thin foam.
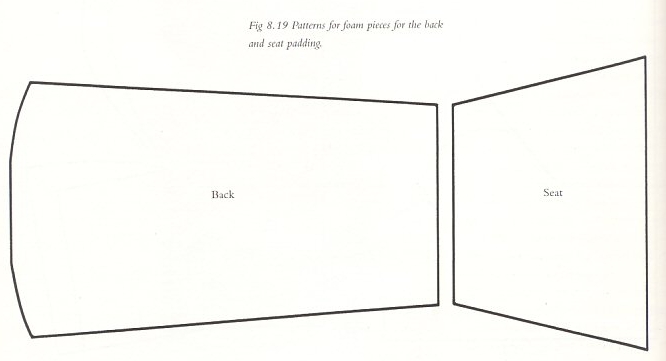
Lay these foam pieces onto your remaining leather and cut out leather pieces large enough to cover each foam cushion with enough extra leather to glue to the undersides of the cushions. Cover the cushions with their matching leather upholstery pieces and glue the leather to the undersides.
22. Fit the cushions in place on the chair, glue into place using the tacky glue again, and let dry.
23. Finish your chair by applying a coat of clear shoe polish to all leather pieces. Be sure to apply lots of effort here to create a high glossy polish to the leather for a stunning leather wingback chair perfect for any room in the house (except perhaps the bathroom!).
Option: to create the look of metal studs along the edges of the chair, try cutting down those metal straight pins (the kind that are just plain flat topped straight pins, NOT the kind that have the colorful plastic balls on their tops) until they have just enough length left on the pin to nail them into the chair through the leather covering. Nail these studs in a line along the edges of the arm fronts for an extra authentic upholstered leather look!
I hope this all makes sense, as this might be the most complicated project we've done yet! It's a good idea to always read through a project from beginning to end first BEFORE getting started on making the item, and this project is no exception. When in doubt, be sure to examine the pictures for additional guidance, and if you have questions, email me! Above all, have fun!
Melissa Darnell