Miniature University Workshop: Furniture 101
Lesson #3
Instructor: Melissa Darnell
Email for questions: [email protected]
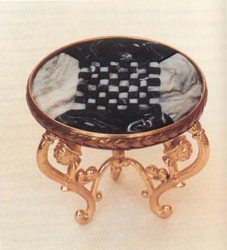
Marble Chess Table
Based on a project from the book "Dollhouse Accessories, Fixtures, and Fittings," by Andrea Barham.
Materials/Tools Needed:
decorative egg stand
brass bangle bracelet
grid paper, finely squared
polymer clays in black, transparent, and white
Epoxy resin
Grip wax (like Blu-tack but less noticeable and doesn't stain; available from most dolls' house suppliers)
1. Start by warming up all three shades of clay either with your hands or by placing them over a radiator. This helps speed up the process of warming them up and making them more pliable to work with.
2. Roll out some thin strings of the white clay and set them aside. Then form half the black clay into a basic square shape. Lay the strings of white clay across the black square and lightly press them on. Now stretch the block with strings in all different ways until the colors merge into a marbled look. Then form the mixed clay into a round slab and set aside.
3. Repeat Step 2, this time using half a block of black clay and translucent clay strings. Make sure both round slabs are an equal thickness and are slightly larger around than the bracelet.
4. Use the bracelets like cookie cutters to cut both the round slabs so that they will each fit perfectly inside the bracelet.
5. Use the grid paper to design an 8 x 8 square chess board that will fit in the center of the bracelet with room to spare left around the board. Trace around the inside of the bracelet onto the grid paper to create a template to work with.
6. Cut out the circle with the board design in the center.
7. Lay the chess board template over the first slab and use a butter knife or pen to lightly trace the chess board design. Make sure to press hard enough to leave an impression on the slab of clay beneath the paper. Repeat for the second slab of clay as well, then place both slabs into the refridgerator for a few minutes to slightly harden the clay for the next step.
8. Using the tip of a craft knife, carefully remove two opposite sides of the black marble slab and two from the white. Fit the remaining 2 black marble sides and 2 white marble sides together in an alternating arrangement of black, white, black, white (see photo at beginning of lesson for arrangement). Also remove every other chess board square in the black slab and replace with ones from the white slab. You should now have your complete table top put together, with an extra table top left over for making a second table later on if you choose.
9. Place the bracelet over the completed table top and smooth the edges of the clay out to meet the bracelet. Then place the entire table top with bracelet best side down onto a bakeable glass surface (such as a casserole dish) and bake in the oven according to the directions on the clay packages (for this project it should be around 100 degrees Celsius, or 200 degrees Fahrenheit for 10 minutes). Be sure not to overbake or the clay will become brittle and its color may be changed.
10. Once the clay has been removed from the oven and is completely cool, glue it into the egg stand using the epoxy resin.
11. You can then use the remaining black and white clay to create tiny chess pieces. If you can warm the clay up enough to the consistency of cake icing, you might try using a cake decorator's bag and decorating tip with a small round opening to squeeze out small amounts of clay that can then be shaped using the tips of tweezers or a butter knife.
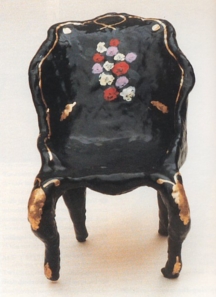
Paper Mache Chair
Based on a project from the book "Dollhouse Accessories, Fixtures, and Fittings," by Andrea Barham.
Materials/Tools Needed:
pliable wire, 1 yard (1 m)
paper mache
primer in gray
black gloss spray paint
acrylic paints in your choice of colors (for final decoration of chair)
thin tip gold marker pen
clear spray lacquer or acrylic seal
1. This project is really quite easy, but creates a stunning chair. To begin, use wire to create the basic frame for the chair.
2. Mix the paper mache, then apply it as smoothly as possible over the chair's wire structure, making sure to cover all the wire. If needed, let the first layer harden slightly before adding more to build up certain areas of the chair. Let harden completely.
3. Use sandpaper to sand the surface of the chair as smooth as possible.
4. Paint the chair with several coats of black paint and let it dry.
5. Use the gold marker pen to add gold accents to the chair. You can also add flowers or other tiny decorations using either additional fine tip paint pens or acrylic paints. Another option is to use tiny images cut out from magazines...use white/school glue to glue these on and let the glue dry.
6. Finish by spraying or brushing your chair with several coats of glossy acrylic seal for a glossy protective finish!