Miniature University Workshop: Furniture 101
Lesson #1
Instructor: Melissa Darnell
Email for questions: [email protected]
Printable Miniature Chair
Materials/Tools Needed:
white cardstock paper (available at any office supply store and most department stores)
computer and color printer
scissors
white/school glue
wood veneer in various types of wood (optional) and wood glue
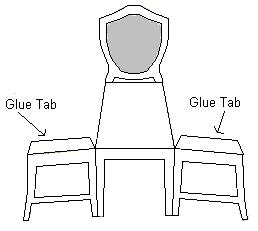
1. Print out the chair below in your choice of scale onto a sheet of cardstock paper.
2. Using a sharp craft knife and a cutting board, carefully cut out the white sections in the back of the chair and in the middle of each side section of legs.
3. Now cut out the chair.
4. Fold the side sections of legs back away from the front section of legs. Fold the front section of legs down away from the chair seat, and fold the back of the chair up towards the seat.
5. Fold the top glue tabs on the side sections of legs down, then glue the chair seat on top of these glue tabs.
6. Your chair is now finished. If you used plain white cardstock, you might want to paint it or at least seal it with two coats of clear spray acrylic seal to protect it from dirt and moisture. You can also use fine tip paint pens to add further decoration (add before spraying with clear acrylic seal), or you may even want to create "padded" seat and back cushions using a bit of thin foam covered with material and glued to these areas on the chair. Miniature tassels hanging from either side of the chair back (where it attaches to the seat) gives this chair an added feminine touch perfect for use with a vanity table as well. Or trying covering the chair in wood veneer (use wood glue to stick the paper-thin wood veneer to the surfaces of the chair) to make it look as if created out of real wood.
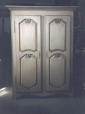
Printable Miniature Wardrobe
Materials/Tools Needed:
white cardstock paper (available at any office supply store and most department stores)
computer and color printer
scissors
white/school glue
wood veneer in various types of wood (optional) and wood glue
1. Begin by printing out one copy of the wardrobe pattern below onto a sheet of cardstock paper.
2. Decide now whether you'd like the doors of your wardrobe to actually open. If so, then cut along the middle, top, and bottom edges of the doors using a sharp craft knife. Gently fold open the doors along their outer sides.
3. Now cut out the entire wardrobe.
4. To make the wardrobe, fold it as if creating a box. All glue tabs are glued to the inside of the wardrobe using small amounts of the white/school glue. Let the glue dry.
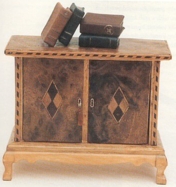
5. Now you can give your wardrobe finishing decorative touches! One way to make your wardrobe very realistic is to veneer it. This is done simply by cutting and gluing veneer over the wardrobe's inner and outer surfaces using the wood glue. The key is to be careful and precise in cutting the veneer so that the underlying paper of the wardrobe won't show along the edges, then use a felt tip marker in the same color as the veneer to color over any remaining edges that might show. You can even get creative with the veneer...try using both a light and a dark wood veneer in patterns over the wardrobe for the appearance of inlaid marquetry. Pictured below is a marquetry wardrobe of a different style as an example of just a few inlaid marquetry designs that can be achieved, plus an example of a wardrobe made of light colored wood with darker wood panels inset in the doors. Once you've finished applying the veneer, let the wood glue dry, then protect the wood veneer with a couple coats of French polish for a realistic sheen.
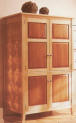
6. You can also paint your wardrobe any style you choose, such as a simple single color with a different color to outline the door panels, or a multitude of colors, or even a glossy black with flowers and gold designs added using a gold paint pen for a japanned look. Just remember to give a finishing coat or two of clear acrylic seal once the paint is completely dry (for the japanned style, be sure to use glossy finish acrylic seal and apply several coats for an extra glossy finish). Here are some examples of wardrobes that have been painted:

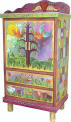
7. Yet another way to decorate your wardrobe is to decoupage it. Try looking for pictures either online or in magazines that appeal to you, such as pictures of landscape paintings, tapestries, murals, etc. You can cover the entire wardrobe with these images, or make the inner panels on the doors the focal point by just covering these areas with the images.
8. Another idea for decorating your wardrobe is to cut out the inner panels on the doors, paint the wardrobe and let the paint dry, trace around the doors onto a sheet of cardstock paper, cut out the new door backing panels, cover them with fabric, then glue them to the backside of the doors. When the doors are closed, the fabric will show through the panels of the doors, and when the doors are opened, the fabric will create beautifully patterned doors on the inside! Pictured below is a wardrobe that can be created by using leather or suede to back the doors with for a really stunning, more masculine style.

9. You can turn your wardrobe into an entertainment center by adding shelves to fit inside the wardrobe, then top with a light television set, or create a mini bar by adding mirror card (cardstock made to look like mirror, available in most scrapbook supply stores), clear plastic shelves to hold glasses and bottles on, and a little sink with a cabinet front across the bottom.
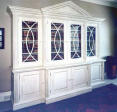
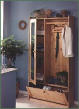
10. Or remove the panels in the doors, back the doors with clear thin plastic for a "glass paneled door" look, then add lots of shelves inside to hold books for an enclosed bookcase! Add additional style with either stained glass panels (see the "Stained Glass Greenhouse Workshop: Lesson #2 for ways to create stained glass in miniature) or use a paint pen to create shaped "pane divider" lines across the panels as is done in one of the examples below. You could replace the clear "glass" style with mirrors (due to the lightness of the wardrobe, I'd recommend using fake plastic mirrors or mirror card), or use a combination of both: have one door be mirrored, remove the other door, and put in shelves and a closet rod for an open armoire, as was done in one of the wardrobes featured below.
11. Once your wardrobe is completely decorated, add the finishing touch of either actual miniature sized doorknobs or create your own using "crystal" clear plastic beads or gold beads in either a round or oval shape, glued directly to the front of the doors. For a victorian or feminine touch, you can even hang tiny tassels from these knobs, or hang a tiny key by a thread from them for a slightly dramatic look.
As you can tell, there are tons of possibilities that can be created with this basic wardrobe. Be sure to go to www.google.com, click on the "Images" tab, then type in either the word "wardrobe" or "armoire" for literally thousands of ideas for what you can do with YOUR wardrobe!
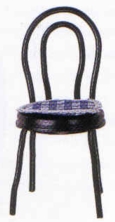
Trash to Treasure Bentwood Chair
Based on a project in the book "Miniature Worlds in 1/12th Scale," by Susan and Martin Perry.
Materials/Tools Needed:
plastic film canister top
drill
electrical mains wire
tacky/craft glue
wire cutters
brown enamel and paintbrush
1. Start by drilling four holes into the plastic film canister top. Your drill bit used for this should be slightly smaller than the thickness of the wire you'll be using. These holes will be for the back of the chair.
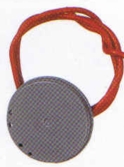
2. Cut a 3 1/2 inch piece of wire and bend it into a tight loop for the inside of the chair back. Push both its ends into the two center holes made in the film canister top in step 1.
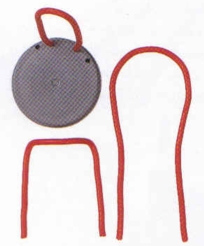
3. Cut a 7 1/2 inch length of wire and bend it into a slightly larger loop. Push both its ends into the two outer holes made in the film canister in step 1 and pull the ends of the wire through to make the back legs of the chair.
4. To create the front legs of the chair, cut a 4 inch length of wire, bend it into a sharp U shape, then push it into place under the film canister seat. Use your hot glue gun to hold the wire for the front legs in place, and add a spot of glue to the ends of all the wires that form the back of the seat and the back legs; this will give the chair added strength. Trim all four legs to a matching length.
5. Spray paint the entire chair a dark brown and let dry.
6. The chair pictured above has a small round chair seat added. You can create this using a circle of cloth or felt that has been trimmed along the edges with either small lace or braided trim.
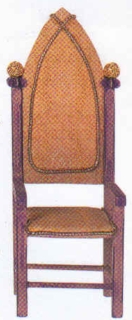
Harry Potter Style Gothic Chair
Based on a project in the book "Miniature Worlds in 1/12th Scale," by Susan and Martin Perry.
Materials/Tools Needed:
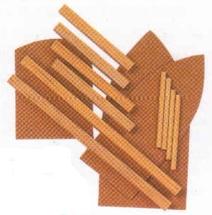
2 4 1/2 inch lengths of 1/4 inch square section timber
2 5/16 inch lengths of 1/4 inch square section timber
2 2 inch lengths of 1/4 inch square section timber
barbecue skewer cut into 4 1 9/16 inch lengths
chair seat cut from 1/8 inch MDF (template included with lesson)
cardboard
scissors
jigsaw or bandsaw to cut MDF seat with
sharp craft knife
silk fabric to cover seat with
mauve acrylic paint
fast drying Epoxy type glue
two star-shaped beads
two round gold beads
gold embroidery cord trim (not thread)
gluing jig, rubber bands, or Lego's plastic building blocks to hold chair together while drying
1. Start by copying the chair templates below. Resize them on your computer to your favorite scale (currently in 1/12th scale), print them out, then cut them out.
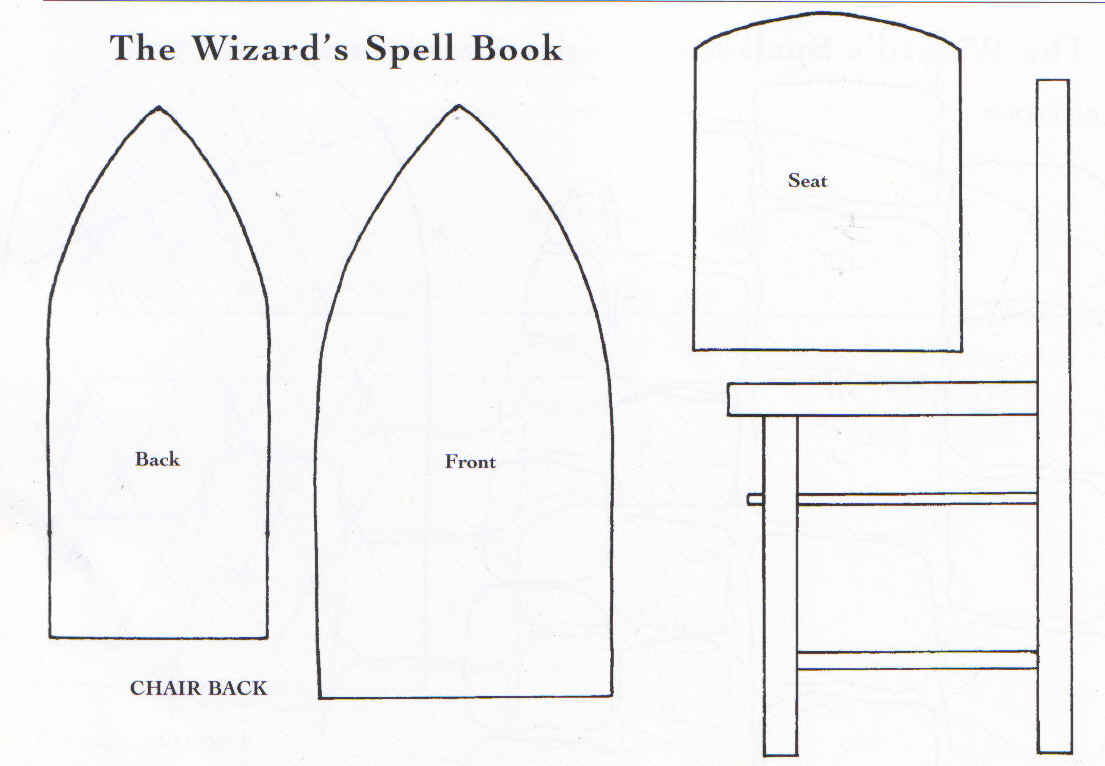
2. Cut a seat and both the chair backs from MDF using the seat template and your jigsaw or bandsaw. Sand all edges smooth.
3. Cut a second seat from cardboard (this will later be upholstered).
4. Assemble the sides of the chair using wood glue and: one 4 1/2 inch square section timber length, one 2 5/16 inch square section timber for the front leg, one 2 inch square section timber length for the chair arm, and one 1 9/16 inch barbeque skewer length for the chair strut. Glue these pieces together as shown below, and hold in place using a gluing jig or Lego's set up like a jig to hold everything in position while the glue dries. Repeat for the other side of the chair.
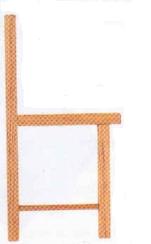
5. Once the glue on both sides of the chair has completely dried, you can now glue the chair sides together with the chair seat and remaining barbecue skewer struts in between. Place in your gluing jig or Lego's gluing jig to hold everything together firmly while the glue dries.
6. While the glue is drying, you can cover the cardboard seat and both backs with fabric (upholster each separately). Glue the smaller chair back to the center of the larger chair back, making sure that the side of the smaller back that has the raw edges of upholstery material is sandwiched in between the two backs and out of sight.
7. Paint the chair mauve using a paper towel or old cloth to rub the paint on with (this gives an uneven, antique looking finish). Let the paint dry.
8. Once the paint has completely dried on the chair, you can glue the upholstered seat and chair back into place.
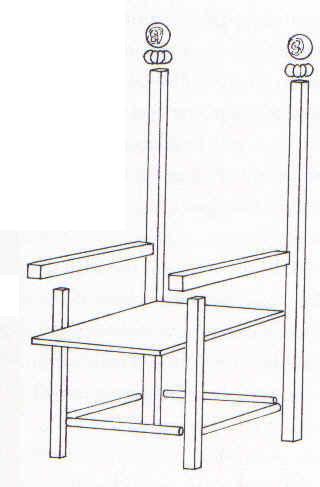
9. Glue a star-shaped bead to the top of each side of the chair, then glue a round gold bead on top of each star-shaped bead (see picture at the beginning of this project for bead arrangements).
10. Finish your chair by gluing the gold embroidery cording along the edge of the smaller chair back, overlap the ends of the cord at the top of the chair, and cut the ends even with the edge of the chair back.
You can make this chair look even more like Dumbledore's dining hall chair in the Harry Potter movies by leaving off the upholstery, spray paint the entire chair gold, add green "marble" armrests on the arms of the chair (use green, translucent, and white marble slightly mixed together), do not use the embroidery cording, only use the larger chair back, and make the point of the chair back sharply pointed instead of curved in true Gothic style as they are presently.
Many mini hugs,
Melissa Darnell