Miniature University Workshop: Flowers & Plants
Lesson #1
Instructor: Melissa Darnell
Email for questions: [email protected]
Lesson #1 features: 3 projects
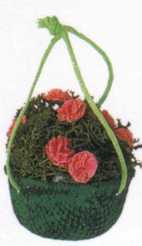
Trash to Treasure Flower Basket
Based on a project from the book, “Miniature Worlds in 1/12 Scale” by Susan and Martin Perry
Materials/Tools Needed:
Pink cleaning sponge
Craft knife
Dried moss
Lid from a roll-on deodorant bottle
Small plastic bag
Rubber band
Small square of Even-weave embroidery fabric
Fabric glue
Disposable paint brush
Nylon string
Green paint
Small pebbles or other small filler
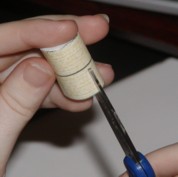
1. Cover the deodorant lid with the plastic bag.
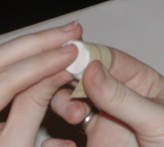
2. Wrap the square of embroidery fabric over the plastic-covered lid and wrap the rubber band several times around the fabric to hold it onto the lid. Paint the fabric below the rubber band with fabric glue and let dry completely.
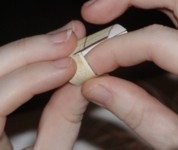
3. Remove the fabric from the lid and trim where the rubber band had been to form your basic basket shape.
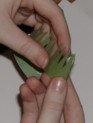
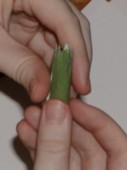
4. Paint your basket green and let dry.
5. Fill most of the basket with small pebbles or other small filler to take up most of the room inside the basket. Use craft glue to hold them in place. Let dry.
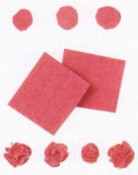
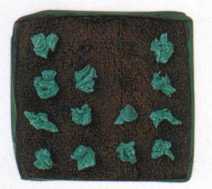
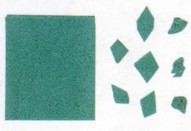
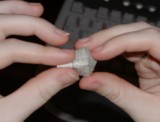
6. To make the flowers, cut very small circles from the pink sponge. Use the craft knife to make several cuts horizontally across the tops of each circle, then use tweezers to carefully separate the layers of the sponge so that they look more like petals.
7. Use a strong needle to poke three evenly-spaced holes around the top edge of the basket. Insert three lengths of nylon thread into each hole and tie each string to the edge of the basket for hanging.
8. Cover the top of the pebbles or other small filler with glue, then top with dried green moss. Glue several of your pink sponge flowers to the dried moss.
9. Finish by tying all three lengths of thread together slightly above the moss and flowers. Cut the extra thread away above the knot, then hang from a small hook for decoration!
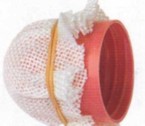
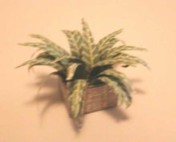
Trash to Treasure Plant Tray
Based on a project from the book, “Miniature Worlds in 1/12 Scale” by Susan and Martin Perry
Materials/Tools Needed:
Small square or rectangular plastic box (can be used from any store-bought product that features a plastic box attached to a sheet of cardboard to hold a product inside)
Green acrylic paint
Paint brush
Green cleaning sponge
Brown acrylic paint
Cocoa powder
School glue
Scissors
Craft knife
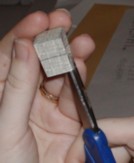
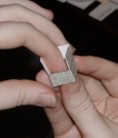
1. If your plastic box has a lip around it, cut this lip off. Then paint green on the outside and inside and let dry.
2. Cut part of the sponge to fit inside the box and test fit it to make sure that it is level with the top of the box. If it isn’t, use scissors to trim its thickness.
3. Paint the sponge brown and while the paint is still wet, sprinkle liberally with cocoa powder. Let dry completely, then gently shake off any excess powder. Glue into the tray.
4. Cut small, irregular shapes from the remaining sponge, then use scissors to make several cuts across the top of each tiny shape.
5. Glue in rows across the top of the brown painted sponge, let dry, and place in your garden themed setting for decoration!
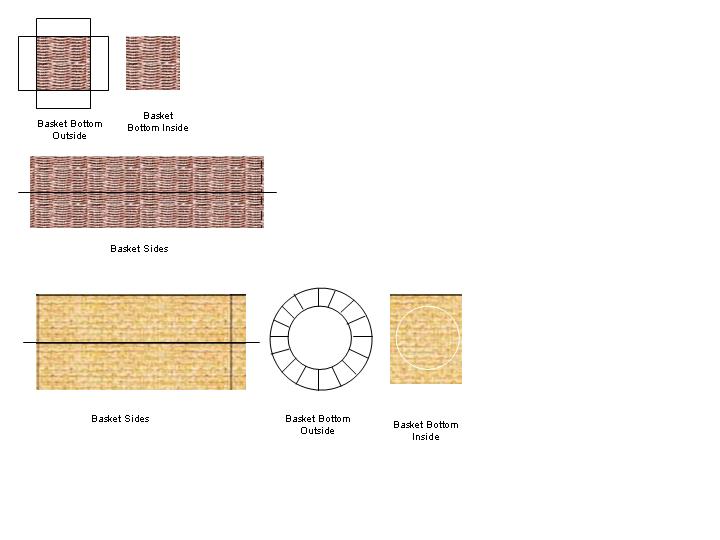
Printable Miniature Spider Plant Baskets

Materials/Tools Needed:
2 sheets of regular white printer paper
computer and color printer
scissors
school glue
Making the basket:
1. Two basket patterns have been provided for you to choose from: a square shaped rose wicker basket or a round shaped yellow basket. Choose which basket you’d like to put your spider plant in and print one copy of the chosen basket template out onto a sheet of regular printer paper.
2. Cut out all pieces.
3. For the round basket’s outside bottom, cut along the black lines that separate each of this piece’s glue tabs. Fold these tabs up.
4. Fold the basket sides piece in half where indicated by a horizontal black line. Then unfold (you’ll use the fold you just created a little later on).
5. Apply a small amount of glue to one of the glue tabs on the basket bottom outside, and attach the side of the basket to this glue tab. Press firmly until dry.
6. If making the square basket, gently make a crease to form the corner for the side of the basket, then glue the basket side to the next glue tab on its bottom outside piece. If making the round basket, just continue on, wrapping and gluing the side of the basket to the glue tabs on the basket bottom outside. Repeat until the side of the basket comes back around to itself, and glue in place where it overlaps.
7. For the square basket, cut down each corner crease just to the horizontal fold made in step 4, then fold each section down into the inside of the basket. For the round basket, make three evenly spaced cuts just down to the horizontal fold made in step 4, then fold each section down into the inside of the basket.
8. Now on to making the plant itself...
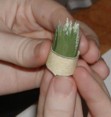
Making the spider plant:
1. Print out one copy of the leaf pattern onto a sheet of paper. Print out one leaf backing onto the back side of the printed out leaf pattern.
2. Cut out the leaf pattern, making sure to remove all white space in between each leaf.
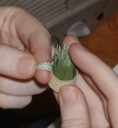
3. Loosely roll the leaf row up, plain green side out.
4. Now apply glue to the insides of the basket you’ve chosen to use (either the wicker or yellow one). Insert the loose roll of leaves into the basket, bottom side down. Your leaves should be standing straight up at this point. Let the glue inside the basket dry.
5. Finish your spider plant basket by carefully curling each leaf down over one of your fingers to give the plant a more natural shape, and your newly created spider plant basket is ready for decorating any room setting!
Leaf Row Pattern

Back of Leaf Row

Basket Patterns