Miniature University Workshop: Ice Cream Shoppe
Lesson #2
Instructor: Marie Gattis
Email Marie with questions: [email protected]
Creating the Counters
Materials/Tools Needed:
Mat board – about two 8 x 10-inch pieces
Poster board – one piece about 8x3-inches
Gallery glass or other thin styrene
Silver tape cut into 1/8 and ¼-ich strips
7 earring backs
Ruler
Craft knife
Knife for cutting styrene
Tacky glue
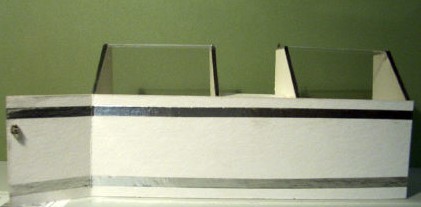
Front counter:
 Cut
the following pieces from mat board:
Cut
the following pieces from mat board:
2 ½ x 10” - counter front
2 ½ x 8” - counter top
1 3/4 x 8” – counter back
1 7/8 x 2 7/16” – counter shelf (may have to adjust width)
½ x 8” for counter top supports (make 2)
5/8 x 2 3/8 for shelf supports (make 2)
Supports for styrene “glass” – see photo below - (make 4)
Cut the following pieces from Gallery Glass (styrene):
1 x 3” (make 2)
1 15/16 x 3” (make 2)
1. To make the swinging door measure 2 inches from the left end of the counter front. With a sharp knife cut partway through the mat board leaving the some of the layers intact. Score the uncut paper layer with the dull side of the knife and crease to form the door.
2. Glue one of the supports ¾ done from the top of the counter front. Glue the other support flush with the top of the counter back.
3. Glue the counter top to the two supports, overlapping the back of the counter by ½”.
4. Glue the bottom of the counter between the front and back pieces.
5. Glue one glass support to the top of the counter flush with the right end. Use one of the 3” pieces of styrene to determine 6. the placement of the second support so that the styrene will rest on top of the supports.
7. Glue another of the glass supports flush with the left end of the counter. Use one of the 3” pieces of styrene to determine the placement of the last support.
8. Glue a shelf support to each of the inner sides of the two middle glass supports and to the top of the counter.
9. Glue the longer end of the shelf to the two shelf supports. Note: The width of the shelf may need to be adjusted to fit between the two glass supports.
10. Glue one of the 1 17/16 x 3” styrene pieces to the front of the two right glass supports and the 1 x 3” piece to the top of the supports. Repeat with the two left supports.
11. Use a 1/8” wide strip of the silver tape to cover the glue and the top edges of the glass supports.
12. Attach a ¼ “ strip of the silver tape to the counter front ¼” from the top and another strip ¼” from the bottom.
13. Glue an earring back to the door for a handle.
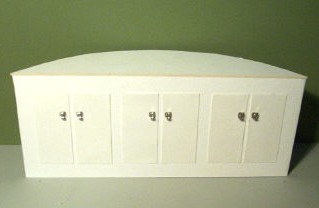
Back counter:
Cut the following pieces from mat board:
3 ¼ x 8” – counter front
2 ¼ x 8” – counter top
1 x 31/4” – supports (make 3)
Cut the following pieces from poster board:
1 x 2 ¼” – cupboard doors (make 6)
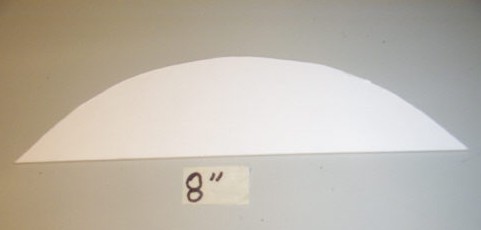
1. Use the paper circle template previously made and saved from “Making the Container” to round off one of the long edges of the counter top to fit the curve of the back wall of the container (see photo below).
2. Glue one of the supports to the back of the counter front about 1 ½” in from the right end and another 1 ½” from the left end. Glue the third support between the first two.
3. Glue the top of the counter to the supports and the top of the counter front.
4. Glue the poster board to the counter front to form three sets of cupboards.
5. Glue an earring back to each of the cupboard doors for handles.