Miniature University Workshop: Stained Glass Greenhouse
Lesson #4
Instructor: Melissa Darnell; based on projects featured in the book "Miniature Worlds in 1/12th Scale," by Susan and Martin Penny.
Email for questions: [email protected]
Hat Box Haberdashery
Materials/Tools Needed:
large hexagonal hat box with lid that is a minimum of 12 inches across and 7 1/2" deep
thick cardboard
french parquet flooring (included with that day's lesson)
wide gold ribbon
fine gold braid
white emulsion paint
white/school glue
ruler
craft knife
scissors
wide paintbrush
thin wire
small gold beads
clear plastic (found on many store-bought packages)
barbecue skewers or wooden matchsticks
muslin ribbon in a white or pastel color
tiny satin roses
hot glue gun with low temp glue sticks
small mirror 5 x 3 1/2" in size, OR 5 x 3 1/2" silver mirror card (can usually be found with scrapbook supplies)
gold embroidery thread
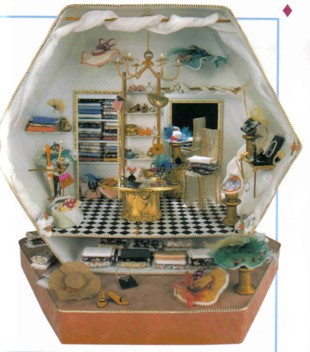
1. Use the lid of your hatbox to create a base on which to stand your hatbox room. If it is a plain, undecorated hatbox and lid, you may want to start by covering the lid and box with a pretty wallpaper or gift wrap paper (use white/school glue thinned down slightly with water to attach the paper to the box). It’s also a good idea to spray the lid and outside of the hatbox with a clear acrylic sealer or varnish it with clear varnish to protect the paper from becoming dirty with handling.
2. Turn the hatbox onto its side, then cut a piece of cardboard to fit inside it, about one to two inches up (see picture of completed room for example of floor’s location). This not only provides you with a small storage space under the room to keep things, but it also ensures that your room’s floor will be large enough to fill with lots of furniture and other goodies! Glue your new floor in place at the edges.
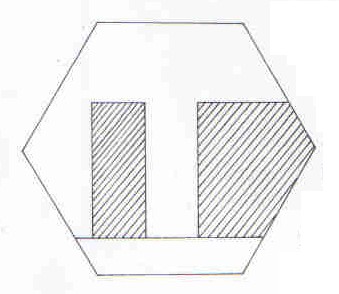
3. For the room’s back wall, lay your hatbox flat over a large piece of thick cardboard and trace around it. Then measure how high up your floor is glued in at, and transfer this measurement to the back wall you just drew onto cardboard (see the horizontal line that runs across the back wall shown in the illustration below). This lets you know where to draw your closet doorway and changing room alcove openings at. Now draw a 2 ½ x 6 inch rectangle hole on the left hand side of your new back wall for the closet opening. On the right hand side of the back wall, draw a hole 6 inches deep and 4 ½ inches wide at the top for the changing room alcove. Cut out both the closet opening. When you cut out the changing room alcove, also cut away the rest of the wall to the right of the alcove hole (see illustration on the next page). Also cut away the area of the back wall below the horizontal line you drew that shows the location of the floor (this will allow the back wall to rest on top of the flooring).
4. If you plan to use wallpaper in your hatbox haberdashery, now is the time to wallpaper the side walls of the room inside the hatbox plus the front (visible) side of the back wall. You may also want to wallpaper the bottom of the box since it will be visible in the closet and alcove opening.
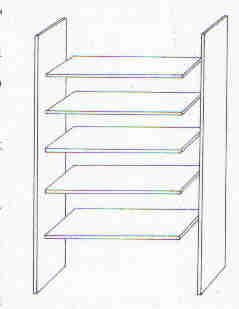
5. Cut five pieces of cardboard that are 4 ¼ x 1 inch each in size for the closet shelves, plus two 7 x 1 inch cardboard side walls for the closet. Glue the side walls of the closet to the undecorated backside of the back wall 4 ¼ inches apart on either side of the closet opening. Then glue in the shelves in between the closet side walls, leaving a larger gap between the lowest shelf and the room floor. To hold everything in place, you may want to wrap a rubber band around the closet’s shelving system to hold it all together while the glue sets.
6. While the glue is drying on the closet shelf system, you can be putting in the flooring for your room. The one pictured in the finished room at the beginning of this lesson is a simple black and white checkered floor that was created by cutting and gluing down 3/8 inch black squares of construction paper in a checkered pattern to the basic floor. But you could also cut the squares out of white and black marbled plastic Contact paper (or the decorative plastic paper that is sticky on one side and is used to line shelves and drawers with), or even use wood grained Contact paper for the flooring. Other options for flooring include using velvet or other similar types of cloth to create a carpeted floor or printing off a printable miniature tile flooring (see our group website’s Links section for websites that provide these for free!).
7. Once your flooring is completed, it’s time to glue in the back wall. The closet shelving system should be butted up against the back of the hatbox. Let dry.
8. Now you can glue in a small 5 x 3 ½ inch handbag mirror to the back of the room in the changing room alcove. Hot glue works well for this and dries stronger and faster than white/school glue will.
9. To frame the mirror and closet opening, you could either use lengths of self-adhesive decorative molding to frame with (as used in the finished hatbox room pictured at the beginning of this lesson) or you could use any one of a variety of miniature sized wallpaper borders (see our group website’s Links section for links to websites that offer selections of these for free!). For baseboard molding, the room featured for today’s lesson simply used metallic gold ribbon glued flat to the back wall for a baseboard.
10. You can then finish your hatbox room any way you like! The one shown for this lesson used short lengths of barbecue skewers (or fireplace matchsticks) that were spray painted gold, then hung both from the ceiling (using small gold wire poked through the box) and glued to the back wall over the changing room alcove. These curtain rods were then draped with lengths of white muslin ribbon that was gently twisted and draped, then glued in place where needed along the sides of the box. Tiny fabric roses were then glued on as finishing touches
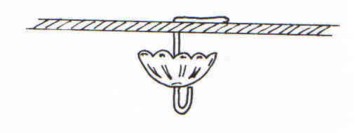
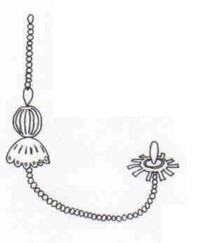
11. The chandelier featured in this lesson’s room was made using six lengths of small wire and various gold beads. It was then hung from the ceiling of the room by first making a small hole in the center of the room’s ceiling, then threading a 1 ¼ inch length of wire through this hole. A cup shaped jewelry finding was then threaded onto the wire (inside the shop) and the end of the wire was formed into a hook to hang the chandelier from.
12. Shelves can be made in many different ways, from glass looking shelves made using clear thin plastic and supported by lengths of barbecue skewers painted gold and glued together, to cardboard or even real wood shelves on the walls.
This is a great basic room for any theme of setting, whether it be a haberdashery, boutique, tea room, or even a bedroom or parlor! The possibilities are endless, and I’d love to see what settings you create for yours!
Many mini hugs,
Melissa Darnell