Miniature University Workshop: Stained Glass Greenhouse
Lesson #2
Instructor: Melissa Darnell; based on projects featured in the book "Miniature Worlds in 1/12th Scale," by Susan and Martin Penny.
Email for questions: [email protected]
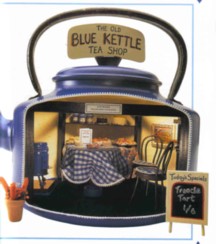
Aluminum Kettle Cafe Room
Materials/Tools Needed:
aluminum kettle with at least 6 inches height inside
blue spray paint designed for painting metal (Rustoleum is a wonderful brand that needs no primer)
emulsion paint in yellow
black felt-tip pen
hacksaw
drill
metal file
soft wire brush to clean kettle's metal surface with (can also use an SOS pad or other cleaning pad for cleaning metal ovens and barbeque racks)
fine sawdust (optional, for use in creating interior walls with a textured finish)
rectangular wood pieces for creating timber beams inside the room
dark wood varnish
sponge brush
velvet or other type of cloth suitable for miniature carpet
piping cord in a color to match the carpet
industrial strength glue that is designed to attach wood to metal
fine braid in a light or white color to trim the kettle's opening with
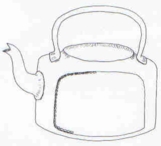
1. Use a felt-tip pen to mark the opening you want to cut in the side of your kettle (to view the room through).
2. Use a drill to make a line of holes along the inside of the opening you drew.
3. Now use a hacksaw to cut through the holes. Remove the waste section of the kettle, then file smooth the edges of the opening.
4. Prepare the areas of the kettle you want to paint by brushing the surfaces with a soft wire brush. This roughens the surface of the areas to be painted so that the paint will stick to them.
5. Tape off any areas you don't want painted, such as the outside edges of the opening.
6. Spray paint the kettle your desired colors. The one pictured at the top of this lesson was painted blue on the outside and yellow on the inside, but most kettles will probably already look very nice without having to paint their outside. To create the textured interior walls, paint one layer of yellow paint on the inside of the kettle, sprinkle the wet paint with sawdust, let dry, then apply another layer of paint. Let dry completely.
7. Use a piece of paper to make a template of the interior bottom of the kettle. Then use this paper template to trace and cut out a circle of velvet or other similar cloth.
8. Apply a thin line of white/school glue along the edges of the velvet carpet circle to prevent the edges of the cloth from fraying.
9. Glue the carpet circle to the inside of the kettle, then cover the cut edge with piping trim.
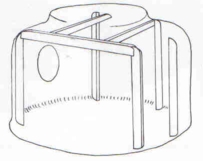
10. From the timber sections, cut 8 lengths to fit up and across the inside of the kettle for beams (1/4th scale can use popsicle sticks sandwiched together for thick beams, and 144th scale can use matchsticks). Three of the beams should be positioned just inside and on either side of the opening, and across the top at the front. The remaining five should form a framework inside the kettle (see illustration below for beam placement). Stain the beams with a colored varnish and let dry, then glue into place inside the kettle.
11. Finish your basic kettle room by gluing decorative trim to cover the cut edge of the kettle's opening.
Ideas: You can make the interior walls of your room more elegant by using wallpaper over the paint to cover them. Be sure to use a glue that specifically says it will attach things to metal.
You could even make a sign for your kettle cafe and hang it from the pouring spout of the kettle. You might also want to use a tiny spot of glue on the top of the spout to hold the rope of the sign in place.
Many mini hugs,
Melissa Darnell