|
|
Wild Bunch Pass
PASS
PROTECTION
We prefer
zone or area protection. Guards and
Tackles set up as far off the LOS as the rules permit (helmets even with the
Center's belt is a good rule of thumb). On
the snap each lineman takes a short step to get square with the rusher in his
area. If uncovered, he checks the
near LB, then kicks back at a 45 degree angle for backside rushers. (Note:
FG/BG etc. refer to Frontside/Backside Guard.)
100
(DROPBACK) PROTECTION:
BT: First
rusher (line or LB) from frontside gap to head-up.
Otherwise, check backside.
BG: Same.
C:
Same.
FG: Block
#1; if no one comes, drop deep to frontside and check for pursuit.
FT: Block
#2 on line from inside gap, to on, to outside gap; if not, check LB.
200
(HALF-ROLL) PROTECTION:
BT: Hinge
BG: Hinge
C:
Even: Hinge; Odd: Reach
FG: Reach
FT: Reach
In 100 or
200, FB takes two steps toward the frontside sideline while reading the outside
rush. If #3 takes an inside charge,
FB seals him inside and rides him past the QB.
If he runs deep to contain, FB locks out and takes him deep.
If #3 attacks FB hard and head on, FB chops the outside hip with his
inside shoulder. If no one rushes,
FB checks middle and backside, then releases.
When zoning
a stunt, linemen must communicate. The
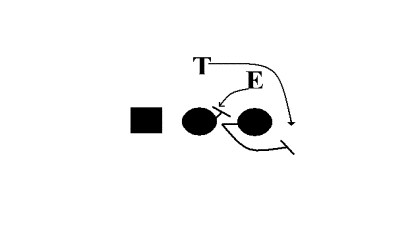
diagram below shows the man over FT rushing inside.
FT goes with him, keeping him on the LOS. FG sees his man disappear behind FT and calls out
"Loop". FG shuffles
toward FT, bumping hips with him and contacting the inside rusher with his near
hand. Both FG and FT call
"Switch". FG now has the
inside rusher, while FT squares up to meet the outside loop charge.
|
|
100 SEAM
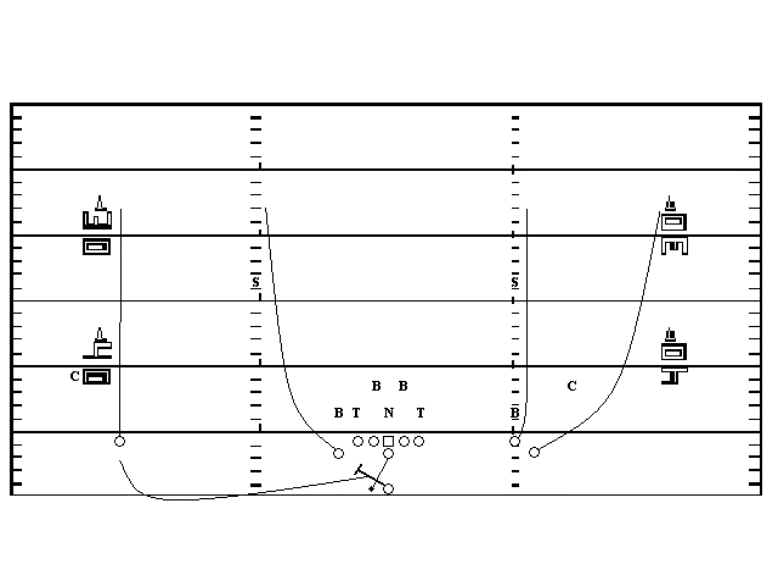
This
"four verticals" play makes concrete the implicit threat of the Wild
Bunch -- cover our four immediate receivers, or pay the price.
X and Z run the numbers, while H and Y zip down the hashes, looking for
the ball quickly. While H is the
most likely recipient of a quick dump pass, any of the four receivers running
their landmarks or the Fullback running his Check Flare can get the ball right
now. Against Cover 1 or 0, Y breaks
opposite his man (usually to the outside), flattens out at +6, and becomes the
primary receiver.
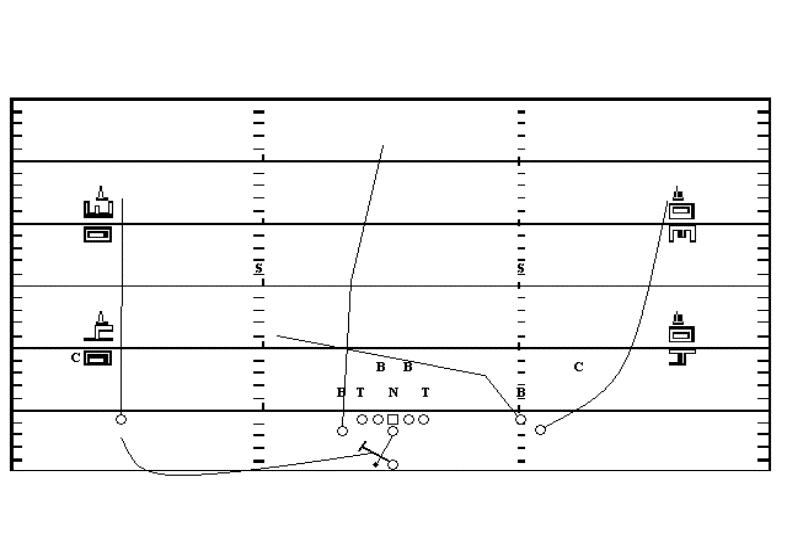
101
CROSS
The
fun begins. Y Crosses to +6, while
H runs a Middle Read, releasing slightly inside.
If there is no middle safety, he breaks deep down the hole.
(If there is a C2 safety ahead of him, H freezes him with eye contact and
breaks inside.) If there is someone playing deep middle, H plants his outside
foot at +12 and breaks hard to the inside -- accelerating away from man coverage
or finding the zone window. If
zone, he makes eye contact with the QB and shuffles straight back down the
window toward him. The QB quickly
looks off backside coverage, then reads the first two short defenders inside the
PCB. H's Middle Read beats the
first short defender inside (he must respect FB's Flare, so can’t jam down
inside). Y's Cross now challenges
the second short defender: if he
follows the Cross, a lane opens wide for the Middle Read; if he sits or drops
vertically, the Cross comes open, and Y cuts downfield after the catch.
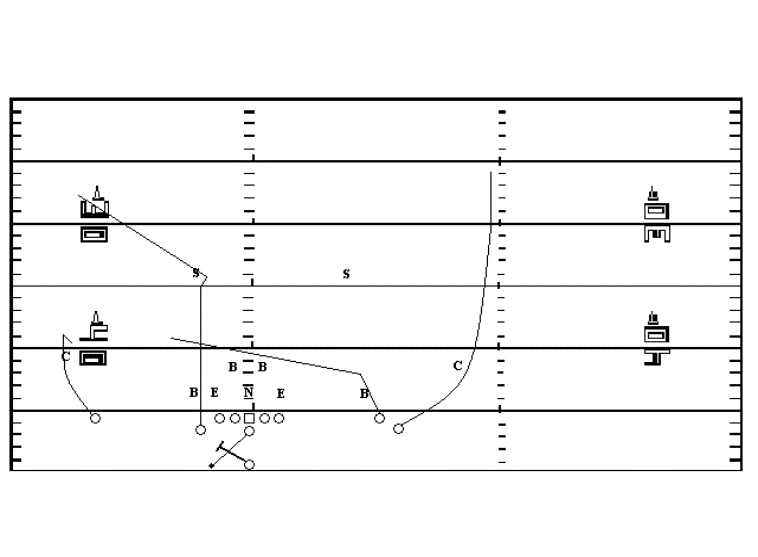
202
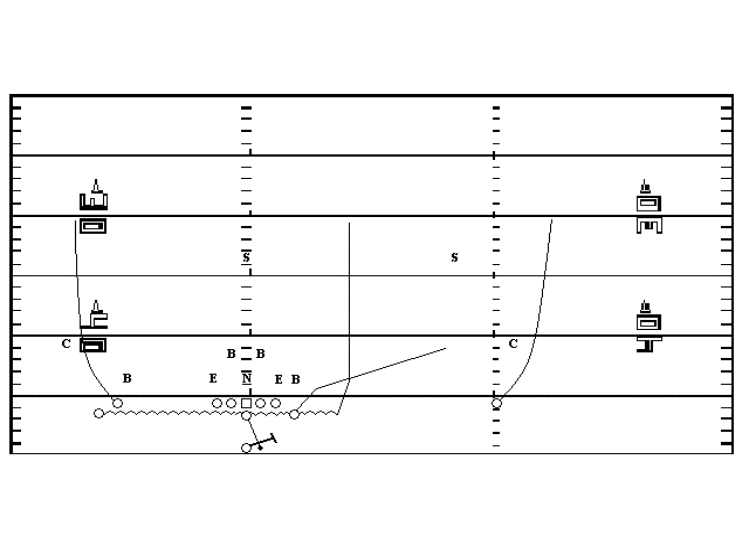
SMASH
Even
more effective than its R&S counterpart, since many defenses can't wait to
overload to Bunch, often anticipating H's motion to wideside.
Instead, without motion, QB half-rolls short at the snap, X hooks or
breaks in at +6, H runs the Smash (post-corner) cut, while Y and Z run Cross,
Seam or Post patterns, depending on coverage:
C3/2:
X Hook, H Smash, Y Cross, Z Seam;
C1/0:
X In, H Smash, Y Post, Z Post.
Late
in the game, we have found Z open with no one within 20 yards of him -- tired
defenders are sloppy defenders, and we run these guys all over the field, all
day long.
113
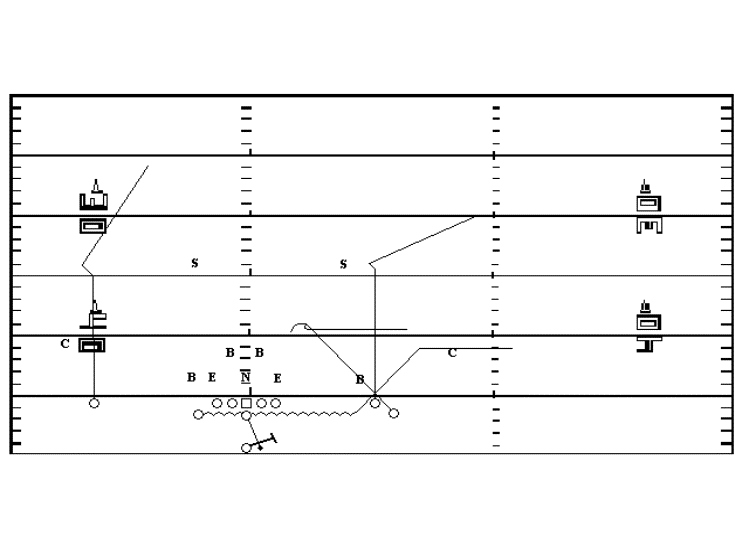
GO
A
classic "keep 'em guessing" R&S route package.
We set the Spread to wideside, then motion Z to Trips.
QB looks for H's Shoot on his third step, then either throws or pump
fakes to signal the next phase of patterns, and scans deep frontside to
backside. X and Y run Seams against all coverages:
C3:
Z is 5 yards outside H at snap, runs Seam.
H Shoots - releases outside two steps, then heads for a spot on the
sideline at +12.
C2:
H Shoots, but breaks deep if QB pumps. Z
starts 3 yards outside H, starts Seam, breaks to Post at +7, splitting safeties.
C1:
H breaks straight downfield two steps, then Shoots. Z is one step outside H at snap, slants outside two steps,
"selling" the deep cut, then runs Shallow Cross under safety.
C0:
Same as C1, but with no deep safety, Z turns his pattern into a quick Post after
the outside cut.
124
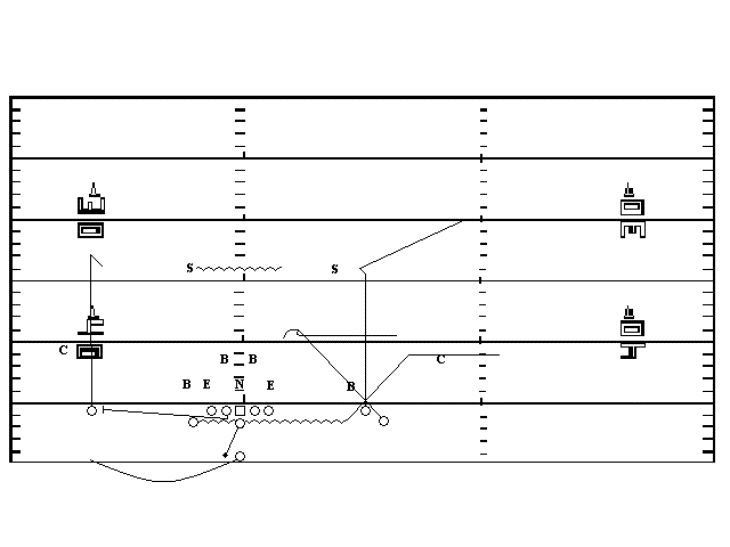
MESH
H
motions to a yard inside Y at the snap. Y
runs a Smash, H a Flat route underneath him, while Z runs a Whip Read.
H and Z literally rub shoulders at the Mesh point.
C3:
QB looks to H right now -- if flat defender jumps him, QB shuffles a few steps
and hit Z's Whip as he snaps his head around into the hole left by the flat
defender. QB throws the ball right
in the hole, stopping Z in his tracks. If
a hyper CB is prowling the Flat, we may pre-determine a pump-fake to H and deep
shot to Y.
C2:
If PCB drops, hit H now. If
PCB squats or moves laterally, hit Y's Smash.
NEVER TRY TO THROW OVER A RETREATING CB. Z sits in the zone window as your outlet.
C1:
Look to Y to beat the safety. If
the safety crowds the Bunch, come back to X on the Post. H is "Q" receiver against blitz, Z is outlet.
C0:
Consider Swap adjustment at LOS (Page 4, lower diagrams).
If QB has time, Y's (or X's in Swap) Smash can be a big play; otherwise,
think H in the Flat, then Z's Whip Read.
124
OPTION SCREEN
Against
defenses that overload the Bunch side, we like to incorporate this Air Coryell
"option screen" look into Mesh. QB
reads the defensive reaction to H's motion: if the secondary slides or rotates to Bunch, or if the
WOLB chases H across the formation, QB calls "Short! Short!"
to alert line, X and FB, then drops facing Spread and reads the defensive #4. The Center or Spread Guard, whoever is uncovered, pulls flat
down the line in the direction of X's original position, looking to kick out the
first defender who shows. Rather
than blocking frontside, FB now Flares backside and looks for the ball
immediately after the snap (he becomes the "Q" receiver if QB
exercises his screen option). If #4 comes up to meet the screen threat, QB hits
X, who has adjusted his route to a 12-yard Hitch.
If #4 stays home, QB dumps the ball off to FB with a blocker leading the
way. If both the secondary and WOLB
stay in place, QB forgets about the screen and reverts to his normal Mesh
procedures: he drops facing Bunch, and executes his Mesh reads.
(If you're worried about defenses keying the "Short" call, have
your QB also call it on a few completely unrelated plays.)
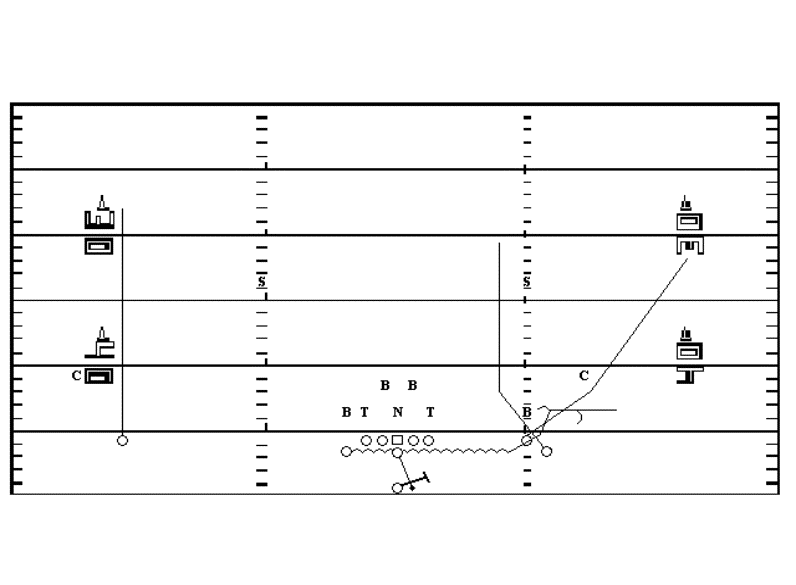
225 TRIANGLE
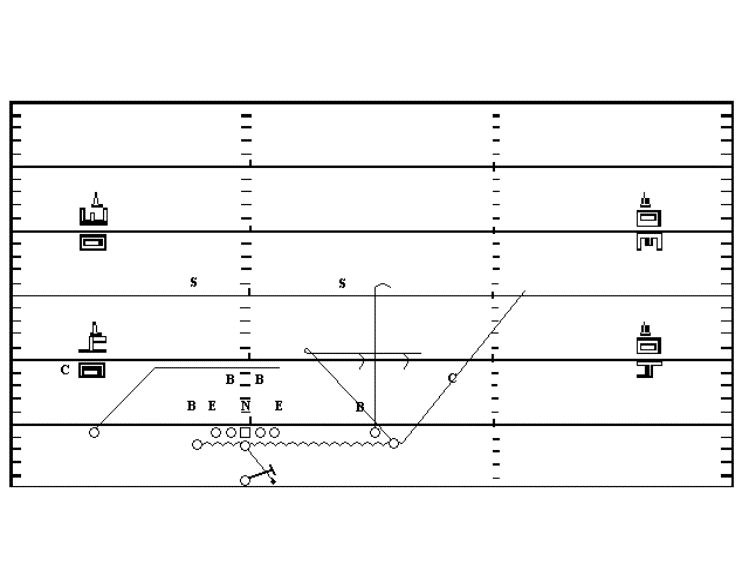
Excellent
Red Zone call. X runs a Shallow
Cross at +4, looking for a zone window or accelerating away from his man.
We can also tag X with a Post, or at the goalline with a Fence -- he runs
hard to the end line, then pivots to face the QB and slides laterally.
H motions just behind Z at the snap and runs a hard Fade, looking for the
ball over his inside shoulder at +10-12. Y
runs an Option cut, getting behind and between LB's at +12.
Y shows his numbers to QB and stays open. Z runs a Whip Read, popping open at +5-6.
From a half-roll to Bunch, QB looks to H's Fade first, then Z's Whip
Read. Y's Option makes him the
perfect outlet. At the goalline, we
may tag H with a Marker adjustment. Two yards deep in the end zone, he looks back briefly for the
ball. When his man looks back, too,
H plants his inside foot at +5 in the end zone and cuts back hard for the cone
at the front corner of the end zone. QB
throws low and hard to the spot when H looks back for the ball.
126
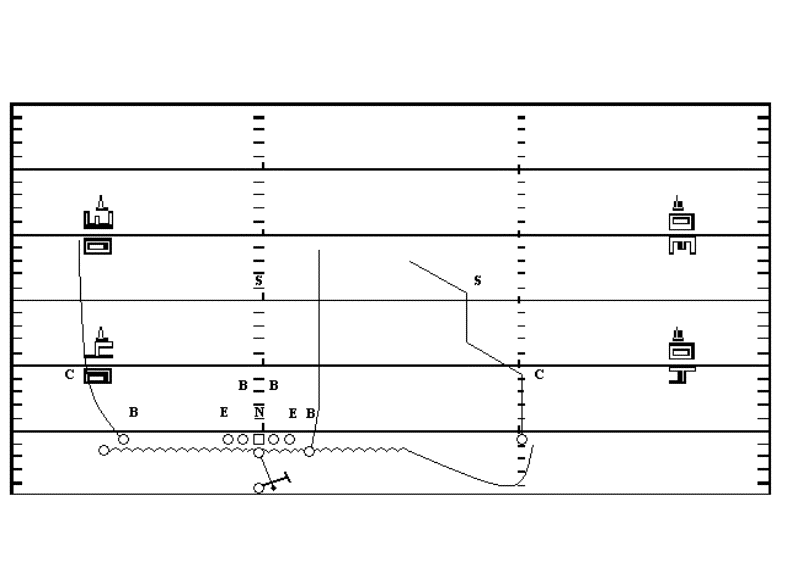
SWITCH
Z
reads the nearest safety on the run -- if he stays deep middle, Z runs the hash
alley, looking for the ball at about +20. If
the safety widens or against C0, Z breaks hard down the deep middle.
If the safety floats over the top of Z's hashmark alley, Z hooks up at
+14-15. Y essentially runs a Fade through the near shoulder of Z's
defender. H's rule is simple -- get
open. If in doubt, head for the
sideline, stopping in a zone hole if one opens. X runs deep, trying to take two backside defenders with him.
Don’t neglect a deep shot to X if he's coming open.
QB reads reaction to H's motion. Versus
man, we will predetermine a deep shot to either Y or Z right off the rub.
If the deep route isn't open, hit H breaking away from his man.
Against zone, QB looks off deep, then throws to the area where H is
breaking. This is a timed throw
while short defenders are still dropping. If
H's Choice route is jumped from inside, look for Z running his hash.
117
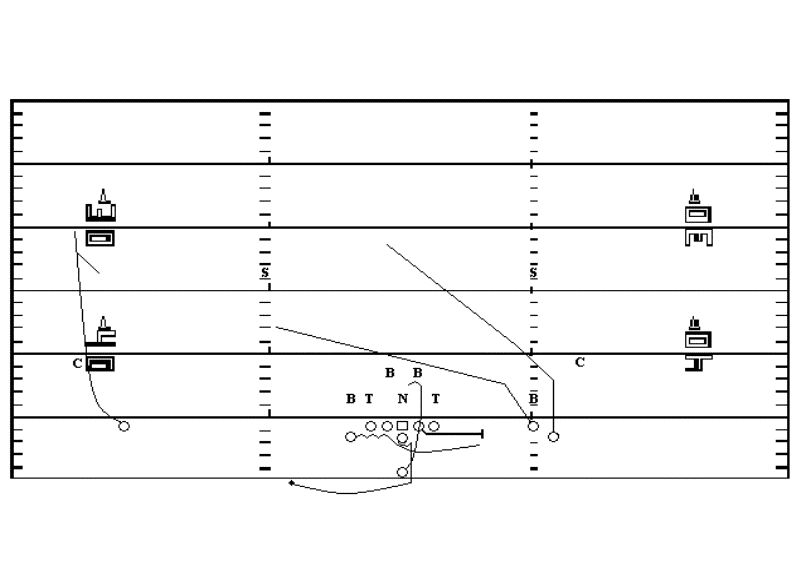
SLIDE
Some
seasons, when we feel we have a superior receiver at X, we will include Slide in
our repertoire as well as Go.
Against
zone coverage, Y runs an outside vertical pattern up the backside numbers, while
H releases slightly outside then streaks downfield, trying to tie up a
linebacker and a safety. Z goes in
motion halfway between X and H, then fishhooks five yards into the backfield
before turning downfield at the point where X lined up.
X runs a quick Slant, lingering in the zone window before heading
downfield another four steps and slanting in again.
Against man coverage, X cuts the slant portion of his pattern short,
breaking hard downfield and taking coverage deep with him.
H turns his pattern into an In or Out (away from the man covering him) at
+10, while Z runs a Wheel off X's backside, trying to rub his man off as he
heads down the playside hashmarks.
333
BOOT
Play
action from the 21 Sweep and 33 Dive sequence.
QB reverses out, spin-fakes to H while keeping the ball in close (no
hand-fake), then flash-fakes the ball in and out of FB's pocket.
Finally, he rolls to the Spread side.
X has taken an Outside Vertical release, reading the PCB.
If the PCB gains depth with him, he will break off to a Hitch at +12.
If the PCB levels or stumbles, X will continue down the bottom of the
numbers. Y runs a Shallow Cross and
Z a quick Post. Y is the
"Q" receiver against blitzes, although QB should be able to run away
from any inside pressure. This is
naked, so QB must observe the backside EOL rush angle every time we run 21 and
33. FB fills for BG, blocking
anyone who rushes or replacing the ILB if he drops.
335 OVER
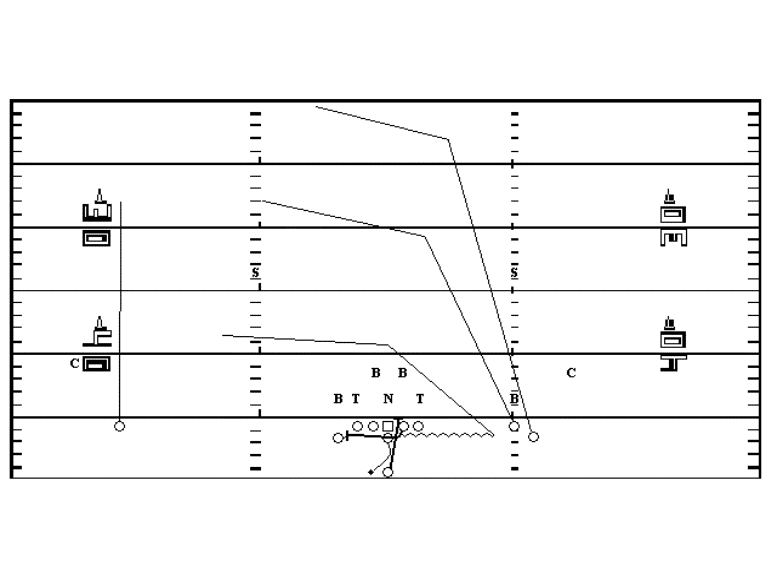
Play
action off the powerful 35 Trap fake, combined with a backside attack against
over-adjustment to Bunch. H goes in
motion then Crosses to +6, Y reaches +14 over the Bunch Guard, then flattens,
while Z flattens at +22. X flies
down the numbers, not even looking for the ball unless he runs by his man.
QB looks off Z's Climb for the first few steps of his drop, then sets to
throw while looking for Y's Over. If
the LBs don't bite on the play fake and drop quickly (this rarely happens), QB
throws to H's Shallow Cross right now to give him a good run after catch
possibility. Against man coverage,
hit the receivers in stride for maximum yardage potential.
FB fills for the Bunch Guard, who pulls and kicks out the playside OLB if
he rushes.