Making an Easel in PSP
This is my first tutorial so
I hope I haven't
forgotten anything.
The only thing you need
for this tutorial is Paint
Shop Pro and a Wood
Fill for the easel.
You can use mine if you like.
Right click and choose save
as and save to your hard drive.
Choose File/New image 500 x
500 transparent.
Next Layer/New Raster Layer.
Hide layer 1 by
clicking on the glasses on
your layer palette.
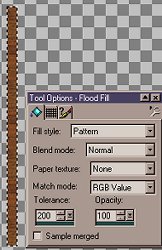
Using the selection tool and
starting at coordinates
200,100 drag out your selection
to 214,431. Flood fill
with your wood pattern using
these settings.
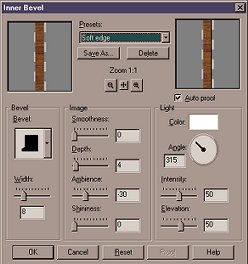
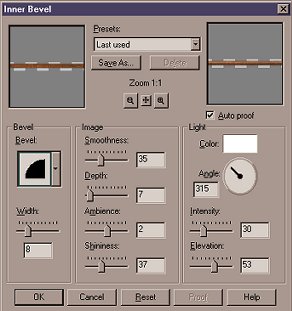
Now choose Image/Effect/Inner
Bevel using the soft edge
preset. Move the easel
support to the center of your
image using the mover tool.
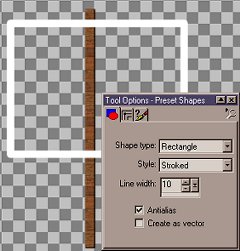
Next choose Layer/New Raster
Layer. Using the
shapes tool with these settings,
draw a rectangle.
Selections/Select All. Selections/Float.
Flood fill with
the wood pattern and apply
an inner bevel, same settings
as before. Selections/Select
None.
Using the magic wand, Match
Mode RGB, Tolerance 0,
Feather 0, select the inside
of the easel. Now choose
Selections/Modify/Expand by
1 pixel. Flood fill with white.
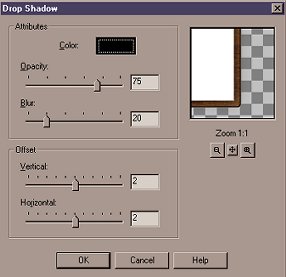
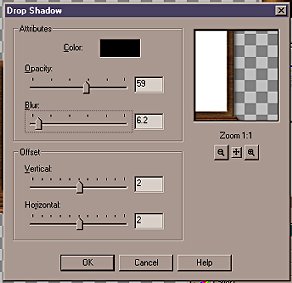
Next Image/Effect/Drop Shadow
and apply a drop shadow
with these settings.
Next apply another drop shadow,
same settings as before
except Horizontal and Vertical
-2. Now choose Layer/
New Raster Layer. Using
the selection tool, make a
selection at the bottom of
the easel and flood fill
with the wood pattern.
Now choose Image/Effect/
Inner Bevel and use the same
settings as before.
Selections/Select None.
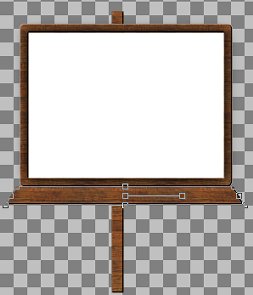
Click on the deformation tool
and holding the control key
drag the right lower corner
out. This is what mine
looks like.
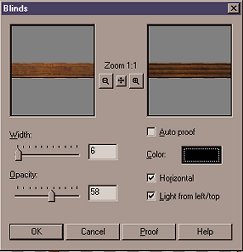
Selections/Select All.
Selections/Float. Now
choose Image/Effects/Blinds
and use these settings.
Selections/ Select None.
Now choose Layer/New
Raster Layer. Using the
selection tool draw a rectangle
at the bottom of the
easel for a rim. Don't
make it too big! Flood fill
with the wood pattern.
Next choose Image/Effects/
Inner Bevel using these settings.
Using the mover tool
center the rim.
Click on layer 2 and choose
Edit/Copy, then Edit/Paste
as a New Layer. Using
the deformation tool, rotate the
leg to the right. Next
Edit/Copy, Edit/Paste as a New
Layer. Then choose Image/Mirror.
Adjust the legs to
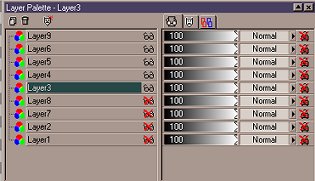
your liking. Hide layers
1,2,7,8 by clicking on the glasses
on your layer palette.
Click on layer 3 and choose
Layer/Merge/Merge Visible.
Click on the merged layer and
choose Image/Effect/Drop
Shadow and add a drop shadow
with these settings.
Apply another Drop Shadow,
same settings except
Horizontal and Vertical are
-2. Now choose
Layer/View All. Click
on Layer 2 and using the
mover tool, move the leg up
to give it perspective.
Using the selection tool,
select the top part of the leg
at the top of the easel and
hit delete. Selections/Select None.
Hide your merged layer and
layer 1 by clicking on the glasses
on your layer palette.
Choose Layers/Merge/Merge visible.
Add your 2 Drop Shadows, same
settings as before.
Hide layer 1 by clicking on
the glasses on the layer palette and
click on the merged layer,
now choose Layers/Merge Visible.
Click on layer 1 and flood
fill with your favorite color or
pattern. Last
of all choose Layers/Merge All and
decorate to your liking!
Home