Building the Base
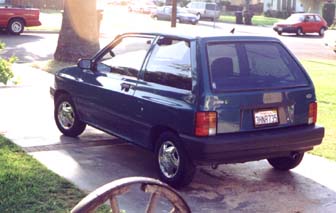
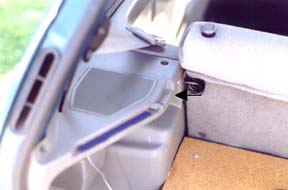
1. Find the mounting brackets for the base of your cover hatch. There are two holes on each side, which are recessed inside of a groove. (See Figure 2) Measure the distance between the two grooves to verify the exact size. On the project car this distance was 39 1/8", so this measurement will be used in the upcoming instructions.
2. Cut the ½" pine to 39 1/8" x 3 ¾"
3. In order to fit inside the plastic housing, there will be notches cut at all four corners of the base. The notches at the "top" of the wood are ¾" long and, and the notches at the bottom of the wood are 5/8" long. (See Figure 3 for details).
- Check that the base fits in the plastic housing, and make sure that the fit is not too close that the base will not fit after it is covered.
- Once the base is sitting evenly in the plastic housing, use an awl to mark the location of the holes in the plastic housing onto the base.
- Using a 1/8" drill bit, drill one hole on the right side as marked.
- Place the wood back into the plastic housing, and slide a screw through the hole to keep the wood in place.
- Check all markings to verify that the holes are still lined up with the markings
- Remove the wood and drill another hole on the left side of the base.
- Check again to verify that the remaining two holes still line up.
- Drill the final two holes.
- To build a cleat, cut the 1x2 lumber to 36" in length.
- Cut the 1x2 lumber in half lengthwise with a table saw. If a table saw is unavailable, it is permissible to use the entire piece of 1x2 lumber for the cleat (at the expense of the overall weight of the cover).
- Line up the cleat with the bottom edge of the base (bottom refers to the side closest to the cover). Center the cleat horizontally at the edge, so that it does not touch the plastic housing on either side. Mark its location with a pencil.
- Spread glue evenly about the cleat, and then place it again on the edge.
- Nail the cleat in place to make sure it is solidly affixed to the base.

Building the cover
Caution: As my grandpa always used to say, "Measure twice, cut once." The hatch has a surprisingly tricky geometry to it, and it’s a shame to waste all that wood with one wrong cut.
- Use the 4’x6’ cardboard to make a pattern. Do not skip this step and start cutting the wood, for it is much easier to cut cardboard with scissors than to create the perfect fit with a jigsaw. Note: the left side of the cover and the right side of the cover have completely different edges, due in part to the gas lift for the hatch. Extend the cover an inch or two past where the plastic housing ends, so that it covers the gap between the housing and the hatchback. Make sure to leave room for the brake light as well. (See Figure 4 for details.) Ensure that the pattern is complete by trying to open and close the hatch several times to determine that everything is covered, and nothing obstructs the path of the gas lift on the hatch.
- Trace the pattern onto the 1/4" plywood.
- Cut out around the marked lines with the jigsaw.
- Lightly sand the edges when finished to remove any splinters.
- Place the cover into the plastic housing to test its fit. The cover should slide into place just as the pattern did. If it does not, this is probably due to the fact that the cardboard pattern was bending. Adjust the pattern so that it fits by taping a ruler to the bottom of the cardboard, and make cuts accordingly. Retrace the pattern onto the plywood and repeat steps 3-5.
- Cut the 1x2 wood to 36" in length.
- Use the other half of the 1x2 lumber that was used in making the cleat for the base. If a table saw was unavailable for that step, use the entire piece of 1x2 lumber for the cover cleat.
- Line up the cleat at the top edge of the cover (top refers to the side where the hinges are placed). Center the cleat horizontally at the edge, so that it does not touch the plastic housing on either side. Mark its location with a pencil.
- Spread glue evenly about the cleat, and then place it again on the edge.
- Nail the cleat in place to make sure it is solidly affixed to the cover.

Upholstery
There are several options to choose from regarding the covering (or lack thereof) of the hatchback cover, depending on the desired look. A cover made out of nice paneling may not require covering at all. However, upholstering the cover provides the best match for any Festiva, as it allows for the widest range of colors and variety. Cloth World carries a variety of upholstery, and this was where the materials for the project car were obtained. The price for the necessary batting and material was around five dollars.- Pick out upholstery material and buy enough to upholster the cover in one continuous piece. Not all material is wide enough to accomplish this, so make sure that the material is at least 48" wide. Note: It is important to use upholstery fabric of some sort, as regular fabric is too thin and deteriorates easily when exposed to the sun.
- Cut out several strips of batting to wrap around the cover.
- Lightly spread glue on the cover, and cover the entire top of the cover in batting. Tuck the batting over the edges of the cover.
- Place the cover top down on the back side of the upholstery. Cut around the cover, leaving at least 3" of material extra on all sides. Leave at least 4" of material at the top side of the cover where the cleat is located.
- Place strips of upholstery cardboard all along the edges of the upholstery. Fold the top of the upholstery material over the upholstery cardboard.
- Fold the upholstery over the edges of the cover and tuck them underneath. As you fold, make cuts in the upholstery as necessary to ensure a smooth fit over curves (such as the area around the brake light). Do not make these cuts too deep, otherwise they will be visible from the top of the cover.
- Pull the material tight so that there are no wrinkles.
- Staple the material at broad intervals all around the cover, checking periodically to ensure the absence of wrinkles. To avoid tearing in the material, staple through both the material and the upholstery cardboard inside.
- Staple the material in 2" intervals all around the cover, ensuring that the material remains tight across the cover.
- Cut out a long strip of batting for the base.
- Lightly glue the batting down to the base. Do not worry about covering the holes for the screws.
- Place the base on the upholstery material. Cut out around the base, leaving at least 2" of material all around the edges, and 3" on the side where the cleat is located.
- Place strips of upholstery cardboard all along the edges of the upholstery. Fold the top of the upholstery material over the upholstery cardboard.
- Fold the material over the base, making sure that it is tight.
- Make cuts in the material so that the upholstery is flush against the notches in the corners of the base. This step is particularly important so that the base will still fit in the plastic housing.
- Staple in broad intervals all around the base, making sure to staple through the upholstery cardboard.
- Once the material is tight across the base, staple in 2" intervals all around the base.
Assembly
- Place the base into the plastic housing to check the fit. If it does not fit, remove the staples surrounding the notches on the corners. Cut back some the material, while ensuring that there is enough to cover the base. Re-staple the material, and check the fit again.
- Once the base fits in the plastic housing, use the awl to make a hole through the upholstery for one of the screws.
- Slide the screw through the hole, making sure it lines up with the hole in the plastic housing.
- On the side opposite the screw, use the awl to make a hole through the upholstery for one of the screws.
- Slide the screw through the hole, once again making sure that it lines up with the hole in the plastic housing.
- Use the awl to make holes for the other two screws, and slide them into the plastic housing.
- Secure the base into the plastic housing with wing nuts to allow for easy removal.
- Place the cover into the plastic housing to ensure that it fits.
- Mark the desired location of your hinges on both the cover and the base. They are 4" from the edges of the base on this project.
- Use the awl to mark the holes for the hinge screws.
- Attach the hinges to the base and the cover.
 |
 |
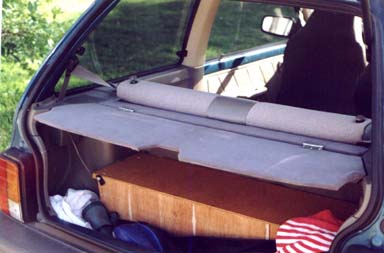
| Figures 6,7: (6 left) View of the cargo hatch from the back. Nice! (7 top) View of the hatch from the inside. Note how it fits the brake light. |
Congratulations, the hatchback cover is now complete. Figures 6 and 7 show how it should look.
Back to the Festiva Menu