


First off, I would like to say that these plans aren't set in stone. The launch platform does not have to be rectangular or 3/4 inches thick. The pipe need not be exactly 3 inches. Our currrent launch pad is roughly triangular with 1/2 inch plywood. The original model used PVC and ABS pipe fittings. Feel free to take the idea and adapt it to the materials you have to work with. The final price will depend on what you have to buy. Print this (2 pages). Print "Safe?"(1 page) Go crazy! Maybe it'll be better! (e-mail me with details if it is). The idea here is to have fun, not make a clone.
The launch pad:
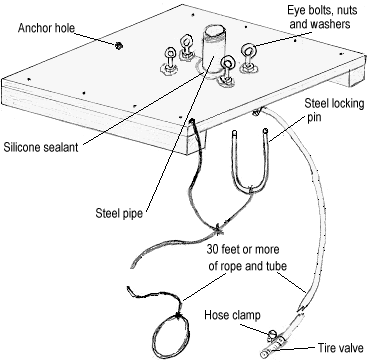
- Materials:
-
- 3/4" plywood, 10" x 10"
- 2" x 2" wood, 2-10" pieces
- 1/2" ID x 3" threaded "black" or "galvanized" pipe (see note #1 below)
- 1/2"-90 degree elbow to fit pipe
- 1/2" hose barb to fit elbow (see note #2 below)
- 1/4" x 3" eyebolts, 4
- 1/4" washers and nuts, 8 each
- 1" pipe strap
- 3/8" hose, 30' (see note #3 below)
- 3/16" rope, 30'
- small hose clamps, 2
- air valve (cut from old inner tube)
- 1/8" or 3/16" metal rod, 10"
- large spike or 10" of 1/4" metal rod
- silicone sealant
- a few screws and nails
- 3/4" plywood, 10" x 10"
#1: Take along the top few inches of the type of 2 liter pop bottle you will use when you go to buy the 1/2" pipe. Make sure the pipe fits easly into the bottle's top. Different pipe brands have different wall thickness'. Plastic pipe (ABS or PVC) is another possibility. It must slide freely. If it's too tight, try another store.
#2:You may have to use a 1/2" to 3/8" adapter and a smaller hose barb if you can't find a 1/2" barb that necks down to fit your tubing. Ask and see what they have in stock at the hardware store.
#3: Depending on your air source, there are a few options. Heavy gauge vinyl hose is cheapest and suitible for low pressure (50/60 PSI) setups. Some other choices are air hose or hydraulic hose for the brave. Ask the guy at the store what the pressure rating is for the tubing you're looking at. Higher is better!
Construction: Bend the 10" rod around the 1/2" pipe to form a "U" that is a snug fit around the pipe. This will be the locking pin (see picture above).
Attach the 2"x2" pieces to the underside of the plywood with a few nails from the top. Drill a hole in the center of the plywood for the 1/2" pipe to fit through. A close fit is wanted here. Screw together the 1/2" pipe and the 90 degree elbow. Add the hose barb onto the elbow and tighten it all together. Put the pipe through the hole and secure it with the pipe strap and two short screws around the elbow.
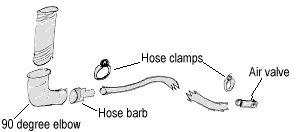
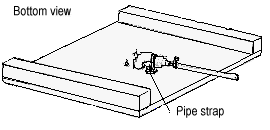
Lay the locking pin on the top plywood surface centered around the pipe and mark where the eyebolt holes will be (see below). Drill the holes and put in the eyebolts, washers and nuts the way the next diagram shows. Drill a hole for the spike near the back edge. This is to anchor the launch pad to the ground.
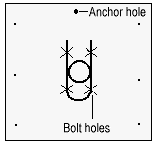

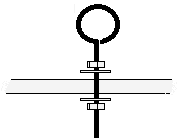
Place a bottle over the pipe and try the locking pin through the eyebolts. Adjust the eyebolts up and down until the pin fits tightly over the ridge next to the bottle's threaded part. Depending on the parts you are using, you may have to place a spacer under the bottle to lift it up against the locking pin. A scrap of plywood with a hole to match the pipe works well. What you want is to be barely able to slip in the pin over the ridge when the bottle is tight against the plywood.
Tie the rope to the locking pin and use a short piece of rope to attach the main rope to the launch pad with a nail or fence staple. Flip the pad over, put the tubing on the hose barb and secure it with a hose clamp. Insert the tire valve into the other end of the tubing and secure it with the second hose clamp. Squirt a generous bead of silicone around the base of the pipe and put an empty bottle over the pipe. Push the bottle firmly into the silicone and leave overnight to harden.
Use it: Did you read "Safe?" yet? Find an open area and anchor the launch pad with the spike. Fill a bottle 3/5's to 1/2 full with water and quickly place over the pipe. Put in the locking pin. Stretch out the rope and tubing and hook your air supply to the air valve. Apply air pressure until water squirts out of the bottle or you're tired of pumping. Yank on the rope to release the rocket.
Enjoy!