
First off, I'll list out the materials that are needed. These are basically the quantities and rough prices,
(I didn't feel like looking up all my receipts now).
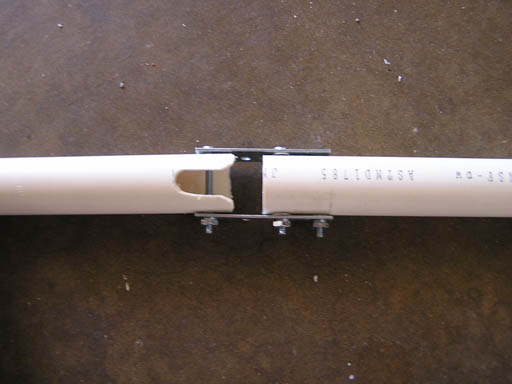
I hacksawed the PVC to make the "bones" of the dummy, it's up to you the length of the limbs you want and how proportional you want it to be. Then I drilled two holes to line up with the mending plate on the upper limb of both the legs and arms. Drilled a single hole so that the lower limb would pivot on the bolt.
Next I cut out that U shaped part in the lower limb with an angle grinder so that it would give the cable more room to bend. Without it, the bend would be really sharp and it would be really hard to bend legs and arms.
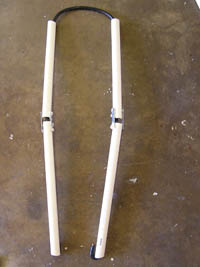
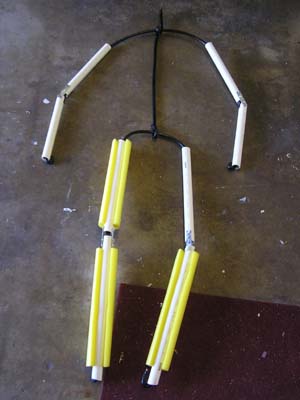
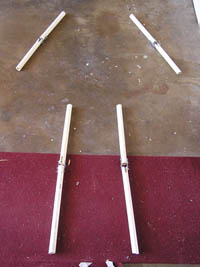 To the right, is a picture of my skeleton layed out. To the far right is a pic of the legs after I ran the
cable through them, and then the same with the arms. The legs and the arms will connect with a single strand of cable
that will serve as the spine.
To the right, is a picture of my skeleton layed out. To the far right is a pic of the legs after I ran the
cable through them, and then the same with the arms. The legs and the arms will connect with a single strand of cable
that will serve as the spine.
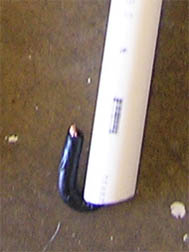
Here are some little detail shots. In the picture below on the left, which are the hands and feet of the dummy, I curled the cable around the tip. When you bend the arms and legs, it pulls slack from the cable which will make the arms want to slide off the cable. This keeps it from working its way down.
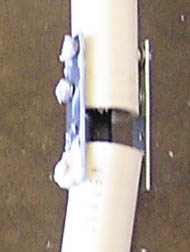
In the picture below on the right, I hacksawed the ends of the bolts off so that there would be no sharp extruding parts that could tear through the padding and tape later on. I then covered the tips in liquid nails, which protects the tips more, and keeps the nut from unscrewing on the lower limb that pivots. This is necessary since the nut is loose so that the lower limb can pivot.
 I then attached the arms and legs with the single strand of cable. At each end of the spine I bent the cable tightly around the center of the legs and the arms and hammered it down. This will hold the any torque created in use as this cable is very strong (especially when you use tight bends). I left a piece of cable protruding where it connects to the arms which will be the spot to attach a head. These connecting points I eventually secured with a lot of tape in an X pattern as suggested by the original grappling article. There is some room for improvement here.
I began to pad it with the noodles. I cut the noodle length-wise down one side, then slipped it over the PVC. This left a gap about an inch and a half wide. I then cut strips from another noodle that were an inch and half wide and placed them in the gap. Run a piece of tape around it once to hold it and continue with the next limb.
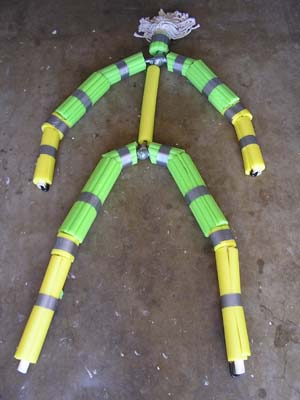 This next pic just shows the completed "noodling". You can see where I used the different sized noodles. I did cover the joints with the noodles, but I did them with separate pieces. This way when the arm/leg bends, it doesn't just tear through the side of a whole noodle. It's setup basically like elbow and knee pads.
You can also see that I attached the head which was the mop idea from the grappling dummy page that I got a lot of the ideas from. (The link is at the bottom of this article). It's a mop cut off at the handle about 3 inches from the mop head. The mop is then taped with a lot of duct tape onto the bit of cable sticking out as a neck.
These pictures show a lot of the padding. The pic on the left shows the torso. This was made by wrapping an article of cloting around the spine tightly, then taping it tight. Repeat over and over until it gets to the desired size. I then used a couple pieces of clothing, rolled them into tight cylinders, and taped them to the sides of the torso. This gave it a more oval body rather than just a round chest. You want to make sure that all of this is really tight so that it will be dense. This way you can put all your weight into it, punch it, whatever, and it won't crumble or sink underneath you.

The pic on the right shows where I added a single article of clothing or rag to each section. One for the upper arm, one for the lower arm, and a small piece for the joint (again a separate piece). I taped each piece down with some tape and made sure it was taped tightly, just as the torso was. The same with the legs. The pic also shows where I wrapped the stringy part of the mop with a sweatshirt, molded it like a head, and taped it down tight. Just use plenty of tape and connect the taped head with the neck part of the dummy so that the sweatshirt will not slide off the mop.
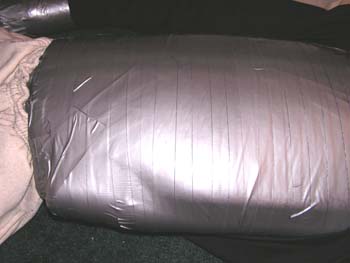
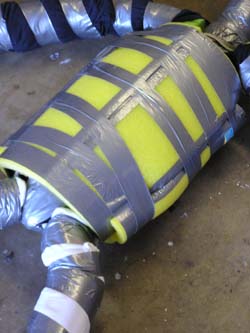 Here's another shot of the torso after I added the final layer of padding. These were the pool "boards" that I found right along side the pool noodles. I used two pieces for the chest and two pieces for the back. For the sides, to keep the body oval shaped, I cut a noodle in half and put on half on each side. Then I taped the whole thing together tightly.
Some more notes on this part. For the joints I stuck in small wedges of the pool noodle stuff as well as some scraps of rags. This to make sure the joints are protected and fully padded. The wedges work like knee caps. When I taped all the joints with this stuff, I extended the leg straight, taped the back of the knee, then bent the knee and taped the front of the knee (as I looped the tape around and around the knee). This would keep the tape crinkled up around the joint, which meant it had plenty of slack. Otherwise, when you bent the knee, the tape covering the front of the knee will just rip, and visa versa.
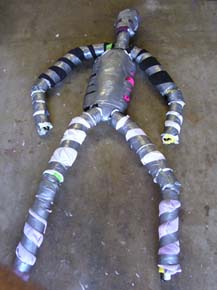
This top pic is of the completely taped torso. I did the same thing for the entire dummy. It's a good idea to use plenty for all the joints, but make sure it is still flexible. The bottom pic shows the completed dummy wearing a sweatshirt a sweats.
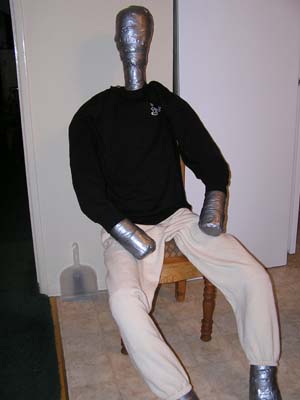
Basically the dummy works great, I just have one major improvement I would recommend. Make the hip joint and shoulder joint strong. I connected it by wrapping the end of the cable around the other part of the cable and then taping. I would recommend coming up with something that won't allow it to move. Without doing this, it's hard to get the dummy to hold positions hands and knees, or the guard. The only other improvement, would be to make its head not look less like a q-tip. :) Hope this little article helps some people out.
Original article I used
|
Qty 1 1 4/3/2 8 12 12/12 -- 4 1 |
Item - 10', 1 1/4" PVC Pipe - 16' Industrial Grade Copper Wire (Strannded) - Foam Pool Noodles/Big Noodles/Boards - 2"x 1/8" (LxW) Bolts - Washers/Nuts - Old clothes and rags - 2" Width Roll HVAC Duct Tape - Stringy Mop |
Cost $2.20 18.40 13.77 8.60 3.52 1.20 -- 27.50 5.50 |
I hacksawed the PVC to make the "bones" of the dummy, it's up to you the length of the limbs you want and how proportional you want it to be. Then I drilled two holes to line up with the mending plate on the upper limb of both the legs and arms. Drilled a single hole so that the lower limb would pivot on the bolt.
Next I cut out that U shaped part in the lower limb with an angle grinder so that it would give the cable more room to bend. Without it, the bend would be really sharp and it would be really hard to bend legs and arms.
To the right, is a picture of my skeleton layed out. To the far right is a pic of the legs after I ran the
cable through them, and then the same with the arms. The legs and the arms will connect with a single strand of cable
that will serve as the spine.Here are some little detail shots. In the picture below on the left, which are the hands and feet of the dummy, I curled the cable around the tip. When you bend the arms and legs, it pulls slack from the cable which will make the arms want to slide off the cable. This keeps it from working its way down.
In the picture below on the right, I hacksawed the ends of the bolts off so that there would be no sharp extruding parts that could tear through the padding and tape later on. I then covered the tips in liquid nails, which protects the tips more, and keeps the nut from unscrewing on the lower limb that pivots. This is necessary since the nut is loose so that the lower limb can pivot.
I then attached the arms and legs with the single strand of cable. At each end of the spine I bent the cable tightly around the center of the legs and the arms and hammered it down. This will hold the any torque created in use as this cable is very strong (especially when you use tight bends). I left a piece of cable protruding where it connects to the arms which will be the spot to attach a head. These connecting points I eventually secured with a lot of tape in an X pattern as suggested by the original grappling article. There is some room for improvement here.I began to pad it with the noodles. I cut the noodle length-wise down one side, then slipped it over the PVC. This left a gap about an inch and a half wide. I then cut strips from another noodle that were an inch and half wide and placed them in the gap. Run a piece of tape around it once to hold it and continue with the next limb.
This next pic just shows the completed "noodling". You can see where I used the different sized noodles. I did cover the joints with the noodles, but I did them with separate pieces. This way when the arm/leg bends, it doesn't just tear through the side of a whole noodle. It's setup basically like elbow and knee pads.You can also see that I attached the head which was the mop idea from the grappling dummy page that I got a lot of the ideas from. (The link is at the bottom of this article). It's a mop cut off at the handle about 3 inches from the mop head. The mop is then taped with a lot of duct tape onto the bit of cable sticking out as a neck.
These pictures show a lot of the padding. The pic on the left shows the torso. This was made by wrapping an article of cloting around the spine tightly, then taping it tight. Repeat over and over until it gets to the desired size. I then used a couple pieces of clothing, rolled them into tight cylinders, and taped them to the sides of the torso. This gave it a more oval body rather than just a round chest. You want to make sure that all of this is really tight so that it will be dense. This way you can put all your weight into it, punch it, whatever, and it won't crumble or sink underneath you.
The pic on the right shows where I added a single article of clothing or rag to each section. One for the upper arm, one for the lower arm, and a small piece for the joint (again a separate piece). I taped each piece down with some tape and made sure it was taped tightly, just as the torso was. The same with the legs. The pic also shows where I wrapped the stringy part of the mop with a sweatshirt, molded it like a head, and taped it down tight. Just use plenty of tape and connect the taped head with the neck part of the dummy so that the sweatshirt will not slide off the mop.
Here's another shot of the torso after I added the final layer of padding. These were the pool "boards" that I found right along side the pool noodles. I used two pieces for the chest and two pieces for the back. For the sides, to keep the body oval shaped, I cut a noodle in half and put on half on each side. Then I taped the whole thing together tightly. Some more notes on this part. For the joints I stuck in small wedges of the pool noodle stuff as well as some scraps of rags. This to make sure the joints are protected and fully padded. The wedges work like knee caps. When I taped all the joints with this stuff, I extended the leg straight, taped the back of the knee, then bent the knee and taped the front of the knee (as I looped the tape around and around the knee). This would keep the tape crinkled up around the joint, which meant it had plenty of slack. Otherwise, when you bent the knee, the tape covering the front of the knee will just rip, and visa versa.
This top pic is of the completely taped torso. I did the same thing for the entire dummy. It's a good idea to use plenty for all the joints, but make sure it is still flexible. The bottom pic shows the completed dummy wearing a sweatshirt a sweats.
Basically the dummy works great, I just have one major improvement I would recommend. Make the hip joint and shoulder joint strong. I connected it by wrapping the end of the cable around the other part of the cable and then taping. I would recommend coming up with something that won't allow it to move. Without doing this, it's hard to get the dummy to hold positions hands and knees, or the guard. The only other improvement, would be to make its head not look less like a q-tip. :) Hope this little article helps some people out.
Original article I used