
Polymer Clay How To's & Tips
 I enjoy sculpting
5 inch or smaller human figurines and placing them in scenes using polymer clay found
in most arts and crafts stores. These clays come in different colors, basically do not dry
out and cook in your home oven. It is an ideal craft for all ages.
I enjoy sculpting
5 inch or smaller human figurines and placing them in scenes using polymer clay found
in most arts and crafts stores. These clays come in different colors, basically do not dry
out and cook in your home oven. It is an ideal craft for all ages.
My techniques come from books and trial and error. I have had some in a local museum gift shop, sold special orders, given as gifts but mostly do them as a hobby. As with most hobbies you must be in the mood or the fun is taken out of it. Look in the PHOTO GALLERY for ideas of what can be done.
How To's:
My basic style consists of:
1) Make the headless human body with an armature (form) made out of aluminum foil wrapped with masking tape for the clay to attach properly.
2) Cover armature with clay forming arms and legs. Depending on the complexity put the clay clothing and shoes on. (Otherwise cook and then add clay clothing and shoes).
3) Place toothpick through neck and cook in home oven
4) Cook round white eyeballs
5) Make head with cooked eyeballs and place on toothpick of cooked body. Smooth in the neck to cooked body. You are now ready to cook finished sculpture
The beauty of this clay is you can cook it over and over again. I find this to be the easiest way to control each process so that when I am working on the face an arm doesn't get smashed under a leg!Many techniques are in the books listed in OTHER SITES & BOOKS so instead of repeating them I am only listing my 'discoveries':
TIPS:
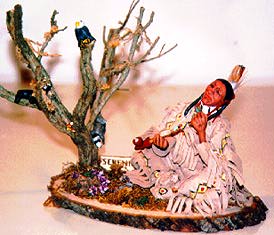
Clay Types - I use Fimo because of it's firmer consistency. I can shape my arms and legs and expect them to hold their shape during cooking more-so then using Sculpey (with a more toothpaste consistency). Don't use armatures for small appendages but they must be held up with something during cooking or they will droop. If there is something to be held in the hands such as a cup place them in the hands during cooking. Try using the fimo object cooked if it's to hold up the hand (like a staff) or uncooked if the hand should stick to it (like a cup) . If there is tree twig being held put it in the hand during cooking, remember 250 degrees certainly won't catch it on fire!
Workspace - I use a 13" square smooth white tile. It is very easy to clean. You can pour paint, glue, hot glue and even cut on it. Then place it right in the oven. Voila!
Glow in the dark fimo - Just in time for holiday stocking stuffers. What big or little kid can resist a glow in the dark SPACE ALIEN?
Cloth versus Fimo - You can't duplicate leather fringe too well without it breaking on the finished product. Small beads pressed in clay doesn't hold well. Most clay cloth can be created by rubbing textured pieces of clothing on clay before putting on body. For painted blankets wrapped around a body scratch the design on the flat clay first. This makes it easier to follow the design when painting it.
Attaching to cooked Fimo - Most glues don't cut it! Especially hot glue! You can drill into cooked fimo with a small drill (dremels are ideal). For earrings, headpieces etc use cut pins or pierced pearl earring holder. For cooked pieces drill a hole in head and stick pin through bead or glue on bric-a-brac to earring holder. Eyeglasses can be made from wire wrapped around a stick for lens and then turn in behind ears and press into drilled holes. To place figures onto a wood base drill a hole in the wood base and a hole in the bottom of the figurine (ideally you should have dowels made sticking out of the bottom of your figurine). Glue a dowel on both ends and place between base and figure.
Feathers - Ever been to a feather store? They are just too big for miniatures! Got a friend with a pet bird? If not, offer to clean your neighborhood pet shop.
Miniature trees - When a small bush such as rosemary or azalea dies use their root system, it makes for a perfect tree. Drill holes in the bottom of 'tree' and the wood base of your sculpture attach with glued ends of a dowel. Spray your trees and mosses with a clear lacquer to add stability and ease dusting.
Clear Resins - Adds a whole new world to scenes. I've used it for streams, oceans, aquariums and pools. Fimo (cooked or not) usually has seams or small holes and the resin will leak out. I pour a little resin first and roll it around the whole area. I let it dry about an hour to seal the fimo and pour fresh resin in. I found that 'Everlasting Elegance by Liquid Glass' reacts with some plastics. After spending many hours on my first aquarium, it turned to a cloud scene after pouring the resin in. The other types of resin seem a little yellowed (noticable only on aquarium type miniatures) but you can add a little blue and green dye.
Personalizing - You have a computer right? You can make miniature signs but put a lot of fimo border around the top sides of the paper. Paper won't stick to fimo.
Good luck on your next project!
Send me a note if you
would:
- Like your comments listed
- Be available to answer questions on the topics
- Like your site, reference or ideas listed
- Just like to leave a comment
mailto:[email protected]
This page was last updated on 11/03/97
![]() This page hosted by
This page hosted by ![]() Get your own Free Home Page
Get your own Free Home Page