![]()
Fig. 1 - Windows Task Bar Speaker Icon
TESTING A MICROPHONE WITH WINDOWS 95/98 SOUND RECORDER
PHASE 1 (Checking which Playback/Record Volume Controls are active)
 1 > Be sure your Speakers (or Headphones) and Microphone are plugged in
     and also that you have properly installed Windows and any needed
     sound card drivers/software.  Be sure to re-boot after installing
     any drivers/software before going any further.  If you are using
     amplified speakers, be sure they are plugged in correctly and are
     turned on.  I recommend starting with the volume set at the middle.
![]()
Fig. 1 - Windows Task Bar Speaker Icon
 2 > Double click on the Speaker Icon near the right end of the Windows
     task bar at the bottom of your screen (see Fig. 1 above).  This
     should bring up any Playback Volume Controls that are active (see
     Fig. 2 below).
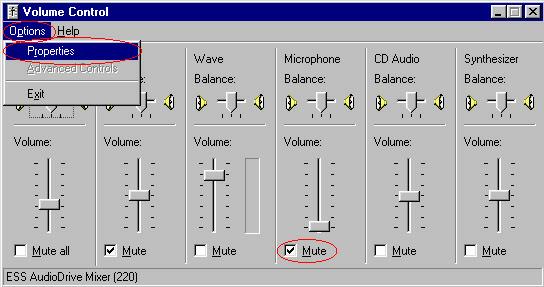
Fig. 2 - Playback Volume Controls
 3 > If you see a Microphone control, and especially if you are
     using speakers, be sure the box for Mute IS checked for it (see
     Fig. 2 above).  Otherwise you will get feedback (loud squealing
     noise).  IF YOU ARE USING ONLY HEADPHONES WITHOUT ANY SPEAKERS you
     may leave the Mute box un-checked (this would allow you to hear
     yourself in the headphones).  Be sure the box marked Mute is NOT
     checked for any other controls. I recommend starting with all Volume
     Control sliders in the middle.

 4 > Now click on Options in the upper left corner of the Volume Control
     window, and then click on Properties (see Fig. 2 above).  This should
     bring up the Properties window (see Fig. 3 below).
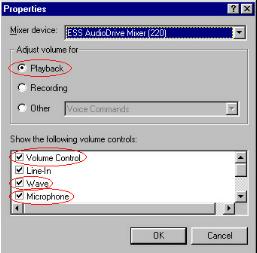
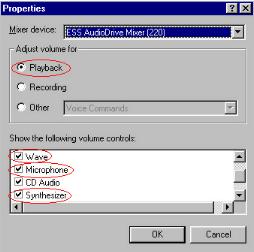
Fig. 3 - Playback Volume Control Properties
In most cases you will want check marks next to the items shown circled above.
 5 > Click in the circle at the left of Recording (see Fig. 4 below).
     The list of items in the box at the bottom should now have changed
     to show which ones are active for Recording.  Be sure there is a
     check mark in the box next to Microphone here!
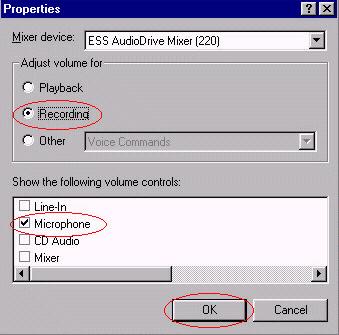
Fig. 4 - Recording Volume Control Properties
 6 > Click in the circle at the left of Other.  The list of items
     in the box at the bottom should now have changed to show which
     ones are active for Other (the list will be similar to the one
     shown in Fig. 4 above).  Be sure there is a check mark in the
     box next to Microphone here also!

     NOTE: If you can not switch to Other, click in the circle next to
           Recording again and go on to the next step.  The Other devices
           may only be needed for specific software and/or sound cards.
 7 > Now click OK (see Fig. 4 above).  The Properties window should go
     away, and any active Recording Volume Controls should now be
     displayed on your screen (see Fig. 5 below).
 Windows 95 Windows 98
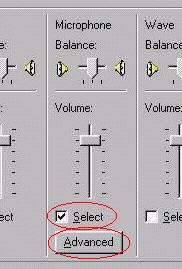
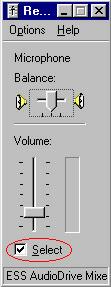
Fig. 5 - Microphone Recording Volume Control
 8 > Make sure there IS a check mark in the Select box for the Microphone
     (see Fig. 5 above), and that there are NO check marks for selecting
     any other controls that may be shown here!  Do NOT close out this set
     of controls yet!  You may need to adjust the Microphone Recording
     Volume in Phase 2 below.
PHASE 2 (Making test recordings using Windows 95/98 Sound Recorder)
 9 > Position your Microphone where you plan to normally use it.

10 > Click Start on the Windows task bar at the lower left hand corner
     of your screen.  For Windows 95, move up to Programs, Accessories,
     Multimedia, and then click on Sound Recorder.  Windows 98 users may
     find the Sound Recorder under Entertainment instead.  If you do not
     see it in either, look thru the rest of your menues.  If you can not
     find it at all, you may need to install it (ask for help on how to
     install Windows Sound Recorder if needed).  Assuming you did find
     the Windows Sound Recorder and have clicked on it, you should now
     see the Sound Recorder window (see Fig. 6 below).
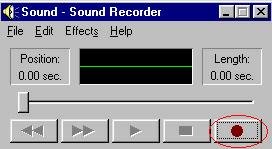
Fig. 6 - Windows Sound Recorder
11 > Click on the Record button in the Sound Recorder window (see Fig. 6
     above) and start talking into the Microphone.  Talk the same as you
     would if you were carrying on a conversation with someone else, and
     try using many different words to check for overloading or distortion
     in the recording when you play it back later.  Click on the square
     Stop button (see Fig. 7 below) when you are finished.

    NOTE: The Windows Sound Recorder will usually only allow you to
           record up to 60 seconds (one minute) of sound.  If you run out
           of time and/or wish to try another test recording see Step 14.

12 > Use your mouse to drag the Microphone Volume Control slider up or
     down (see Fig. 7 below).

     NOTE: Windows 95 users should see a colored level indicator bar
           moving up and down in the Microphone Volume window as you
           speak (see Fig. 7 below).  Adjust the Microphone Volume Control
           slider so that the peaks in the color bar do NOT show any red
           at the top (red means you are overloading and distorting).
           Yellow is ok, and the green below that is even better.  Try to
           stay in the yellow on peaks and avoid going into red as much as
           possible.

           Windows 98 users that do not see a color level indicator bar
           in the Microphone Volume window will have to adjust the
           Microphone Recording Volume by trial and error until you get
           the best sounding recording with no distortion.
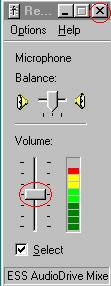
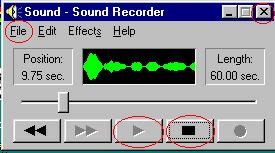
Fig. 7 - Windows 95 Microphone Recording Volume Control and Sound Recorder while making a recording
13 > When you are done, click on the square Stop button (see Fig. 7 above).
     If you go beyond the time limit (usually 60 seconds) the Recorder
     should stop by itself.  Click the Play button (the one with an arrow
     on it, see Fig. 7 above) to listen to your recording.  Check if it is
     loud enough, but yet not distorted.

          Windows 98 users:  If you can not get loud enough volume when
          recording (even with the Micropone Volume slider all the way
          up), click on the Advanced button at the bottom of the
          Microphone Volume window (see Fig. 5 above), put a check mark
          in the box for Mic Boost (20dB) and then click Close (see Fig. 8
          below).  If you can not turn down the volume far enough, and the
          recording is distorted, try un-checking the Mic Boost box.
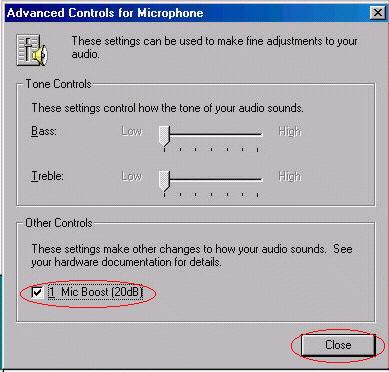
Fig. 8 - Windows 98 Microphone Recording Volume Advanced Controls
14 > To try another recording, in the Sound Recorder window click on
     File, then New (see Fig. 9 below).  When asked if you want to save
     this file, click on No, and go back to Step 11.

Fig. 9 - Starting a new file in Windows Sound Recorder
15 > If you are sure that the recording sounds ok, then you can close
     both the Sound Recorder window, and the Microphone Recording
     Volume window by clicking the the "X" in the upper right corner
     of each (see Fig. 7 and Fig. 9 above).  The Sound Recorder will ask
     if you want to save this file.  If you really want to save the file
     click Yes, otherwise click No.

16 > You should now be able to use your Microphone in most Windows 95/98
     programs including Pow-Wow. [for use in Pow-Wow Voice Chat you may
     need to also adjust the Threshold level (which I have not covered
     here) and I would suggest using Lo Quality to help get thru the
     already overloaded inter-net.  Hi Quality may sound better, but will
     really not work well on a crowded inter-net link.  I suggest using
     Hi Quality only on a LAN or really high speed system, not for normal
     use thru the inter-net.  Try both and see which works best for you.
     Also, some sound cards and/or slower computers will only work in
     half-duplex mode for Pow-Wow Voice Chat.]
If you have any questions, comments, or suggestions send e-mail to: [email protected]
Information about solving several other problems using Pow-Wow can be found at:
http://www.poohbos.com/powwow
[Home]
[Space]
[Just for Fun]
[Computer]
[Government]
[My Kids]
[TV-Radio]
[Weather]
[Modem]
[Sponsors]
[Back to the Top]